CRU RTX Secure 610-IR User Manual
Page 23
RTX220 QR - Manual
Page 23
Windows 7 and Windows Server 2008 R2
a. After you launch the initiator, input the IP address for the RTX
Secure’s CH-1 or CH-2 port (depending which connection link is
shown as “Up” on the NIC screen in the GUI (this as well as the
address is determined in Section 8.6.2).
b. Click on the “Quick Connect…” button.
If the log-on is successful you’ll now be able to use the RTX
Secure just like any other disk attached to your computer.
NOTE: The Quick Connect feature does not support
advanced connection types like CHAP. For instructions on
connecting to an iSCSI target using advanced settings,
visit the following URL:
http://technet.microsoft.com/en-us/library/
ee338480(v=ws.10).aspx#BKMK_ConnectAdvanced
9.2.3 GlobalSAN iSCSI Initiator for MacOS
This software can be launched by double-clicking on the
globalSAN iSCSI icon in System Preferences.
a. After you launch the initiator you’ll see the globalSAN window
pop up. Press the Add button (“+”) and choose Portal from the
dropdown menu to add a new portal.
b. On the Add Portal dialog box, enter the IP address for the RTX
Secure’s CH-1 or CH-2 port depending which connection link is
shown as “Up” on the NIC screen (this as well as the address is
determined in Section 8.6.2), and then click OK.
c. If you have set up CHAP in the RTX Secure GUI (Section 8.6.5),
input the proper information by clicking on the “Authentication
Settings” button.
d. Select the new target in the list to the left, then select the
appropriate connection from the list that opens up on the right
side and click the “Connect” button.
If the log-on is successful you’ll now be able to use the RTX Secure
just like any other disk attached to your computer.
10 Usage with Mac and Windows Operating Systems
10.2 Usage with Windows Operating Systems
10.1.1 Compatibility
The RTX Secure supports 3.5” SATA hard drives.
10.1.2 Formatting a Drive
When you first mount a drive to a Windows operating system, a
pop-up window will ask you if you would like to format it. Click
“Format Disk” and skip to Step F. If the prompt does not pop up,
use the Disk Management utility by following these steps:
a. Right-click on the My Computer icon on the desktop (Windows
XP) or the Computer button in the Start Menu (Windows Vista,
7, Server 2008, Server 2008 R2), then select “Manage”. The
Computer Management window will open.
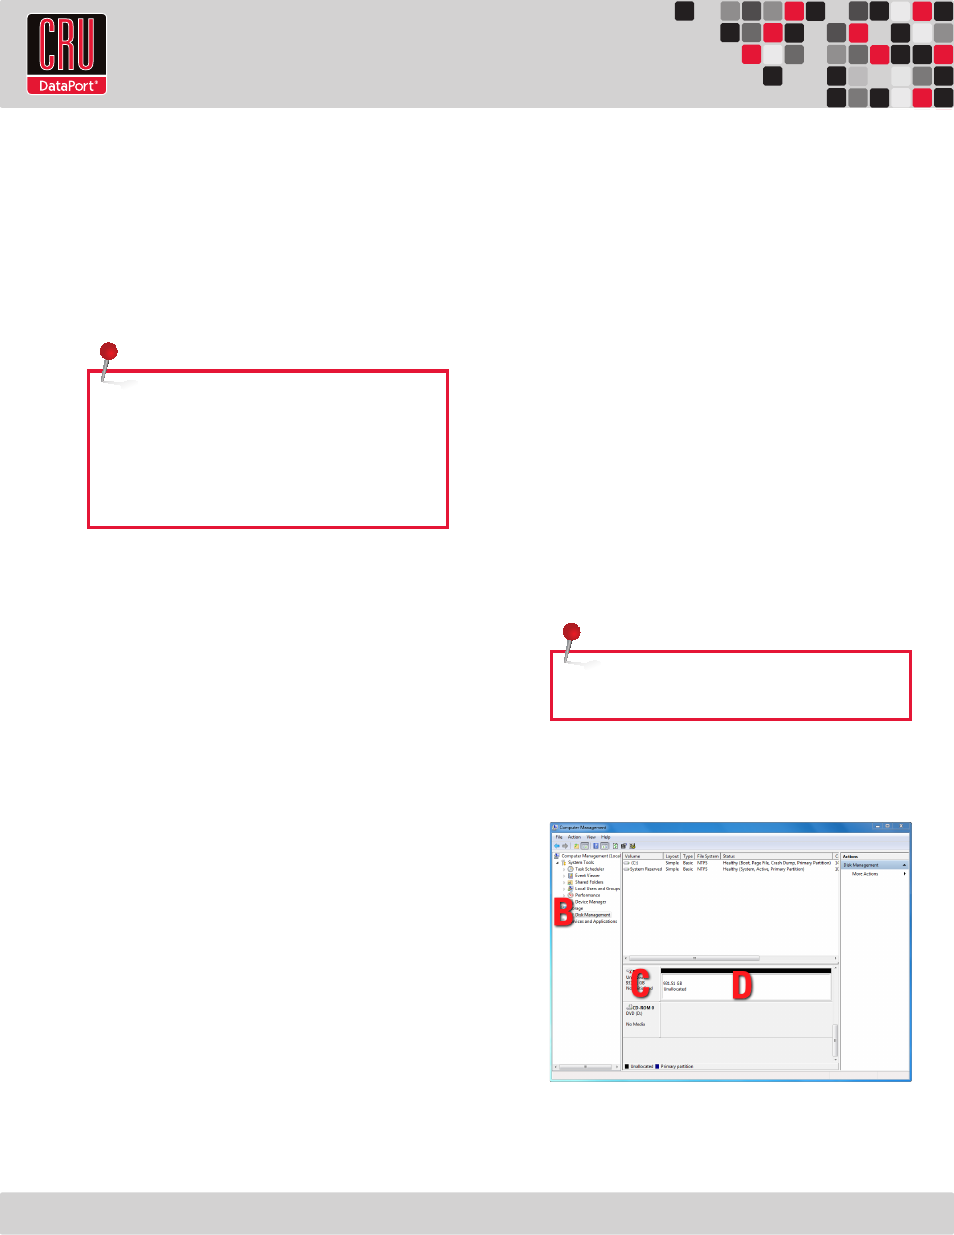
b. In the left pane of this window, left-click on Disk Management
(labeled ‘B’ in the picture below).
c. The volume should appear in the list of Disks in the lower
middle/right pane. You may need to scroll down to see it. If the
volume is already formatted, you can identify it easily by its
volume name. If it’s unformatted, the Drive Properties Box will
say “Unallocated” and you’ll need to initialize the volume
before formatting it.
Initialize the volume by right-clicking the Device Properties Box
(labeled ‘C’ in the picture below) and selecting “Initialize Disk”.
If you are prompted to select a partition type, select MBR for
volumes 2TB or smaller, or GPT for volumes larger than 2TB.
NOTE: Windows XP does not support GPT or volumes
larger than 2TB.
d. To format the volume, right-click the Drive Properties Box
(labeled ‘D’ in the picture below) and select “New Partition…”
(Windows XP) or “New Simple Volume...” (Windows Vista, 7,
Server 2008, Server 2008 R2).
e. Unless you wish to customize the settings in these dialog
prompts, Click “Next” on the Select Partition Type (shows up in