Installing the dr snow thrower attachment – DR Power 30 Snow Thrower User Manual
Page 17
CALL
TOLL
FREE
1-800-DR-OWNER 13
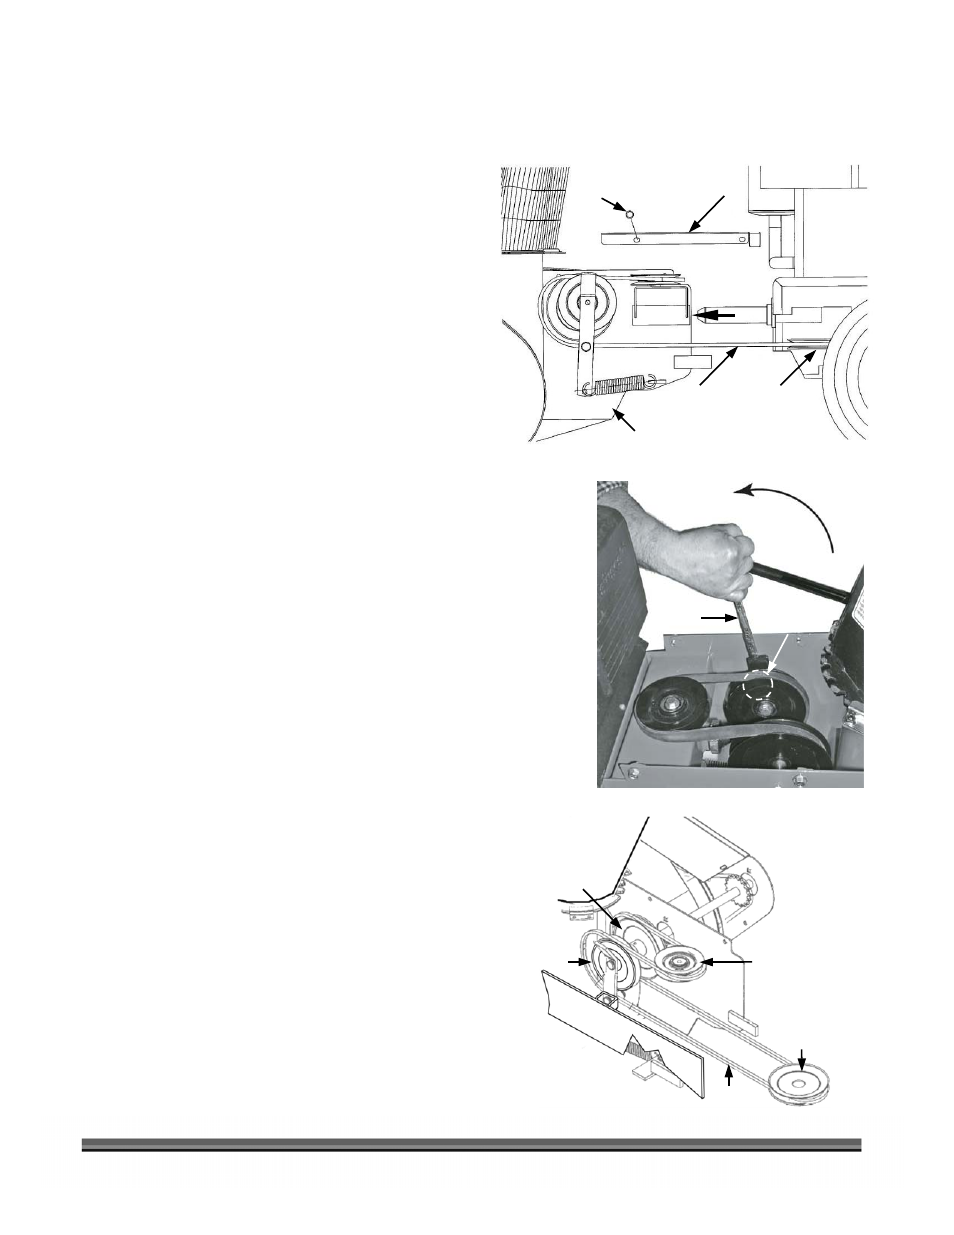
Installing the DR SNOW THROWER ATTACHMENT
Tools and Supplies Needed:
•
1/2" Wrench or Socket
•
9/16" Box Wrench
•
#2 Lithium Grease
1. Apply a thin coating of #2 Lithium Grease on the
Attachment Pin (Figure 6).
2. Remove the four (4) Belt Cover Retaining Bolts
using a 1/2" Wrench or Socket and remove the
Cover (Figure 6).
3. Line up the DR SNOW THROWER ATTACHMENT
with the Power Unit Attachment Pin and slide the
Pin into the socket on the Snow Thrower (Figure 6).
4. Reattach the Collar and Retaining Pin (Figure 5 on
page 12) to secure the Snow Thrower.
5. Locate the Snow Thrower Drive Belt and make sure
to install it on the Engine Pulley below the Power
Unit (Figure 6 or 8).
6. Using a 9/16" Box Wrench on the Tension Pulley
Nut (Figure 7), pull on the Wrench to release the
tension and install the Belt on the Idler Pulley
(Figure 8). Make sure that the V-belt is not twisted
and fits into the V-groove on the Pulley.
NOTE: Pulling on the Wrench will tighten the Nut and
move the Idler Arm.
7. Route the V-belt around the Drive Pulley, Tension
Pulley, and Idler Pulley (Figure 8) and then ease the
Tension Pulley back into position with the Wrench.
8. Reinstall the Belt Cover and secure in place using
the four (4) Belt Cover Retaining Bolts. Tighten the
Bolts using a 1/2" Wrench or Socket (Figure 6).
Figure 6
Figure 8
Belt Cover
Bolt (4 places)
9/16"
Wrench
Attachment
Pin
Power
Unit
Drive Belt Engine Pulley
Snow Thrower
Idler Pulley
Power Unit
Engine Pulley
Drive Belt
Drive Pulley
Tension Pulley
Nut (hidden)
Figure 7
Wrench used as Lever on
Tension Pulley Nut.
Tension Pulley