DR Power Self-Propelled Pro-XL Self-Propelled 8.26fpt Subaru User Manual
Page 19
CONTACT US AT www.DRpower.com 19
Use only DR belts on your machine. Do not use hardware store variety belts.
Replacing the Trimmer Head Belt (non Self Propelled models)
Tools and Parts needed:
3/8" Wrench
7/16" Wrench
9/16" Wrench
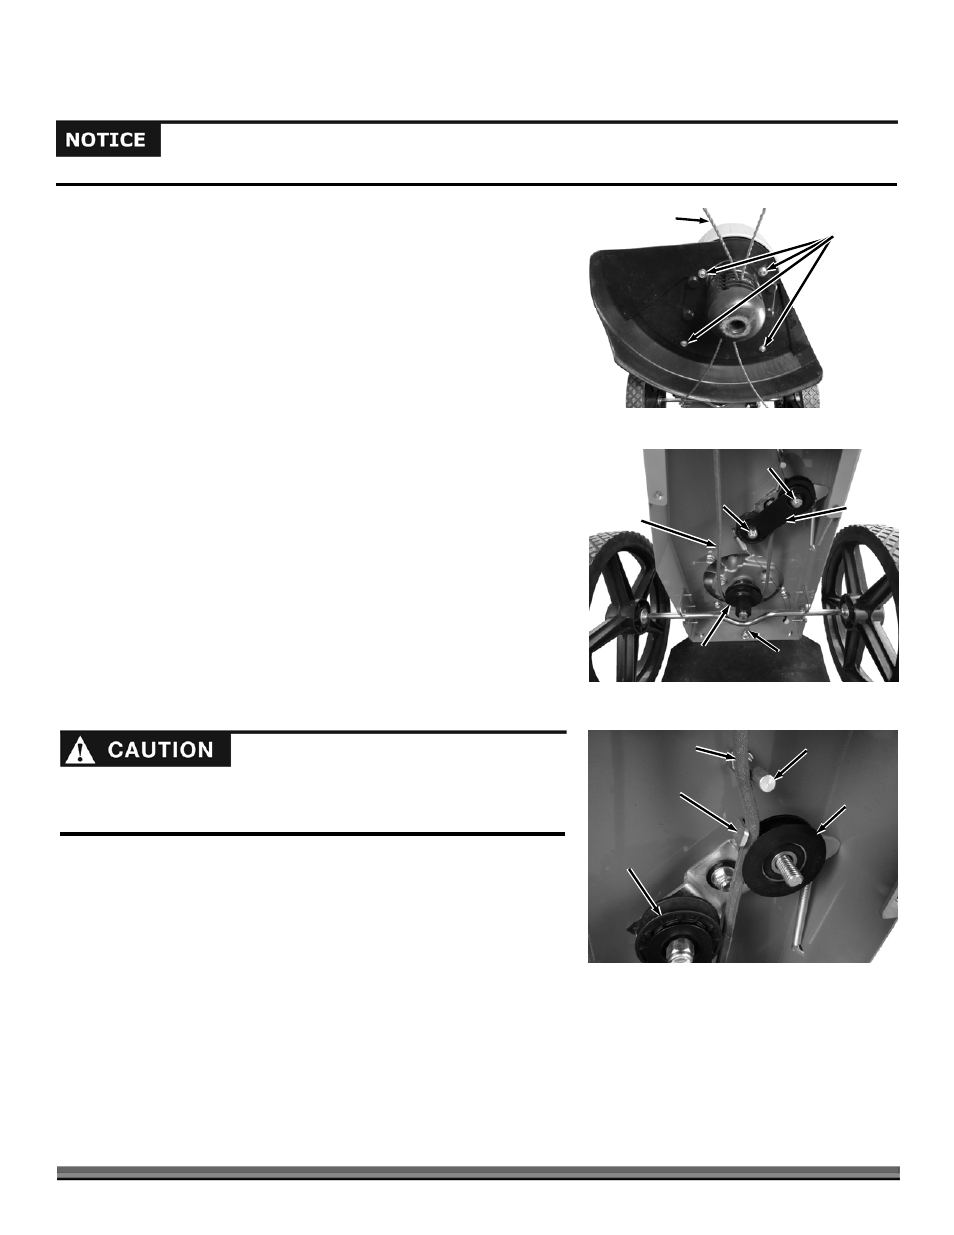
1. Tip the machine back to access the underside.
2. Remove the Trimmer Cords from the Head Assembly.
3. Remove the four Trimmer Guard Bolts and Flat Washers with a 3/8"
Wrench. Remove the Trimmer Guard (Figure 25).
4. Loosen the Engine Belt Guide Locknut at the back of the Frame using a
7/16" Wrench (Figure 26) and rotate the Guide out of the way.
5. Remove the Locknut that secures the Washer Plate to the flat groove Idler
Pulley using a 9/16" Wrench. Loosen the other Locknut to the V groove Idler
Pulley using a 9/16" Wrench just enough so the Washer Plate can be rotated
out of the way.
6. Remove the flat Idler Pulley and Spacer behind it.
7. Remove the Belt from around the Engine and Head Assembly Pulleys.
8. Install a new DR Drive Belt around the Engine and Head Assembly Pulleys.
9. Rotate the Engine Belt Guide into position and tighten the Locknut with a
7/16" Wrench.
10. Install the small Spacer first, then the Flat Groove Idler Pulley with the Belt in
the groove. Make sure you place the Belt correctly between the Idler Pulley,
Bracket Tab, and Guide Pin (Figure 27).
11. Rotate the Washer Plate onto the Flat Groove Idler Stud and install the
Locknut using a 9/16" Wrench. Tighten both Idler Locknuts using a 9/16"
Wrench.
12. Position the Trimmer Guard and secure with the four Bolts and Flat
Washers using the 3/8" Wrench (Figure 25).
13. Install the Trimmer Cord and tip the Trimmer down on the Head Assembly.
14. After installing the new Belt, be sure to adjust the tension properly by
adjusting the In-Line Adjuster all the way in (refer to page 24). Proper
tension will extend the life of the Belt.
Note: Before using your Trimmer for the first time or after you have installed a new Belt, engage the Trimmer Head Engage Bar 10 times
and hold it for 3 seconds each time. This is required to wear in the Belt to ensure the best grip for trimming.
Figure 26
Belt
Engine
Belt Guide
Washer
Plate
Engine
Pulley
Flat Groove Idler Locknut
“V” Groove
Idler Locknut
Figure 27
Guide Pin
Bracket Tab
Flat Groove
Idler Pulley
Belt
“V” Groove
Idler Pulley
Trimmer
Guard
Figure 25
Bolts and Flat
Washers
Trimmer Cord
The Belt must be installed on the inside of the guide Pin as shown in figure
25. If it is not installed on the inside the Trimmer Head will not function
correctly..