Replacing the drive belt (self propelled model) – DR Power Self-Propelled Pro-XL Self-Propelled 8.26fpt Subaru User Manual
Page 22
22
DR
®
TRIMMER/MOWER
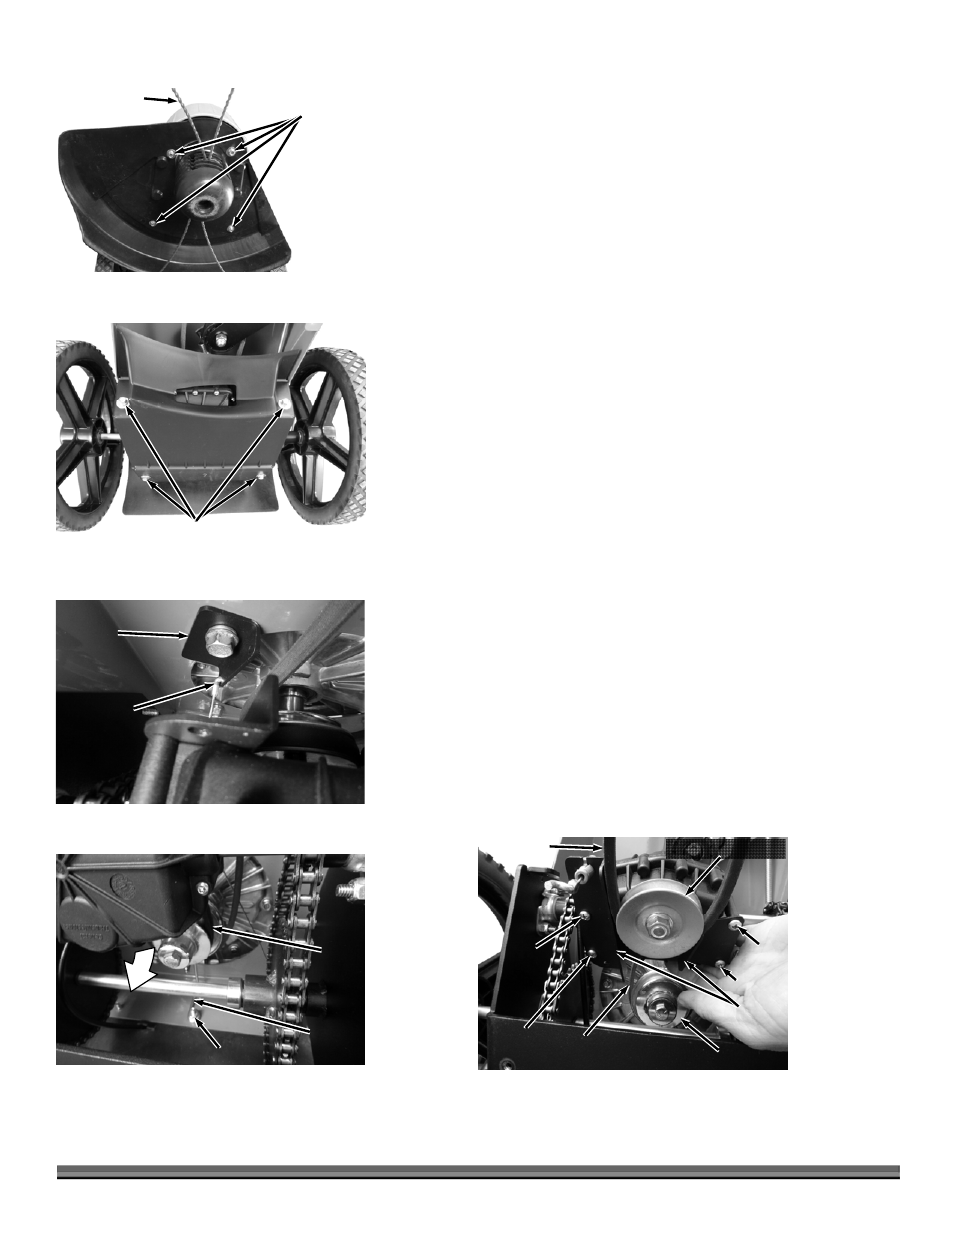
Replacing the Drive Belt (Self Propelled model)
Tools and Parts needed:
3/8" Wrench
7/16" Wrench
Philips Head Screwdriver
1. Tip the machine back onto the handlebar to access the underside.
2. Remove the Trimmer Cords from the Head Assembly.
3. Remove the four Trimmer Guard Bolts and Flat Washers with a 3/8"
Wrench. Remove the Trimmer Guard (Figure 33).
4. Remove the four Transmission Cover Bolts and Flat Washers with a 3/8"
Wrench. Remove the Transmission Cover (Figure 34).
5. Disconnect the Z-bend end of the Drive Cable from the Bracket (Figure 35).
6. Loosen the Belt Guide Locknut using a 7/16" Wrench and rotate the Guide
out of the way (Figure 36).
7. Rotate the Transmission down toward the back to slide the small Drive Belt
from the Engine Pulley groove.
Note: Ensure that the Drive Cable does not kink or get over stressed during the
following procedure.
8. Continue to rotate the Transmission to gain access to the Belt retainers and
Screws on the bottom of the Transmission (Figure 37).
9. Remove the two Screws where the Belt wraps around the Pulley and loosen
the other two using a Philips Head Screwdriver.
10. Rotate the Belt Guides away from the Transmission Pulley and remove the
Belt.
11. Install a new DR Drive Belt around the Transmission Pulley.
12. Rotate the Belt Guides into position and secure with the two Screws you
removed and tighten the other two using a Philips Head Screwdriver.
Bracket
Figure 35
“Z” Bend
Engine Pulley
Figure 37
Drive Belt
Remove
Belt
Guides
Loosen
Remove
Loosen
Trimmer
Belt
Transmission Pulley
Figure 36
Drive
Belt
Transmission
Belt
Guide
Locknut
Transmission
Guard
Figure 34
Bolts and Flat
Washers
Trimmer
Guard
Figure 33
Bolts and Flat
Washers
Trimmer Cord