DR Power Self-Propelled Pro-XL Self-Propelled 8.26fpt Subaru User Manual
Page 20
20
DR
®
TRIMMER/MOWER
Replacing the Trimmer Head Belt (Self Propelled model)
Tools and Parts needed:
3/8" Wrench
7/16" Wrench
9/16" Wrench
Philips Head Screwdriver
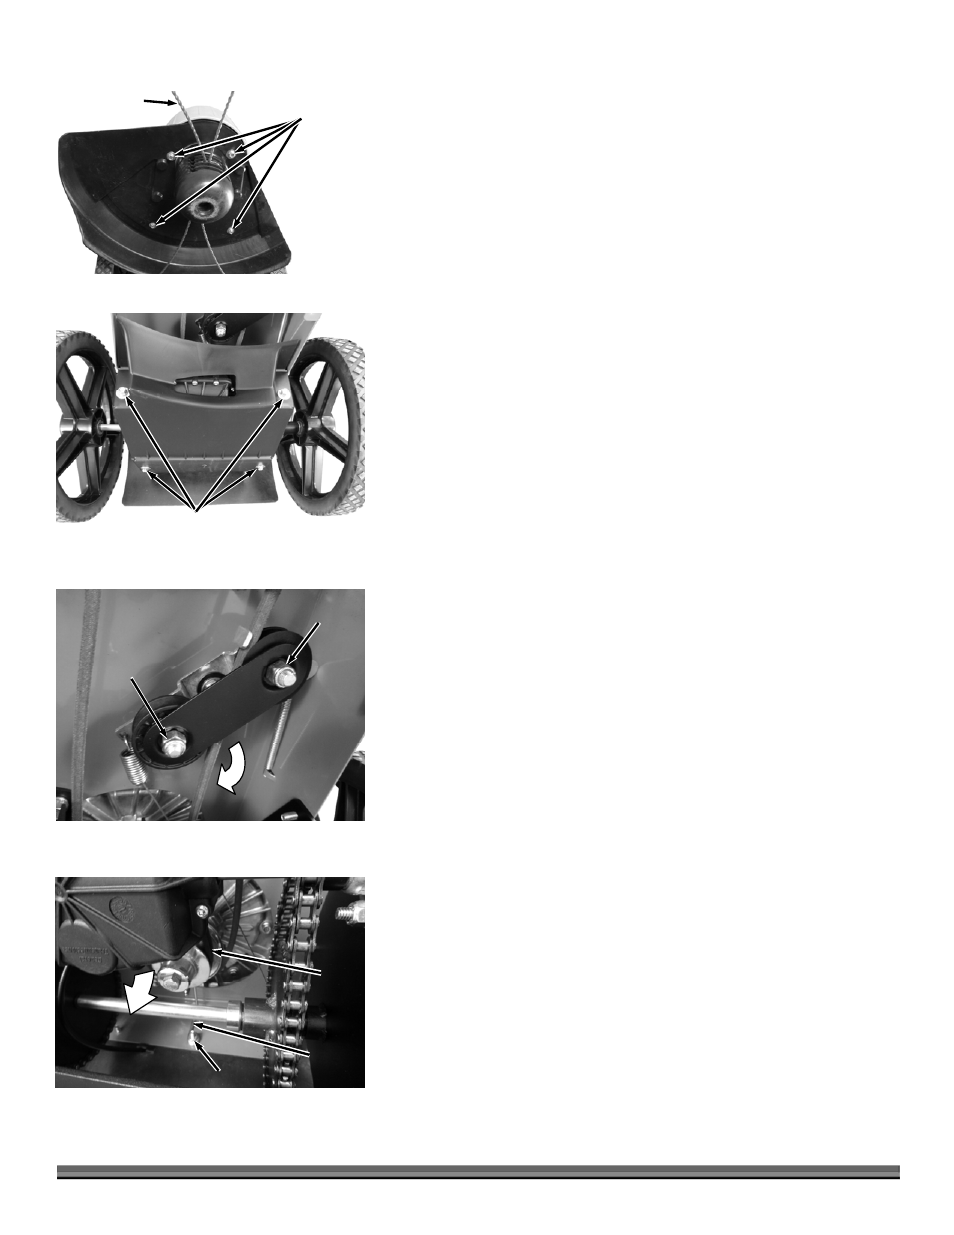
1. Tip the machine back onto the handlebar to access the underside.
2. Remove the Trimmer Cords from the Head Assembly.
3. Remove the four Trimmer Guard Bolts and Flat Washers with a 3/8"
Wrench. Remove the Trimmer Guard (Figure 28).
4. Remove the four Transmission Cover Bolts and Flat Washers with a 3/8"
Wrench. Remove the Transmission Cover (Figure 27).
5. Remove the Locknut that secures the Washer Plate to flat groove Idler Pulley
using a 9/16" Wrench. Loosen the other Locknut to the V groove Idler Pulley
using a 9/16" Wrench just enough so the Washer Plate can be rotated out of
the way (Figure 30).
6. Loosen the Engine Belt Guide Locknut using a 7/16" Wrench and rotate the
Guide out of the way (Figure 31).
7. Rotate the Transmission down toward the back to slide the small Drive Belt
from the Pulley groove. This allows you to now remove the Trimmer Head
Belt from around the Engine and Head Assembly Pulleys.
8. Install a new DR Trimmer Head Belt around the Engine and Head Assembly
Pulleys.
9. Rotate the Transmission into position as you guide the Drive Belt into the
Engine Drive Pulley groove.
10. Rotate the Engine Belt Guide into position and tighten the Locknut with a
7/16" Wrench.
Figure 31
Drive
Belt
Transmission
Engine
Belt
Guide
Locknut
Figure 30
Washer
Plate
Flat Groove
Idler Locknut
“V” Groove
Idler Locknut
Transmission
Guard
Figure 29
Bolts and Flat
Washers
Trimmer
Guard
Figure 28
Bolts and Flat
Washers
Trimmer Cord