Bearing frame installation – Flowserve TB-MAG INNOMAG User Manual
Page 34
INNOMAG® TB-
MAG™ ASME and ISO SEALLESS ENGLISH 26999988 06-14
Page 34 of 44
c) Replace the inner o-ring on the mechanical seal
before re-assembly. Lubricate the inner o-ring of
the seal before assembling the bearing frame
onto the adapter
d) Align the four mounting holes on the adapter
[1340] with the four mounting holes on the seal
[4200].
The spacers must remain in place until the
seal [4200] has been bolted into the assembly.
e) Set the seal [4200] into the bore of the adapter
[1340]. Thread the (4) 10-24 screws in a few
turns only. Do not tighten the screws yet.
f)
Clean and Inspect the mating surfaces
g) Lower the bearing frame onto the adapter [1340].
h) Tighten the hex cap screws [6570.1]. Torque to
61 Nm (45 lbf
•ft.).
Depending on the condition of the bearing
frame assembly, the following steps are optional. The
bearing frame is factory machined so that the run out
cannot be greater than 0.05mm (0.002 in.). However,
corrosion of the mating faces could affect the
concentricity of the bearing frame [3200] and
adapter. If corrosion is present follow the next steps
(Section 6.14 step k-p).
i)
Place the shaft extension tool (Part # TLG-2030-
SI) over the shaft [2100].
j)
Tighten the shaft extender to the shaft with the
lower set screw with an allen wrench.
k) Insert the top of the dial test indicator into the
upper hole on the shaft extender and tighten the
screw.
l)
Measure the concentricity of the bearing frame
shaft [2100] and the mechanical seal bore on the
adapter [1340]. Using the dial test indicator,
measure the run out of the seal bore.
m) If concentricity of 0.05 mm (0.002 in.) or less
cannot be achieved, the damaged components
should be replaced.
n) Using the indicator mounted to the shaft
extension, measure the perpendicularity of the
machined surface on the inside of the adapter.
The face should be perpendicular to the shaft
within 0.05mm (0.002in.).
6.15.1 Seal Chamber Pressure Test Procedure
The pump must be stopped during
this test.
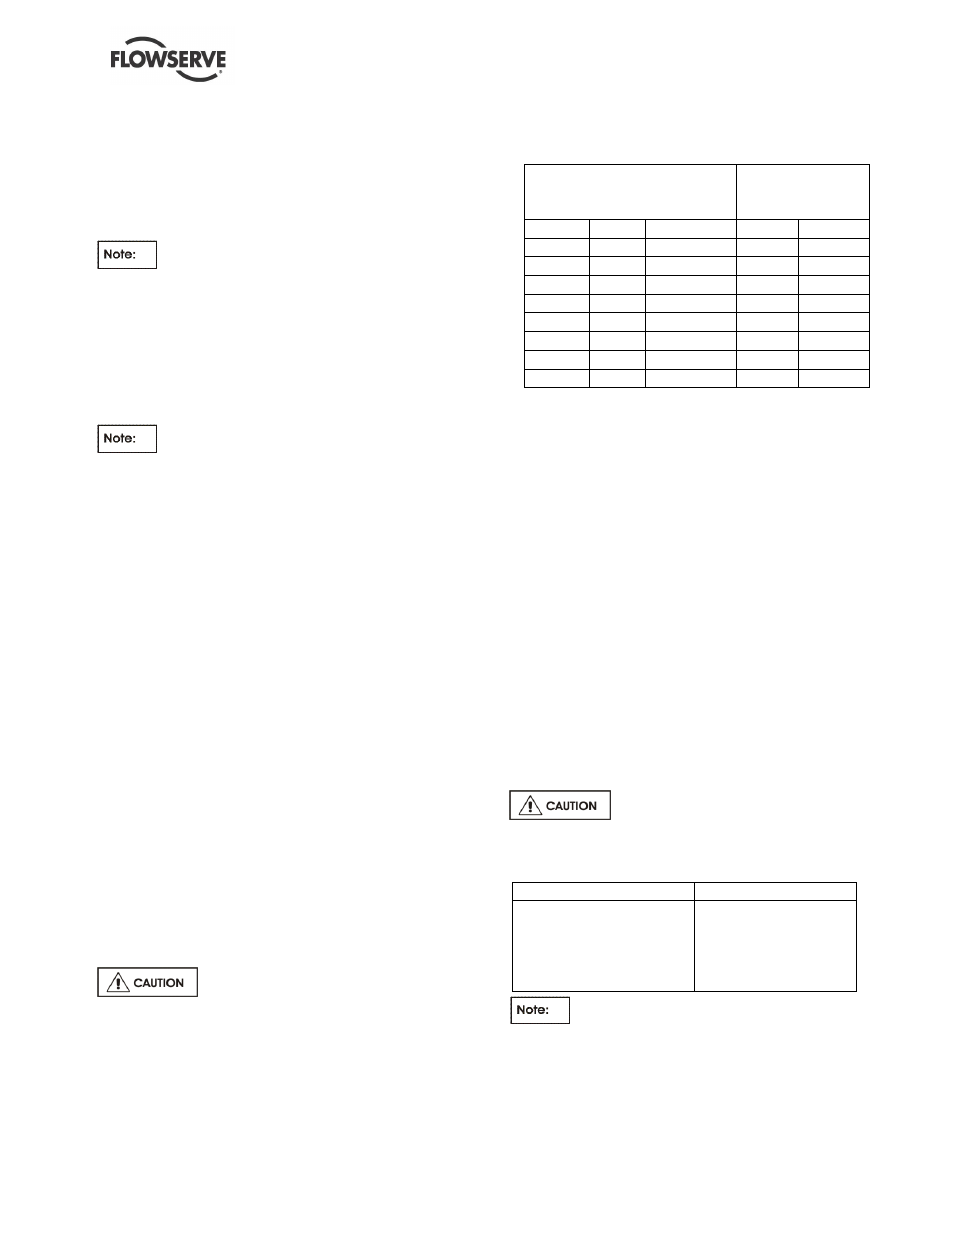
a) You will need an air accumulator with a
pressure gauge for this test. The total volume
of the accumulator tank should be 28 litres (1
cubic foot, 7.5 gallon). A larger or smaller
accumulator can be used, but the pressure drop
must be adjusted. See the following chart:
Accumulator Volume
Allowable
Pressure Drop
in 5 minutes
litres
ft
3
US gallons
bar
psig
7.6
0.27
2
0.55
8
18.9
0.67
5
0.21
3
28.4
1.0
7.5
0.14
2
37.9
1.34
10
0.10
1.5
45.4
1.60
12
0.09
1.25
53.0
1.87
14
0.08
1.1
56.8
2.0
15
0.07
1
75.7
2.67
20
0.05
0.75
b) Plug one adapter drain connection so that the
seal chamber is isolated. Use PTFE pipe thread
tape to ensure a proper seal.
c) Connect the accumulator hose to the barbed
hose adapter pipe fitting.
d) Tighten the accumulator hose clamp.
e) Pressurize the accumulator and seal cavity to 1.7
bar (25 psig).
f)
Check all fittings and connections for leakage
(soap solution type test). Bubbles indicate leaks.
g) The pressure in the accumulator will drop
immediately due to expansion and seating of the
o-rings. This is normal. Wait 1-2 minutes and re-
pressurize the seal chamber to 1.7 bar (25 psig).
h) Measure pressure decay. Pressure drop should
be less than that indicated in the table in step (a).
i)
Vent pressure from cavity upon completion of the
test and reconnect any leak sensors or drain
lines to the adapter.
6.16 Bearing Frame Installation
All bearing frames [3200] are
shipped without oil. See the following table for the
recommended oil:
Mineral Oil
Synthetic Oil
Quality mineral oil with
rust and oxidation
inhibitors. Mobil DTE
Heavy / Medium ISO
VG 68 or equivalent.
Royal Purple,
Conoco Syncon 68
or equivalent
It normally takes 2 hours for bearing
temperature to stabilize and the final temperature
will depend on the ambient, rpm, pumpage
temperature and pump size.