Flowserve PLEUGER User Manual
Page 29
PLEUGER STANDARD USER INSTRUCTIONS ENGLISH 71569293 01-13
Page 29 of 40
flowserve.com
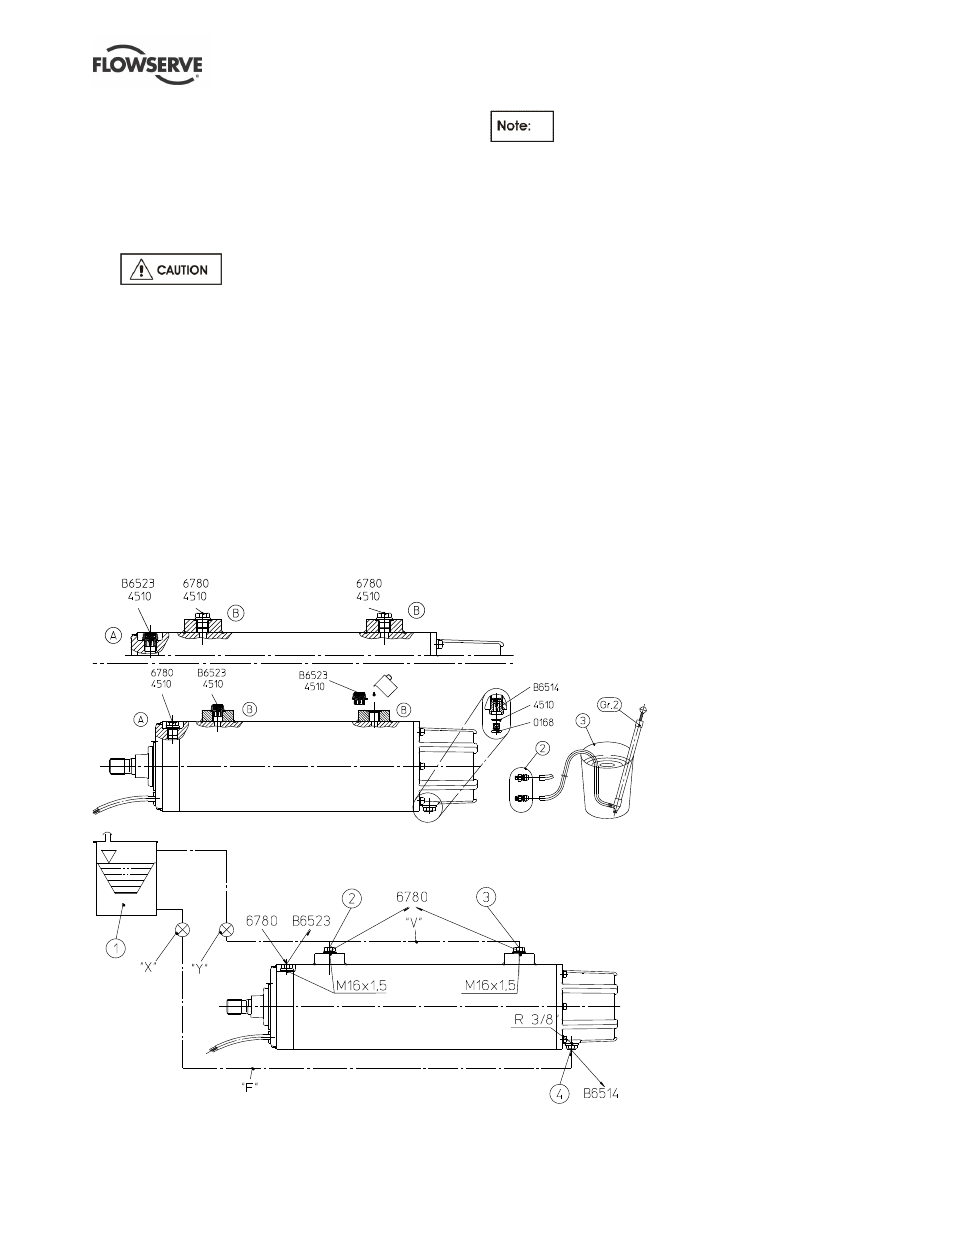
f) The screw plug [6780] and one of the two vent
valves [B6523] mentioned above must be taken
from the accessory pack supplied with the motor.
(See section 6.5.9,
Accessory pack “Z”.) For the
second vent valve [B6523], use the one that has
been screwed out, as described in b) above.
g) All seals [4510] for replacement are contained in
a
ccessory pack “Z”.
After installing the vent valves, the
motor must not be rotated or positioned vertically.
h) Top up the motor again in its installed position
until the liquid escaping from the vent valve
[B6523] contains no bubbles.
i)
Pull the filling pump hose off the filling nipple [2]
and screw out the filling nipple (if the filling has
been carried out with a filling pump) and refit the
screw plug [0168] into the filling valve [B6514]
together with the seal ring [4510].
6.6.10 Motors with header tank for horizontal
installation
(See figure 6-10.)
Motors for this type of installation must be
specially equipped.
a) Put the motor horizontally with the vent valve
[B6523] at the top. Screw out the vent valve
[B6523] and replace it with a screw plug [6780]
from the accessory pack (see section 6.5.9,
Accessory pack “Z”.)
b) Rotate the motor so that the carriers located on
the stator housing are at the top. Remove the
screw plugs [6780] from the carriers, and screw
the pipe connectors [2 and 3] into the threaded
holes (M16 x 1.5).
c) Fit the pipes
“V” into the connectors [2 and 3] up
to the points marked "Y" and close the pipe on
the end.
d) Rotate the motor so that the filling valve [B6514]
is at the top. Screw out the filling valve [B6514]
and screw a pipe connector [4] into the threaded
hole (R ⅜ in. or R ¾ in.).
e) Fit the pipes/hoses [
“F”] into the connector [4] up
to the points marked
“X” and close the pipe on
the end.
f) Install the motor horizontally and lay further pipes
up to the header tank [1].
Figure 6-9A
Figure 6-9B
Figure 6-10