2 remote position indication – Flowserve L120-85 Actuator User Manual
Page 21
4.7.2 Remote Position Indication
NOTE: Typical voltmeter remote indicators furnished by Limitorque
are built to accept a maximum of 10 volts. In order to make volt-
meter adjustments, you will need a separate voltmeter with a scale
suitable for the maximum incoming control voltage.
1. Mount the Adjustable Resistor as close as possible to the
Remote Voltmeter Indicator.
2. Turn power to actuator OFF and connect all wiring as shown in
Figure 14. For now, connect the wires leading to the Remote
Voltmeter Indicator to your test meter so you can conduct volt-
age readings during the setup.
3. Move the Adjustable Resistor Slider to the extreme opposite end
of the Resistor from the Power Connection.
4. Open the Electrical Compartment Cover (piece 200-1). Loosen
the Hex Head Retaining Nut at the base of the Potentiometer
Bracket and dis-engage the Spur Gear from the Potentiometer
Drive Gear. This will allow manual rotation of the Potentiometer
Assembly. See figure 14.
5. Manually position the valve in the fully CLOSED position. As
you are rotating the Handwheel to the CLOSED position, notice
the direction the Potentiometer Spur Gear would be turning the
Potentiometer Shaft/Wiper Arm inside the Potentiometer.
6. When the valve is CLOSED, turn the Potentiometer Shaft to the
end-of-travel position that corresponds to the CLOSED position
of the Potentiometer. Carefully reposition the Potentiometer
Spur Gear onto the Potentiometer Shaft to re-engage with the
gear train. Re-tighten Hex Head Retaining Nut at the base of the
Potentiometer Bracket.
c
WARNING: Hazardous Voltage. Use extreme caution
if power is ON and Electrical Compartment Cover is
removed.
7. Turn power to the actuator ON. Your Test Meter should read “0”
or almost “0”. If not, go back through the above steps 1–7 to get
your Potentiometer calibrated to the proper end-of-travel.
8. Now manually position the valve in the fully OPEN position.
9. Move the Adjustable Resistor Slider toward the Power Connec-
tion end until the Test Meter reads 10 volts.
10. Turn actuator power OFF, disconnect the Test Meter and connect
the leads to the Remote Voltmeter Indicator.
11. Turn actuator power ON. Your Remote Voltmeter Indicator
should read full OPEN.
12. Further adjustment may be necessary. If the Remote Voltmeter
Indicator reads less than full OPEN, carefully move the Adjust-
able Resistor Slider ahead being careful not to exceed the full
OPEN position on the Remote Voltmeter Indicator. If the Indica-
tor reads more than “0” when the valve is CLOSED, repeat this
procedure.
13. When the Indicator properly shows valve position, lock the
Adjustable Resistor Slider in place.
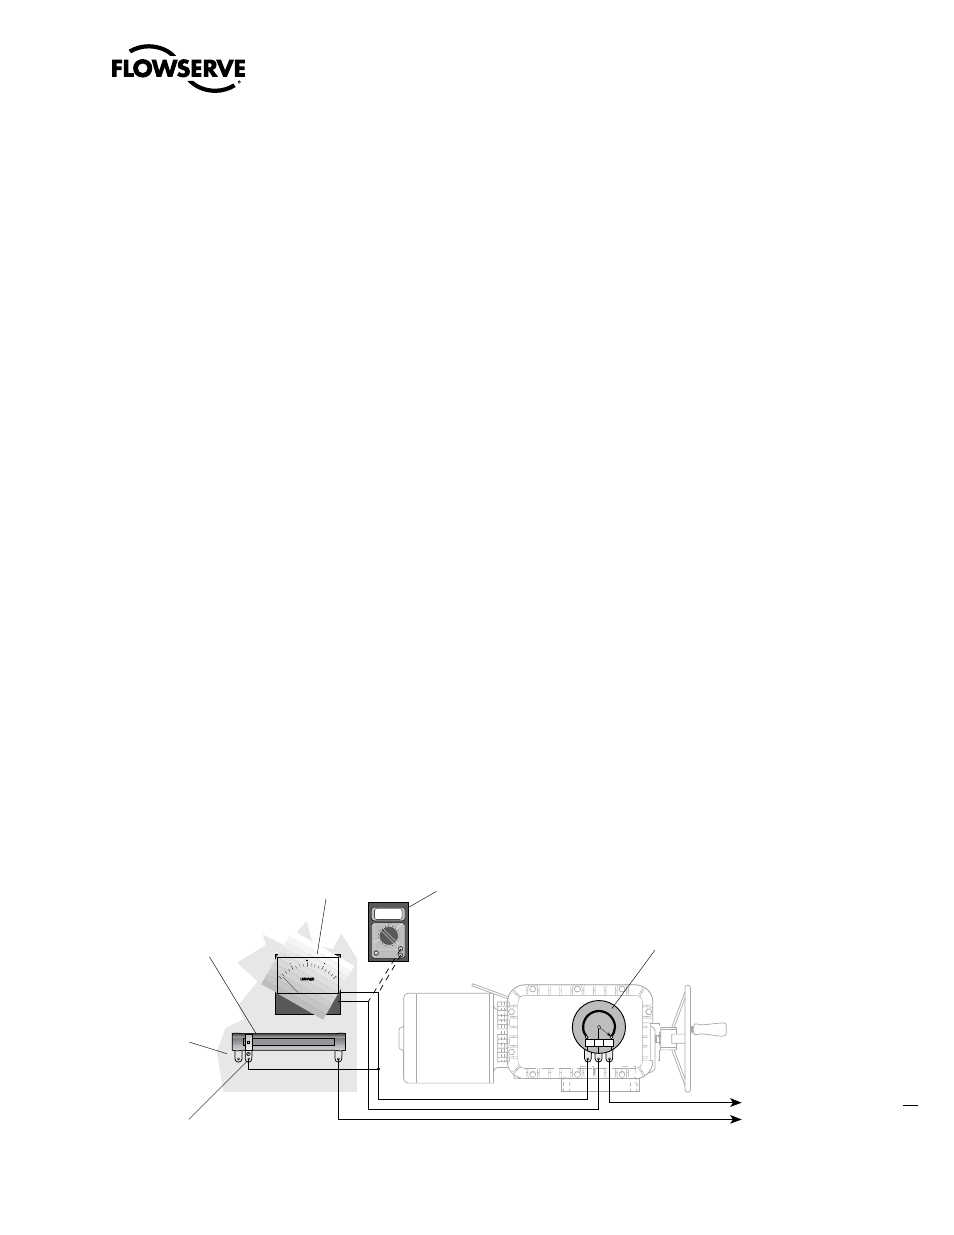
Figure 14: Remote Position Indicator Calibration Configuration
P1 P2 P3
CLOSED
Valve Position
1
4
1
2
3
4
OPEN
LIMITORQUE CORPORATION
LYNCHBURG V A.
25 watt, 50 ohm Potentiometer
type Variable Resistor mounted
in a Limitorque Actuator Housing
10.00
Digital Multitester
Control voltage range
110 volts to 480 volts
175 watt, 2500 ohm
Adjustable Resistor
located adjacent to
Remote Position
Indicator for voltage
adjustment
Remote
Voltmeter
Indicator
Ohmmeter
for calibration
Adustable
Resistor Slider
Mounting
Surface
21
Limitorque L120-85 Installation, Operation and Maintenance FCD LMENIM1202-00 – 11/05
flowserve.com