Installation, Enclosure rtu connection (if applicable), Installing the ics page/party – GAI-Tronics 701-302ICS ICS AC-Powered Page/Party Plug-in Amplifiers User Manual
Page 5: Plug-in amplifier
Pub. 42004-730L2B
ICS AC-Powered Page/Party
®
Plug-in Amplifiers
Page: 3 of 20
f:\standard ioms - current release\42004 instr. manuals\42004-730l2b.doc
04/11
Installation
CAUTI ON
Do not install this equipment in hazardous areas other than those on the
equipment approval list in the “Specifications” section. Such installation may cause a safety hazard
and consequent injury or property damage.
The ICS AC-powered Page/Party
®
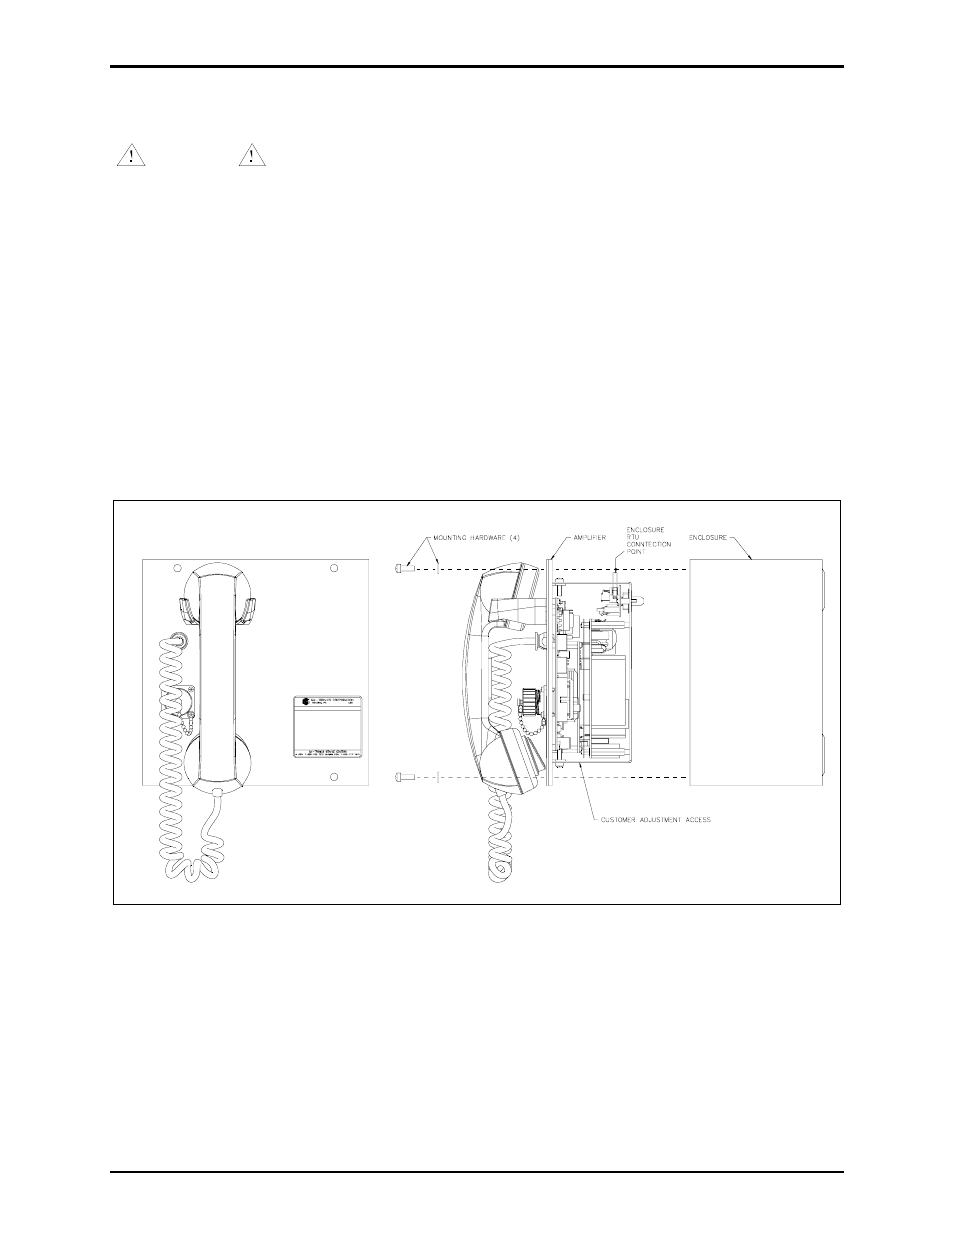
Plug-in Amplifier plugs directly into the enclosure. Figure 2 shows
installation details. Please refer to the applicable amplifier section when you are installing and adjusting
the amplifier. Use extra caution not to damage the protruding latch wings of connector P6 located on the
top right edge of the amplifier during installation and removal.
Installing the ICS Page/Party
®
Plug-in Amplifier
1. Plug the amplifier directly into the enclosure.
2. Attach the amplifier to the enclosure with the hardware provided. See Figure 2.
3. Apply power to the station.
Figure 2. Installation Detail
Enclosure RTU Connection (if applicable)
Amplifiers with VLC or SmartSeries PCBAs can be connected via an enclosure ribbon cable to provide a
double-pole, Form “C” relay and one fuse-protected contact. If an RTU is present in the enclosure,
connect the ribbon cable provided to the receptacle on the top side of the amplifier.
N
OTE
: When the SmartSeries PCBA is installed with an ADVANCE head end connection, the RTU
provides monitoring of the input status (to trigger action in the ADVANCE head end), a double-pole,
Form “C” relay contact (output cable supervision is optional) and one fuse-protected contact.
- 701-302ICSVC ICS AC-Powered Page/Party Plug-in Amplifiers 701-304ICSVC ICS AC-Powered Page/Party Plug-in Amplifiers 701-904ICS ICS AC-Powered Page/Party Plug-in Amplifiers 751-001ICSVC ICS AC-Powered Page/Party Plug-in Amplifiers 701-304ICS ICS AC-Powered Page/Party Plug-in Amplifiers 701-902ICS ICS AC-Powered Page/Party Plug-in Amplifiers 751-001ICS ICS AC-Powered Page/Party Plug-in Amplifiers 751-901ICS ICS AC-Powered Page/Party Plug-in Amplifiers 701-307ICS ICS DC-Powered Page/Party Plug-in Amplifiers 701-307ICSVC ICS DC-Powered Page/Party Plug-in Amplifiers 701-309ICSVC ICS DC-Powered Page/Party Plug-in Amplifiers 701-909ICS ICS DC-Powered Page/Party Plug-in Amplifiers 751-002ICSVC ICS DC-Powered Page/Party Plug-in Amplifiers 701-309ICS ICS DC-Powered Page/Party Plug-in Amplifiers 701-907ICS ICS DC-Powered Page/Party Plug-in Amplifiers 751-002ICS ICS DC-Powered Page/Party Plug-in Amplifiers 751-902ICS ICS DC-Powered Page/Party Plug-in Amplifiers