Loft – Highgear Loft User Manual
Page 10
15
ALTIWARE SERIES
english
16
LOFT
english
The Loft is equipped with an highly sensitive altimeter system which measures altitude and altitude changes using
variations in local barometric pressure. Your CURRENT ALTITUDE is always shown in the CENTER LINE OF THE
DISPLAY. The LOWER LINE of the display shows the TIME OF DAY, and the UPPER LINE displays your MAXIMUM
AND ACCUMULATED ALTITUDE along with a BAR GRAPH SHOWING ALTITUDE CHANGES OVER TIME.
HOW THE ALTIMETER WORKS
Because the altimeter system in the Loft relies on barometric pressure for its measurements, it is critical that you
regularly calibrate the unit to a known altitude. For maximum accuracy, daily calibration is a must and if you are using
the unit during times of changeable weather, the unit may need to be calibrated several times during the day. Generally,
the small pressure changes experienced during a day of use will have only a minor effect on the accuracy of the unit.
However, the arrival or departure of a weather front can change the current weather display by several hundred feet
or more. In spite of this, pressure based altimeters, if kept properly calibrated, are one of the most accurate means of
measuring altitude available
The best place to calibrate you unit is your home. If you do not know the actual altitude of your home, there are a couple
of ways you can find this out. The simplest is to find a topographical map of your area. This will give you the exact
altitude at your location. If this is not possible, go to some place where you can find out the actual altitude. A local
airport is a good choice. Calibrate your altimeter at the known location and return home, taking note of the altitude
reading when you return home. Keep this number handy and use it to calibrate your altimeter each time you go to use it.
ALTIMETER FUNCTIONS
BAROMETER FUNCTIONS
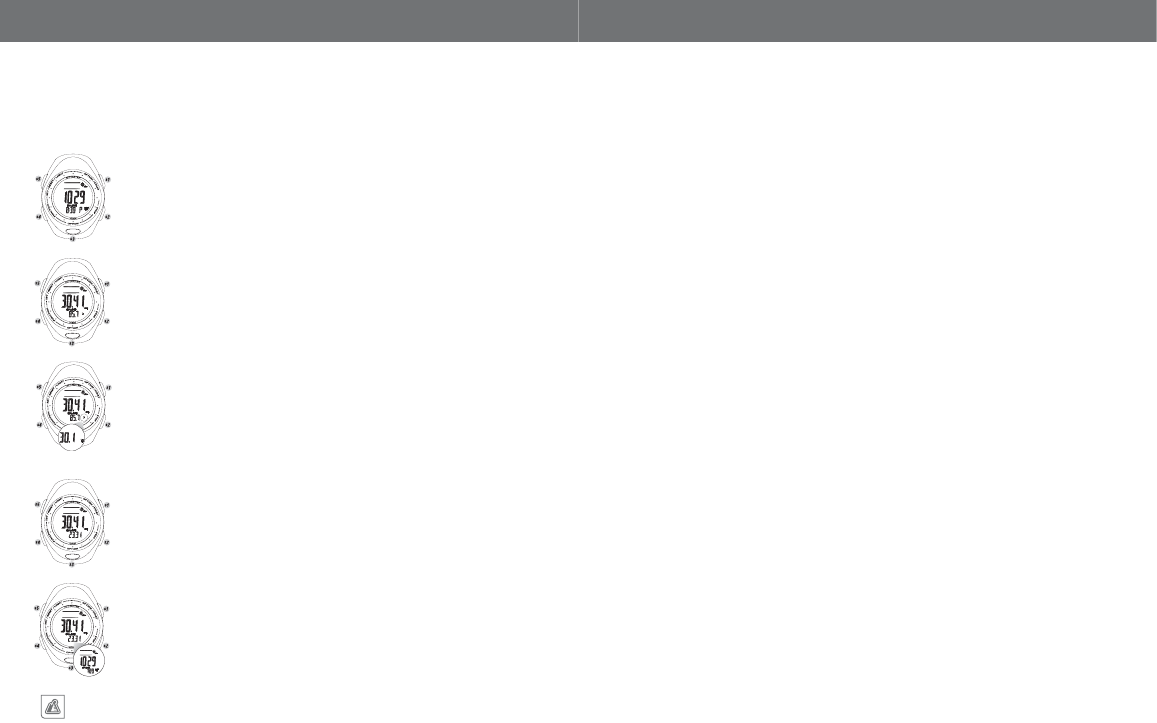
SECONDARY BAROMETER MODES
In the Barometer Mode, Barometric Pressure corrected to Mean Sea Level (MSL) is always displayed in the center of the
display and the Barometric Pressure Graph in the top line. The Barometer Mode has three additional secondary display
options in the lower line which are accessed by a QUICK PRESS of the S1 or S3 key.
SCREEN ONE
TOP LINE: Graph showing Sea Level Barometric Pressure Trends over the past 24-hrs
CENTER LINE: Barometric Pressure corrected to Mean Sea Level (MSL)
BOTTOM LINE: Time of Day
SCREEN TWO
TOP LINE: Graph showing Sea Level Barometric Pressure Trends over the past 24-hrs
CENTER LINE: Barometric Pressure corrected to Mean Sea Level (MSL)
BOTTOM LINE: Temperature in Degrees Centigrade or degrees Fahrenheit
CHANGE TEMPERATURE UNITS
While the current temperature is being shown in the lower line of the display, the user may
change the units of the display between degrees centigrade or degrees Fahrenheit by a
PRESS & HOLD of the S2 key. Pressing the key for less than two seconds will display the
alternative unit. Continuing to hold the key until the temperature icon stops flashing will
lock the display variable on screen
SCREEN THREE
TOP LINE: Graph showing Sea Level Barometric Pressure Trends over the past 24-hrs
CENTER LINE: Barometric Pressure corrected to Mean Sea Level (MSL)
BOTTOM LINE: Absolute Barometric Pressure
CHANGE BAROMETER UNITS
While the actual pressure is being shown in the lower line of the display, the user may
change the units of the display for both the Absolute and Sea Level barometric pressure
between Inches of Mercury (inHg) and Millibars/HectoPascals (mbar/hPa) by a PRESS
& HOLD of the S2 key. Pressing the key for less than two seconds will display the
alternative unit. Continuing to hold the key until the temperature icon stops flashing will
lock the display variable on screen.