Performing, Selecting a sound (scene/tone), Layering zones (layer) – Roland Fantom-08 88-Key Music Workstation Keyboard User Manual
Page 17: Dividing the keyboard into two regions (split), Selecting a sound, Layering zones, Dividing the keyboard into two regions, Selecting a scene, Selecting a tone, Changing the keyboard’s split point
17
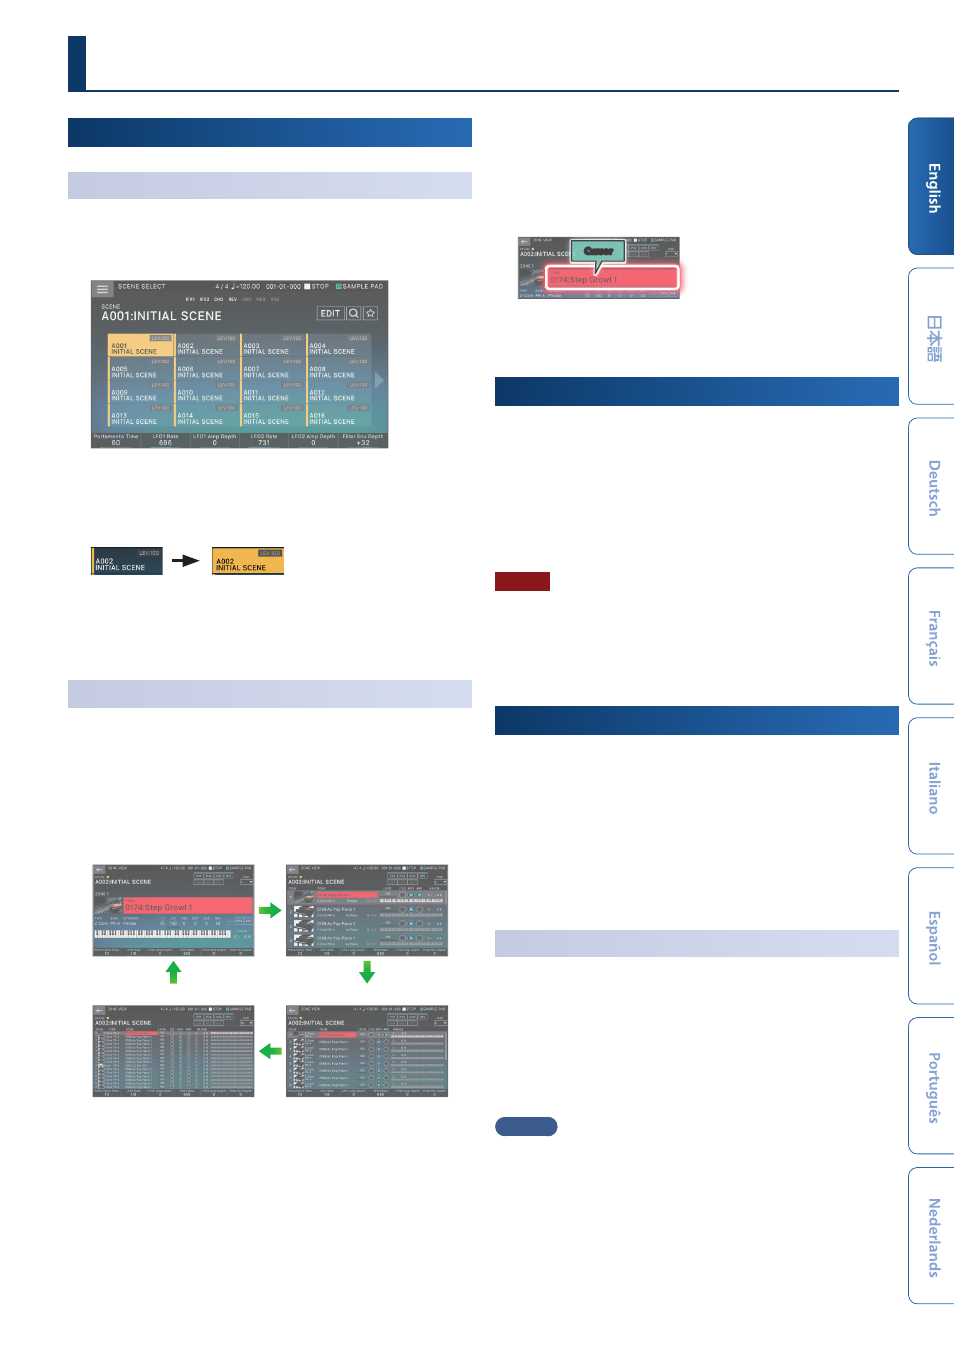
Selecting a Sound
(SCENE/TONE)
Selecting a Scene
1 .
Press the [SCENE SELECT] button.
The SCENE SELECT screen appears.
2 .
Touch a scene icon in the screen to select the desired
scene.
The icon of the selected scene is colored.
Sixteen scene icons are arranged in the screen as a 4 x 4 grid,
and you can select one of these scenes. By touching the “
ã
”
or “
â
” icon located at the left or right edge of the screen, you
can choose from the “previous” or “next” 16 scenes.
Selecting a Tone
1 .
Press the [ZONE VIEW] button.
The ZONE VIEW screen appears.
Each time you press the [ZONE VIEW] button, the VIEW
number (the number of zones shown simultaneously) is
switched.
1 ZONE VIEW
4 ZONE VIEW
8 ZONE VIEW
16 ZONE VIEW
2 .
When ZONE SELECT is on, use the ZONE INT/EXT [1]–[8]
buttons to select the current zone (the zone to operate).
3 .
Press a ZONE SELECT button [1]–[8] to select the zone
that you want to control.
To select zones 9–16, use the [ZONE 9-16] button to switch
groups, and then press a ZONE SELECT [1]–[8] button.
4 .
Press a tone category button [1]–[16] to select the type
(category) of tone.
5 .
Move the cursor to the tone name (number), and use
the [VALUE] dial or the [INC][DEC] buttons to select a
tone.
Cursor
¹
When the cursor is located at the tone name (number),
pressing the [ENTER] button displays the “TONE LIST.”
Layering Zones
(Layer)
1 .
Press the ZONE INT/EXT button of the zones that you
want to layer, making them light red.
2 .
Of the zones that are lit, press the ZONE SELECT button
of one zone to specify it as the current zone.
When you play the keyboard, the zones lit red are sounded
as layers.
NOTE
Zones whose ZONE INT/EXT button is lit green are controlling an
external MIDI sound module.
To switch to the internal sound engine, once again hold down the
[SHIFT] button and press the corresponding ZONE INT/EXT button
to make the button light red (INT setting).
Dividing the Keyboard into Two Regions
(Split)
1 .
Press the [SPLIT] button to make it light.
The high region plays the zone 1 tone, and the low region
plays the zone 4 tone.
2 .
To cancel split, press the [SPLIT] button to make it go
dark.
When you cancel split, the high and low regions (KEY
RANGE) are reset, and return to the layer state.
Changing the Keyboard’s Split Point
1 .
While holding down the [SPLIT] button, press the key
that is to become the new split point.
The split point is shown.
When you release the [SPLIT] button, the previous display
will reappear.
The split-point key is included in the ZONE 1 section.
MEMO
¹
If you want to change the tone of the upper key range, press
ZONE SELECT [1]; if you want to change the tone of the lower
key range, press ZONE SELECT [4]. Then select a tone.
¹
By using the KEY RANGE function you can freely specify the
key range for each zone.
¹
Hold down the [SHIFT] button and press the [SPLIT] button
to switch to the KEY RANGE setting screen.
Performing