Panel descriptions, Top panel/front panel, Front panel – Roland P-20HD Video Instant Replayer User Manual
Page 2
2
Panel Descriptions
Top Panel/Front Panel
Name
Explanation
INPUT section
1
[REC] button
Starts/stops recording.
Lit
Recording
Unlit
Recording stopped
To stop recording, hold down the [REC]
button and press the [EXIT] button.
2
[SELECT] button
Switches between input video (LIVE IN 1/LIVE IN 2/
PinP/SPLIT). The LED for the selected input lights up.
3
[AUDIO OUT] knob
Adjusts the output volume.
Pad section
4
[STILL] button
Switches the pad functions to select still image
clips.
[AUDIO] button
Switches the pad functions to select audio clips.
[CLIP LIST] button.
Switches the pad functions to select video clips.
[PALETTE] button
Switches the pad functions to select video clips
within a palette.
5
Pads [1]–[8]
Used for selecting the clip (video/still image/
audio) assigned to each pad.
6
[<] [>] buttons
Switches the pad page.
7
[SPEED] lever
Adjusts the playback speed.
8
[SPEED RANGE]
button
Switches between ranges of playback speeds that
can be adjusted using the [SPEED] lever.
OUTPUT section
9
[LIVE IN] button
Outputs video from the LIVE IN bus.
[REPLAY] button
Outputs video from the REPLAY bus.
AUTO PLAY section
10
[CLIP] button
Plays back the video clip.
[PLAYLIST] button
Plays back the playlist.
11
Cooling vents
Heat from inside the P-20HD is released from these
vents.
* Do not block the cooling vents. If the cooling vents are
blocked, the internal temperature might rise, causing the
unit to malfunction.
Name
Explanation
MARKER section
12
[LIVE IN] button
Switches between marker reference times.
Lit
LIVE IN time
Unlit
REPLAY time
[DELETE] button
Deletes a bookmark.
[IN] [OUT] buttons
Sets the video clip’s start time (IN point) and end
time (OUT point).
[BOOKMARK]
button
Sets a marker (bookmark) in the recording data.
[MAKE CLIP] button
Creates a video clip whose OUT point is the
moment at which you press the button.
TRANSPORT section
13
[ ] button
Stops the video that’s currently playing
back.
Video
Paused
Audio
Muted
[
ø
] button
Plays back the recorded video.
[
ф
] [
ы
] buttons
Jumps to the next bookmark (or previous
bookmark).
14
[MENU] button
Shows or hides the menu.
15
[EXIT] button
Exits a menu level or cancels an operation.
16
[VALUE] knob
(ENTER)
Turning
Selects a menu item, or edits the
value of a setting.
Pressing
Confirms a selected menu item or
an edited setting. Also executes an
operation.
JOG/SHUTTLE section
17
[JOG] button
Sets the [JOG/SHUTTLE] dial to jog mode (p. 15).
[SHUTTLE] button
Sets the [JOG/SHUTTLE] dial to shuttle mode
(p. 15).
18
[JOG/SHUTTLE] dial
In jog mode/shuttle mode, adjust the frame
advance, frame rewind, and playback speed.
When you press the dial while in shuttle mode,
shuttle mode is turned off.
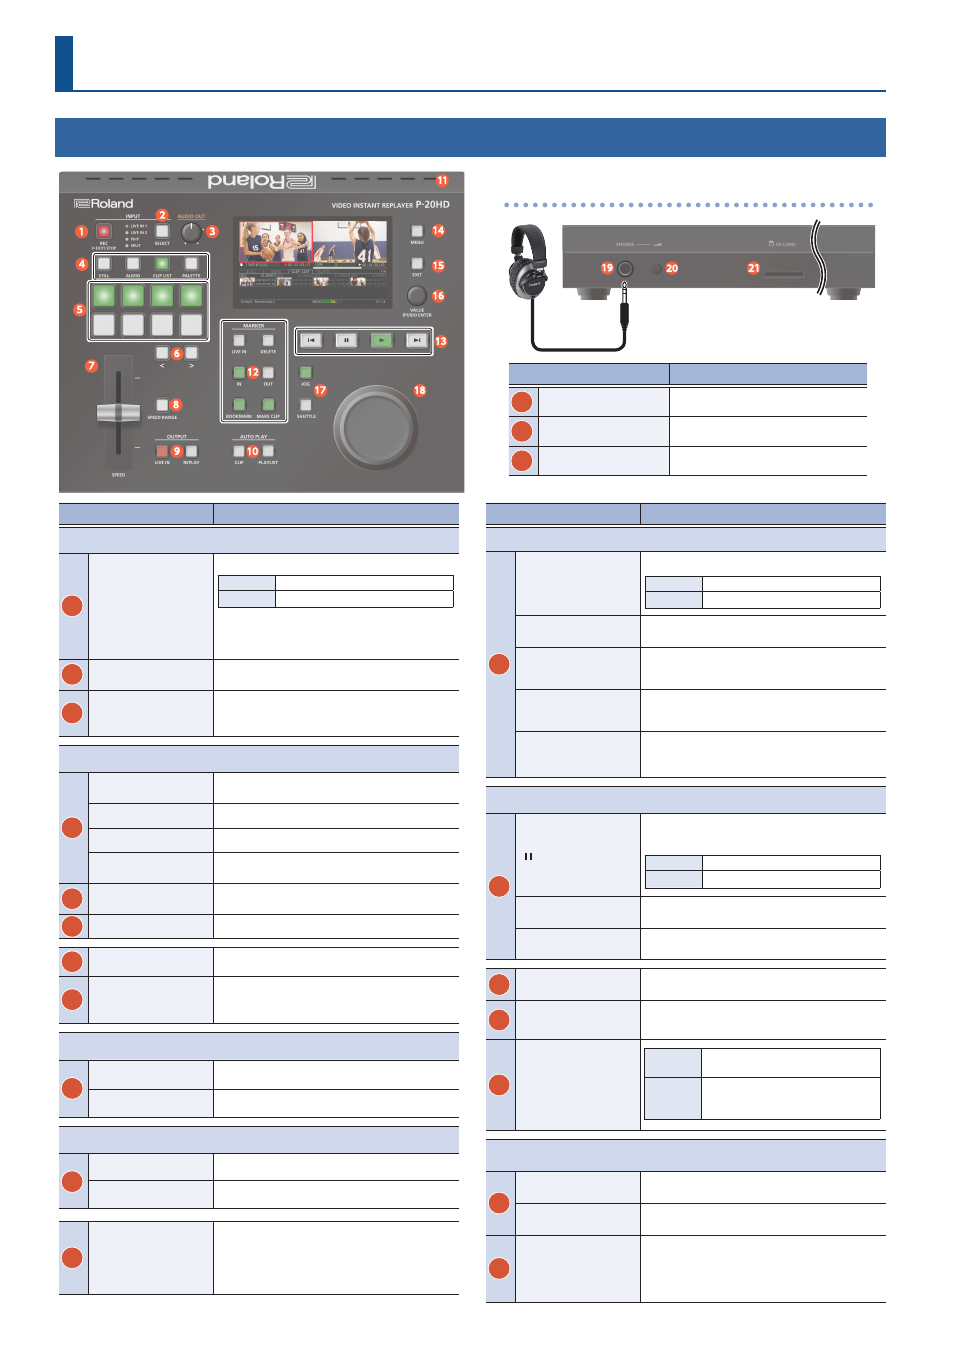
Front Panel
Name
Explanation
19
PHONES jack
Connect your headphones here.
20
[PHONES] knob
Adjusts the headphone volume.
21
SD card slot
Insert an SD card here.