Adjusting the tempo, Tap tempo, Recording to a variation that’s not playing – Roland AIRA TR-6S Rhythm Performer User Manual
Page 14: Returning to the beginning of the pattern, Checking the value of a knob or fader, Assigning a different function for each instrument, To the [ctrl] knob, Finely adjusting the timing of notes, Nudge function), Reloading the value of a knob or fader
14
Playing Patterns
Assigning a Different Function for Each
Instrument to the [CTRL] Knob
1
Hold down the
[SHIFT]
button and press the
[KIT]
button.
2
Use the
[VALUE]
knob to select
“KIT: CTRL >BD–
OH,”
and then press the
[VALUE]
knob.
3
Use the
[VALUE]
knob to select a parameter.
4
Press the
[KIT]
button.
MEMO
In advance, use “Assigning Parameters to the [CTRL] Knobs
(CTRL SELECT)” (p. 13) to specify “User.” If something other than
“User” is specified, this parameter is not shown.
Adjusting the Tempo
1
Press the
[TEMPO]
button.
2
Turn the
[VALUE]
knob to make the adjustment.
By holding down the [SHIFT] button and turning the [VALUE] knob,
you can adjust the setting in steps of 0.1 units.
Tap Tempo
Here’s how to tap-input the tempo.
1
While holding down the
[SHIFT]
button, press the
[TEMPO]
button three or more times.
The tempo is specified as the average timing at which you press
the button.
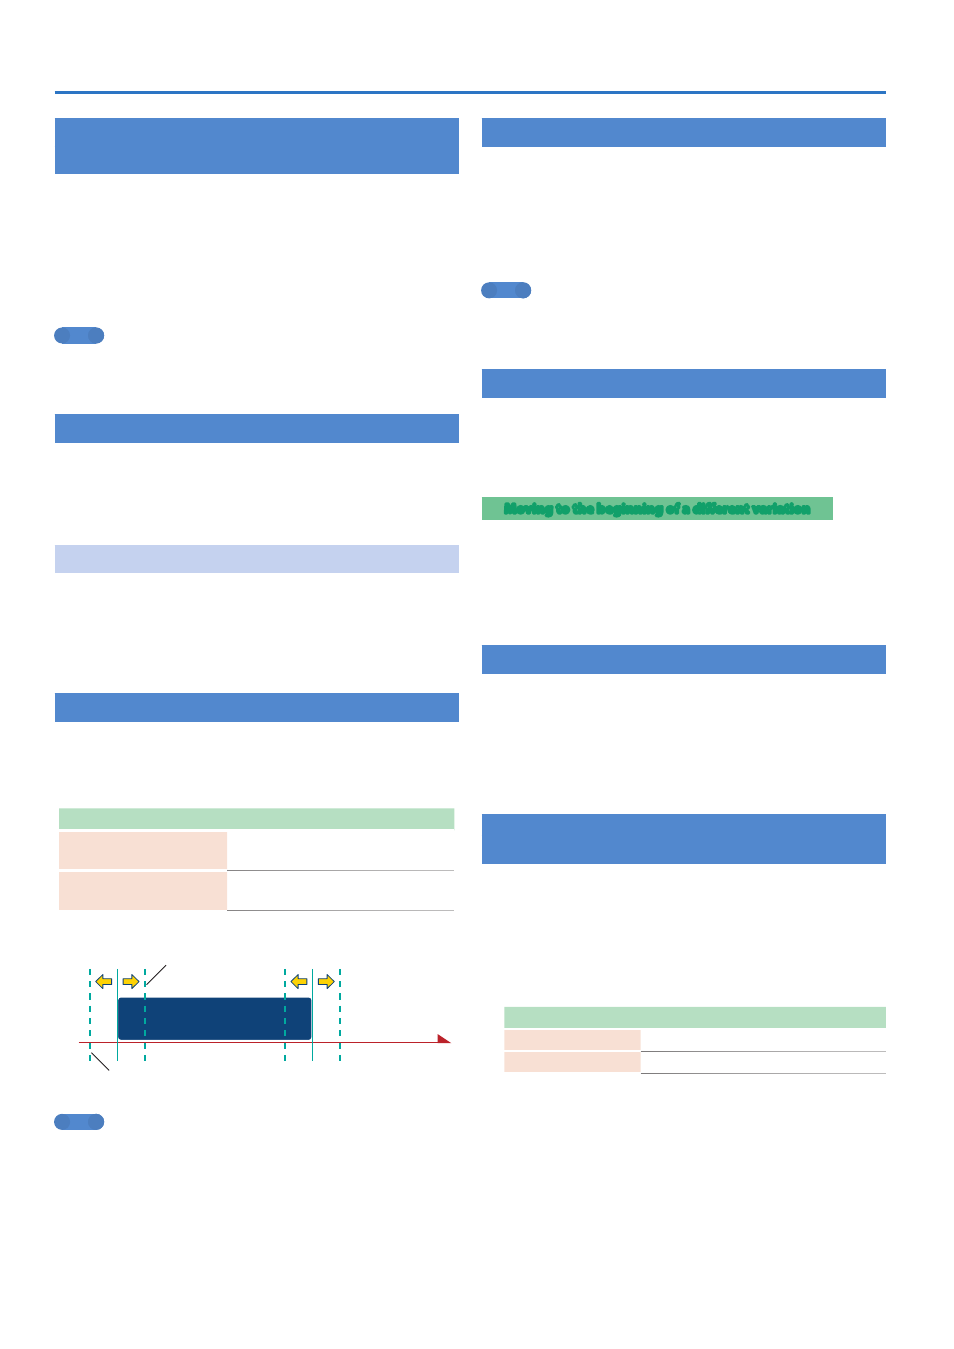
Finely Adjusting the Timing of Notes
(Nudge Function)
The “nudge” function lets you adjust the timing of notes forward or
backward.
Using the nudge function changes the playback timing of the entire
pattern.
Operation
Explanation
[SHIFT] + [COPY] button
NUDGE-
Moves the playback timing backward.
[SHIFT] + [UTILITY] button
NUDGE+
Moves the playback timing forward.
Note
Step (time)
NUDGE-
Moves the playback timing backward.
NUDGE+
Moves the playback timing forward.
MEMO
5
You can finely adjust the timing according to the number of
times that you press the button.
5
This applies only during playback. When you stop, the timing
returns to its original state.
5
You can use a system setting to specify whether the MIDI clock
timing is changed.
&
“MIDI TX: Tx Nudge”
Recording to a Variation That’s Not Playing
Here’s how you can record to a different variation without changing
the variation that’s selected to play (TR-REC only).
1
Hold down the
[TR-REC]
button and use the
[A]
–
[H]
buttons to select the variation that you want to
record.
You’ll switch to TR-REC, and can record to the selected variation.
MEMO
You can also select this by holding down the [TR-REC] button and
turning the [VALUE] knob. In this case, you’ll be able to select FILL
IN 1 or FILL IN 2.
Returning to the Beginning of the Pattern
Here’s how to forcibly return to the beginning of the pattern while it’s
playing.
1
Hold down the
[SHIFT]
button and press the
[START/STOP]
button.
Moving to the beginning of a different variation
If more than one variation is selected, here’s how you can move to the
beginning of any one of those variations.
1
Set the basic screen to VARIATION.
2
Hold down the
[SHIFT]
button and press an
[A]
–
[H]
button.
Checking the Value of a Knob or Fader
During playback or editing, here’s how to check the value of each
controller.
1
Hold down the
[SHIFT]
button and operate the
controller whose value you want to check.
The screen shows the parameter and its value.
Moving the controller does not change the value.
Reloading the Value of a Knob or Fader
(Reload Function)
During playback or editing, here’s how you can reload the value of a
controller (return it to the saved state).
1
Hold down the
[UTILITY]
button and operate the
controller whose value you want to load.
The screen shows the parameter and its value.
Moving the controller does not change the value.
Operation
Explanation
[UTILITY] + [KIT]
Load controllers
(all)
[UTILITY] + [INST]
Load controller
(currently selected instrument)