Casella CEL CEL-593 User Manual
Page 2
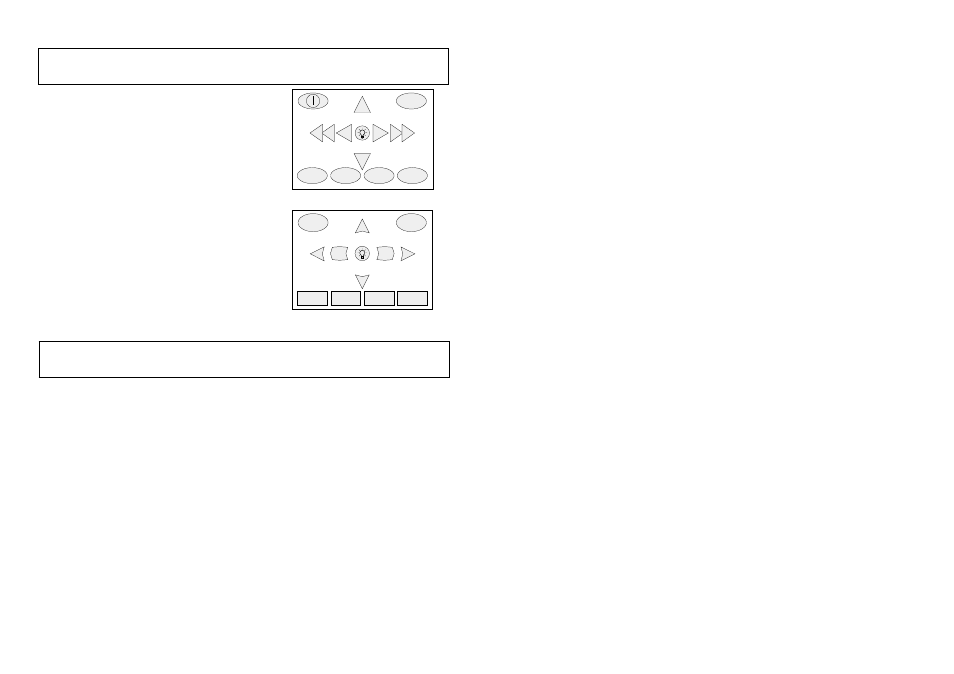
Menus and results are shown on a high
definition screen in both alphanumeric and
graphical formats, while operator
commands are exercised via the keypad in
association with menu options shown on
the instrument display. The earlier and
later keypads are shown here for easy
series identification. The keys have exactly
the same functions despite a different
appearance.
Figure 1 (opposite) shows a typical
screen display with the currently selected
option indicated by the reverse video
cursor field. Options in the four lowest
boxes on the screen are mirrored by the
four areas on the lowest part of the keypad
which allow the respective option to be
implemented.
On most screens, the shallow boxes
immediately above the four option boxes
indicate the current instrument bandwidth,
measurement or recall mode, or real time
measurement status.
Warnings !
2.
Menus & Controls
3.
Installing Microphone, Preamplifier, Interface
Module & Batteries
980007e
ON/OFF
Earlier Series 1 and 2 Keypad
EXIT
Series 3 Keypad
Esc
To prevent DAMAGING the
microphone, the 200 V polarizing
supply must be OFF when a
CEL-250 or MK 250 Electret
Microphone is used.
DO NOT remove the protective grid
from Type 1 microphones as this
will expose the diaphragm to
possible damage.
DO NOT fit microphones or
preamplifiers to the instrument
with the power ON. Screw
microphones and adaptors only
finger tight. Do not use pliers or
other tools.
Repairs of damage caused by a
failure to observe the warnings in
this book will not be covered by
the normal warranty conditions.
If a CEL-250 or MK 250 microphone is
supplied and you dont know whether the
polarizing voltage is OFF, before doing
anything else, check it as described in
Chapter 4.
When the polarizing voltage is known
to be OFF, or some other microphone is
supplied, install microphone, preamplifier,
interface and batteries as follows.
1. With the power OFF, locate the
preamplifier in the guides (Figure 2)
and push firmly into place.
2. Screw the CEL-192 Type 1 Microphone
on to a CEL-527 or CEL-525 Type 1
Preamplifier.
Or: ONLY when polarizing voltage is
already OFF, screw the CEL-250 (or
MK 250) Type 1 Microphone on to a
CEL-527 or CEL-525 Preamplifier.
Or: Screw the CEL-292 Type 2
Microphone on to a CEL-530 Type 2
Preamplifier.
Page 60 - Getting Started - CEL-553/573/593