Winding the bobbin – Baby Lock Sashiko 2 (BLQK2) Instruction and Reference Guide User Manual
Page 18
G
E
T
T
I
N
G
R
E
A
D
Y
17
Winding the Bobbin
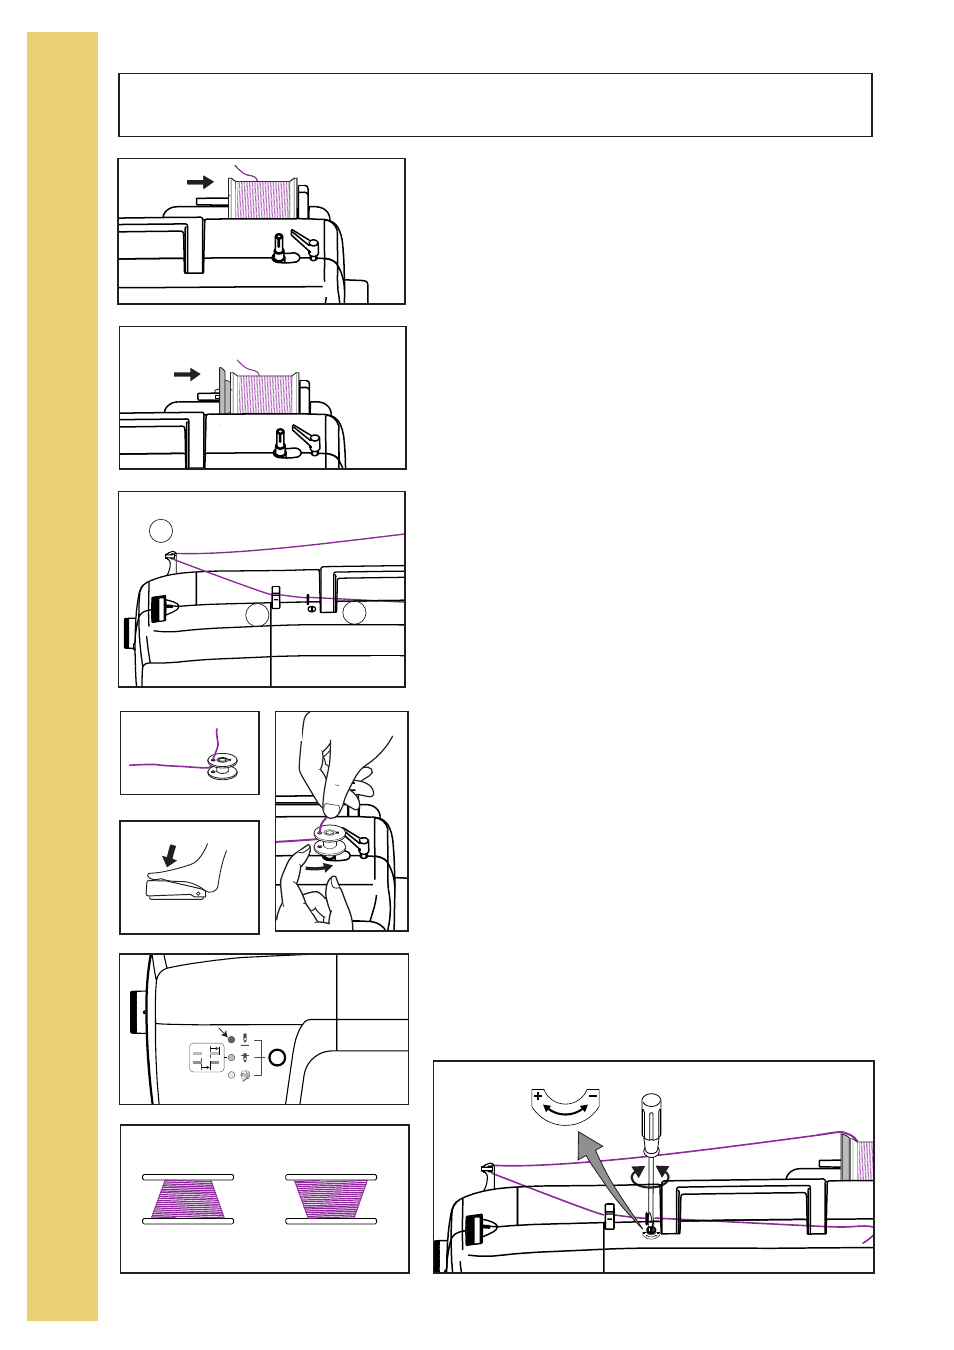
a
b
c
A
B
1. Slide the spool of thread onto the spool pin. (Fig. A)
2. Slide the correct size spool cap onto the spool pin.
(Fig. B)
Spool cap should be close in size to the thread spool,
however should not be smaller. If the spool cap is small-
er than the thread spool, thread may get caught in the
slit on the end of spool and cause damage.
3. Place the thread into the thread guide for bobbin wind-
ing (a), and insert the thread into the pre-tension disk (b)
until the thread snaps into place. Then lay the thread
into the bobbin winder adjustable thread guide (c).
(Fig. C)
4. Insert the end of the thread through one of the holes in
the bobbin going from the inside of bobbin to the outside
as illustrated. (Fig. D)
5. Place the empty bobbin on the bobbin winder shaft.
While holding the thread tail securely in one hand, push
the bobbin winder shaft to the right toward the bobbin-
winder lever. (Fig. E)
Press the foot control to wind bobbin. (Fig. F)
After the bobbin has wound a few turns stop the
machine, cut the thread near the hole of the bobbin and
then continue with bobbin winding.
NOTE: When winding the bobbin the desired speed can
be set with the foot control. Press on the foot control
slowly until you have reached your desired speed.
Maintain the speed for at least 3 to 4 seconds then pres-
sure can be released from foot control. The speed will
maintain constant until the foot control is tapped once to
stop the machine or until the bobbin is fully wound.
6. The bobbin winder will stop automatically once the
bobbin is fully wound and the top LED light will flash the
color blue. (Fig. G)
7. Slide the bobbin winder shaft with the bobbin to the left
and grasp the full bobbin and pull upward to remove.
8. If the thread is winding uneven while winding the bobbin
(Fig. H); adjust the bobbin winder balance adjusting
screw with screwdriver by turning it clockwise toward the
(+) symbol to raise the thread guide or counterclockwise
toward the (–) symbol to lower. (Fig. I)
C
D
E
F
G
H
I