Cloud Electronics 46-120 - CDI-46 User Manual
Page 5
CDI-46 Installation and Setup Guide V1.0
5
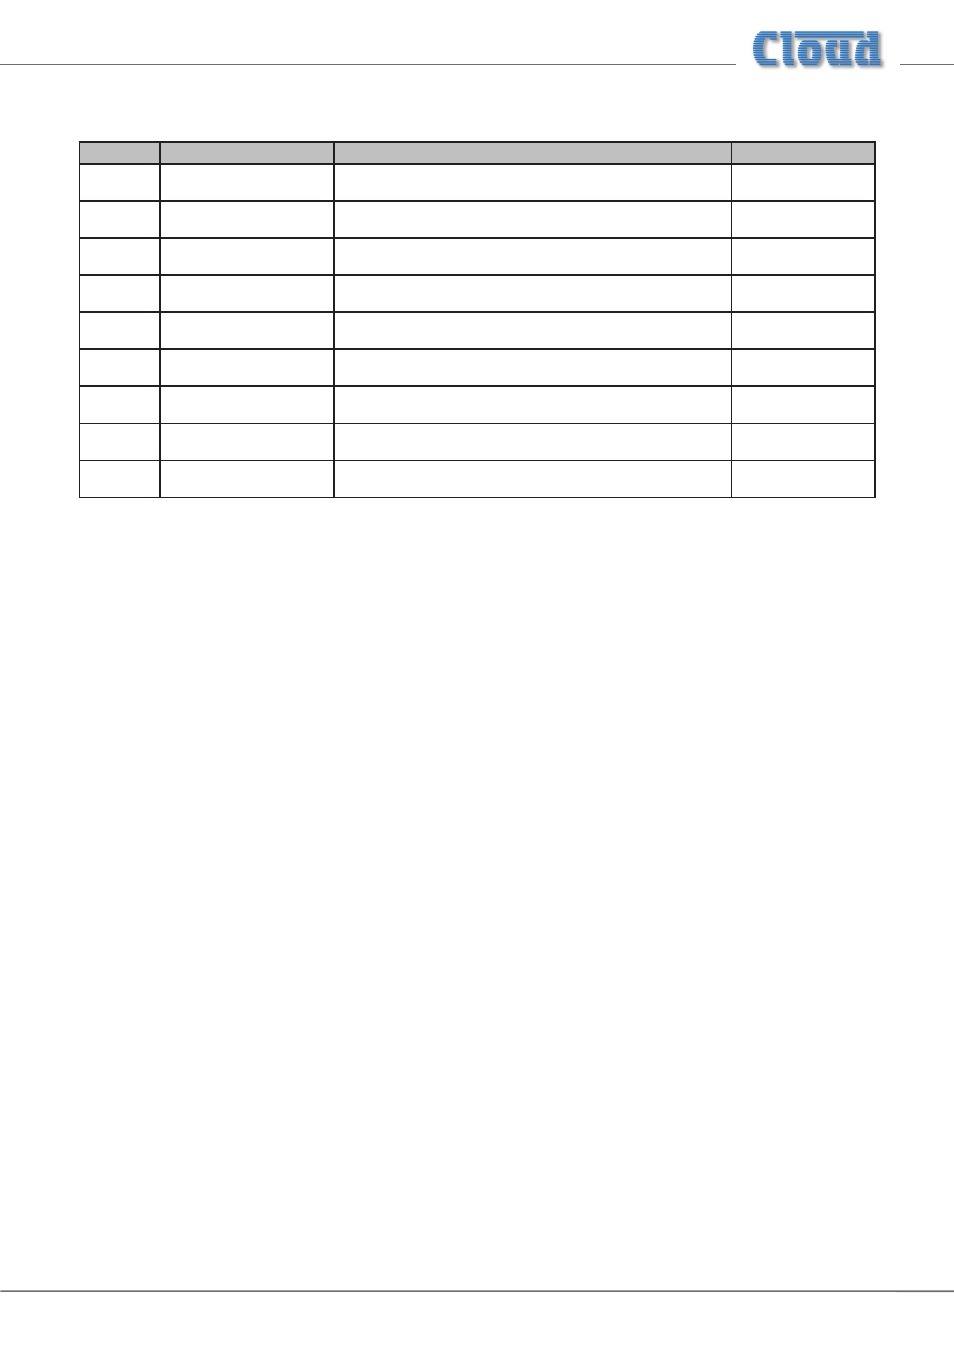
The jumpers concerned, and their functions, are listed below:
JUMPER
DESCRIPTION
EFFECT
DEFAULT
J1
Mic 1 phantom power
OFF: MIC 1 phantom power OFF
ON; MIC 1 phantom power ON
OFF
J2
Mic 2 phantom power
OFF: MIC 2 phantom power OFF
ON: MIC 2 phantom power ON
OFF
J5
Music Mute contacts
N/O: contact closure required for muting
N/C: contact opening required for muting
N/O
J7
Mic over Facility input priority
OFF: No priority
ON: MIC 1 & 2 have VOX-triggered priority over signals at facility port
OFF
J10
Mic1, Zone 1 Access Bypass
PRESENT: Mic has permanent access to Z1
ABSENT: Use access port to enable access to Z1
PRESENT
J11
Mic1, Zone 2 Access Bypass
PRESENT: Mic has permanent access to Z2
ABSENT: Use access port to enable access to Z2
PRESENT
J12
Mic1, Zone 3 Access Bypass
PRESENT: Mic has permanent access to Z3
ABSENT: Use access port to enable access to Z3
PRESENT
J13
Mic1, Zone 3 Access Bypass
PRESENT: Mic has permanent access to Z4
ABSENT: Use access port to enable access to Z4
PRESENT
J17A, B, C*
MIC 1/TEL input transformer
OFF: MIC 1 input accepts standard mics
ON: MIC 1 input suitable for connection to telephone system
OFF
* J17 A, B & C must be moved together.
6. Unplug the 20-pin ribbon cable from CON13 on the line input sub-board (immediately behind the line input phono sockets).
7. Remove the two M3 screws identified on the diagram above from the main PCB (adjacent to CON21 and CON23).
8. Replace the screws with the M3x15 hex pillars supplied with the card.
9. Using small pliers, remove the two jumpers from header CON21 and the four from header CON23 (both on the main
PCB).
10. Hold the CDI-46 card upside-down so that its connectors are facing the front of the chassis. Note that it is supplied with
four ribbon cables already fitted; three of these now project towards the rear of the chassis. Plug the 10-way ribbon cable
coming from CON8 on the CDI-46 card (this one is the left-most of the three) into header CON21 on the main PCB. The
red ident on the ribbon cable should be to the right.
11. Plug the 20-way ribbon cable from CON7 on the CDI-46 card (the middle one) into header CON22 on the main PCB. The
free connector can only go in one way.
12. Plug the 10-way ribbon cable from CON5 on the CDI-46 card (the right-most one) into header CON23 on the main PCB.
The red ident on the ribbon cable should be to the right.
13. Now turn the CDI-46 card the right way up and position it below the line input sub-board so that the three connectors
and two tapped M3 holes align with the empty holes on the rear panel. The two hex pillars should align with the two holes
in the rear of the card.
14. Fix the card in place: use the two M3 screws removed in Step 7 to secure the rear to the hex pillars and the two black M3
screws supplied with the card to fix the connector end of the card to the 46-120 rear panel.
15. Plug the remaining free ribbon cable from the CDI-46 (from CON4 on the card) into the now-empty CON13 on the line
input sub-board.
16. Plug the 20-way ribbon cable which was unplugged in Step 6 into the empty CON6 at the rear of the CDI-46 card.
17. Replace the top cover using the same screws (Step 3).