Sim2 C3X1080 User Manual
Page 2
C3X 1080
ENGLISH
1
1
5
6
+12V
USB 1.1
R/Pr
CONTROL (RS2
32)
GRAP
HICS RGB
C/Y
B/Pb
HV
S-VI
DEO
AUDIO OUT
HDM
I 1
REMO
TE
3
2
S-VI
DEO
MENU
ESC
SOU
RCE
1
4
O
I
HDM
I 2
MENU
11
9
8
12
10
15
16
13
14
17
18
1
4
2
3
7
1 INTRODUCTION
The C3X1080 projector represents the state of the art in image
processing combined with the innovative DLP™ 3 chip 1080p
system and outstanding optics.
Its range of inputs (1 Composite Video input, 1 S-Video input,
1 Components or RGB input, 1 graphic RGB input, 2 HDMI™
inputs) allow it to be connected to a wide range of analogue
and digital sources: DVD players, video recorders, satellite
and terrestrial receivers, computers, video game consoles,
camcorders, etc.
Its image processing system permits optimum reproduction
of a wide range of input signals, from interlaced video to high
definition and digital graphics.
Faithful reproduction of signals at higher resolutions (such
as high definition video and graphics) occurs without loss of
information or reduction of image sharpness thanks to the
processor’s high pixel rate signal acquisition capabilities.
Different input signal resolutions can be adapted to match
the specified screen resolution without loss of image quality,
thanks to a generous selection of preset aspect ratios, some
of which are user definable.
All picture adjustments can be made with the remote control
interacting with a simple menu-activated On Screen Display;
alternatively, the projector can be controlled by a domestic
automation system through its serial port or USB port.
The appliance has been subjected to exhaustive operating
tests by SIM2 to ensure the very highest quality.
The projector bulb life should thus initially be around 30-60
hours. In addition to the customary checks, the Quality
Control department also runs additional statistical tests
before shipment.
In such cases, the packaging may show signs of having
been opened, and the hours of lamp operation shown may
prove to be higher than those normally shown when only
standard tests are performed.
CONTENTS
1 INTRODUCTION
1
2.1 REMOTE CONTROL
2
2.2 KAYPAD
2
3 IMPORTANT SAFETY INSTRUCTIONS
3
4 UNPACKING
5
5 INSTALLATION
6
6 SWITCHING THE PROJECTOR ON AND OF
8
7 PROJECTOR STATUS
9
8 CONNECTIONS BOARD
9
9 REMOTE CONTROL
11
10 ON SCREEN MENU
11
11 CLEANING AND MAINTENANCE
20
12 COMMON PROBLEMS
20
13 OPTIONAL ACCESSORIES
21
14 TECHNICAL SPECIFICATION
22
APPENDIX
APP.1 PROJECTION DISTANCES
APP.2 DIMENSIONS C3X 1080
APP.3 INSTALLATION INSTRUCTIONS
DLP and DMD are registered Texas Instruments trademarks.
HDMI, the HDMI logo and the expression High-Definition Multimedia Interface
are trademarks or registered marks of HDMI licensing LLC.
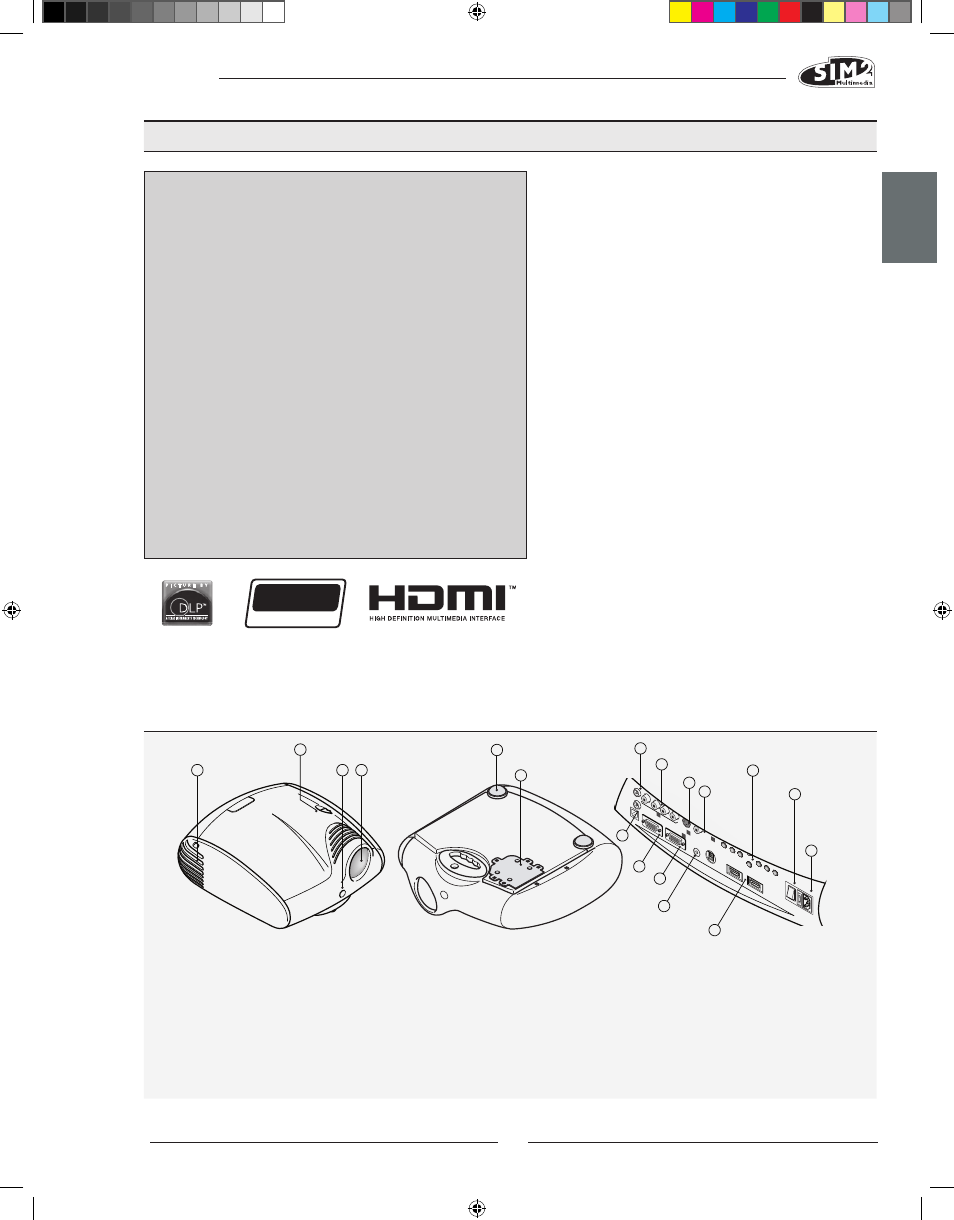
1 Projection lens.
2 Lens shift knob.
3 Remote control IR sensor on front of unit.
4 Cooling air vents.
5 Adjustable feet.
6 Bulb compartment.
7 Fused power socket.
8 Main power switch.
9 Control keypad
10 Composite video input.
11 S-Video input.
12 RGB / YCrCb input.
13 2 HDMI input
14 Remote control input
15 VGA input
16 RS232 serial interface.
17 USB 1.1 interface
18 Motorised screen control outputs.
PROJECTOR
FULL HD
1920
x
1080
460722000