English – Sim2 C3X1080 User Manual
Page 5
C3X1080
ENGLISH
4
• Be careful with cables.
Make certain cables are routed so that people will
not be impeded or tripped up. Keep all cables away
from children. Install the unit as close to the wall socket
as possible. Avoid stepping on power cables, make
certain they do not become tangled, and never
jerk or tug them; do not expose them to sources of
heat, and make sure they do not become knotted
or crimped. If the power cables become damaged,
stop using the system and request the assistance of
an authorised technician.
• Disconnect the unit from the mains power supply in the
event of electrical storms and when not in use.
To prevent damage from lightning strikes in the vicinity,
disconnect the unit during storms or when the system
is going to be left unused for a long time.
• Avoid contact with liquids and exposure to damp.
Do not use the unit near to water (sinks, tubs, etc.); do
not place objects containing liquids on or near to the
unit and do not expose it to rain, humidity, drops of
water or sprays; do not use water or liquid detergent
to clean it.
• Do not allow the unit to overheat.
To prevent this, allow a free space of at least 40 cm at
the back of the projector. Do not obstruct the ventila-
tion slots. Do not place the unit near to heat sources
such as heaters, radiators or other devices (including
amplifiers) that generate heat. Do not place the unit
in any area where there is insufficient space (shelving
units, bookshelves, etc.) and in general avoid placing
it in poorly ventilated areas as this may prevent suf-
ficient cooling.
• Never look directly at the projection lamp.
Never look directly at the lamp when it is on as the
intense light may damage your eyes. Take particular
care that children cannot do so.
• Position the unit on a stable surface.
Place the projector on a stable surface or use the
provided ceiling mounting bracket.
Never place the projector on its side or rear, on the
lens or top panel.
• Do not insert objects through the openings in the unit.
Make sure that no objects are inserted inside the
units. If this should occur, disconnect the unit from
the power supply immediately and call an authorised
technician.
• Switch Off.
Disconnect the mains power supply when the projec-
tor is not in use. This will considerably reduce power
consumption and also lengthen the service life of the
unit’s electrical circuitry.
• Read this manual carefully and keep it in a safe
place for future consultation.
This manual contains important information on how
to install and use this equipment correctly. Before
using the equipment, read the safety regulations
and instructions carefully. Keep the manual for future
consultation.
• Do not touch internal parts of the units.
Inside the housing there are electrical parts carrying
dangerously high voltages and parts operating at high
temperature. Never open the housing. Any servicing and
repair work must be performed by an authorised Service
Centre. Opening the housing voids the warranty.
• Disconnecting the appliance from the power supply.
The device which disconnects the unit from the mains
is the power plug. Ensure that the power cable plugs
and the electrical mains socket outlets are eas-
ily accessible during installation operations. Pull the
plug, not the cable, to disconnect the unit from the
mains.
• Use only the specified power supply.
Connect the units to a mains electrical supply with
rated voltage of between 110-240 VAC, 50/60 Hz and
equipped with a protective earth connection. If you
are not sure of your domestic mains rating, contact
an electrician. Take care to avoid overloading the
power socket and any extension leads.
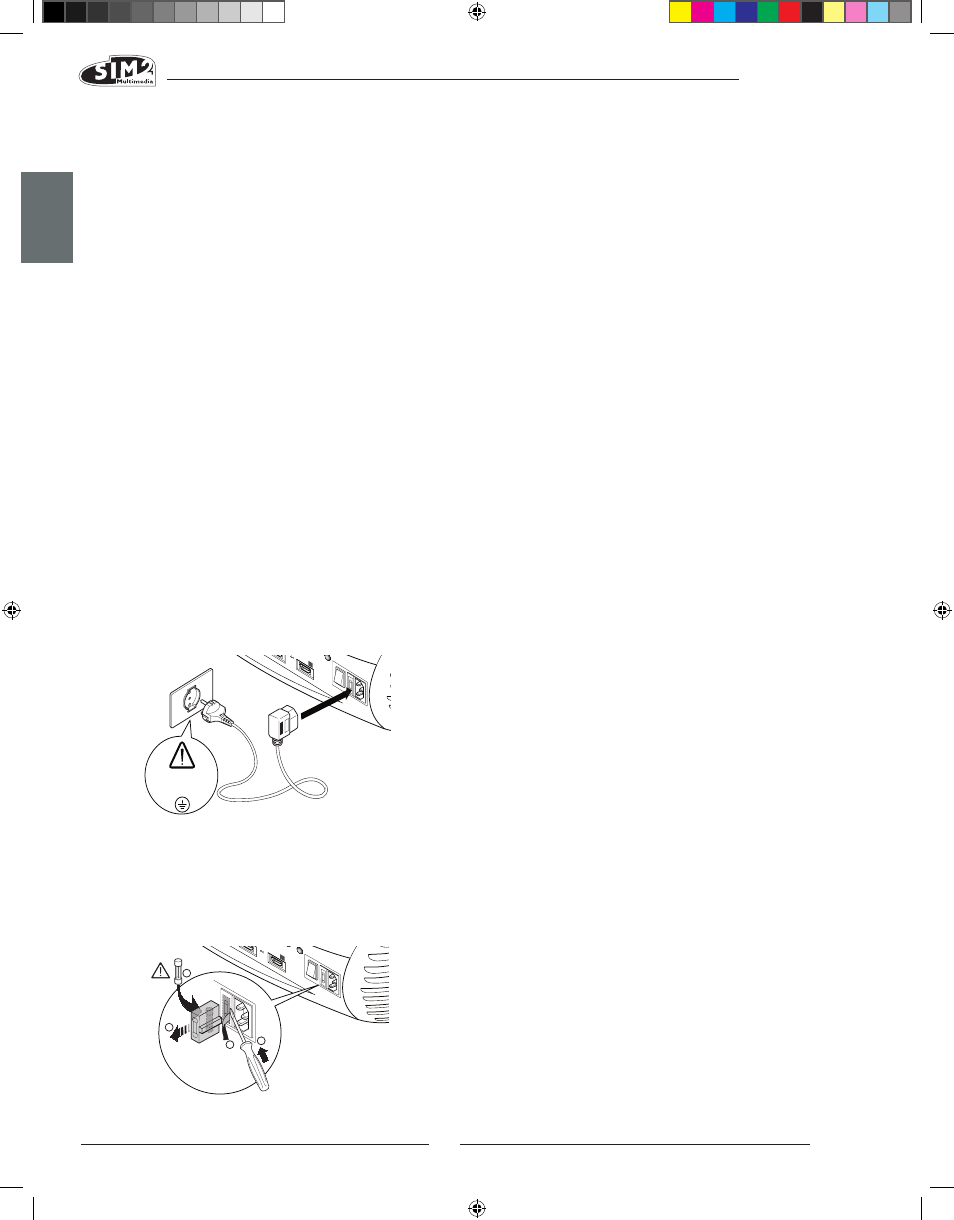
• Connection of the units to the mains power supply.
Connect the unit as shown in Fig. 2.
• Changing the fuses. Before changing the fuse
disconnect the unit from the mains power supply.
The fuse compartment is next to the power supply
connector (Fig. 3). Remove the fuse holder (2) with a
flat head screwdriver and replace the fuse (3). Fit the
replacement fuse (4). Use only T 5A H fuses.
Fig.3
110-240 Vac
50/60 Hz
HDM
I 1
ESC
SOURCE
5
0
I
HDM
I 2
6
ESC
SOURCE
0
I
250 V
T 5A H
3
4
2
1
HDMI 2
6
Fig.2