Alto Professional ZMX164FX USB User Manual
Page 5
5
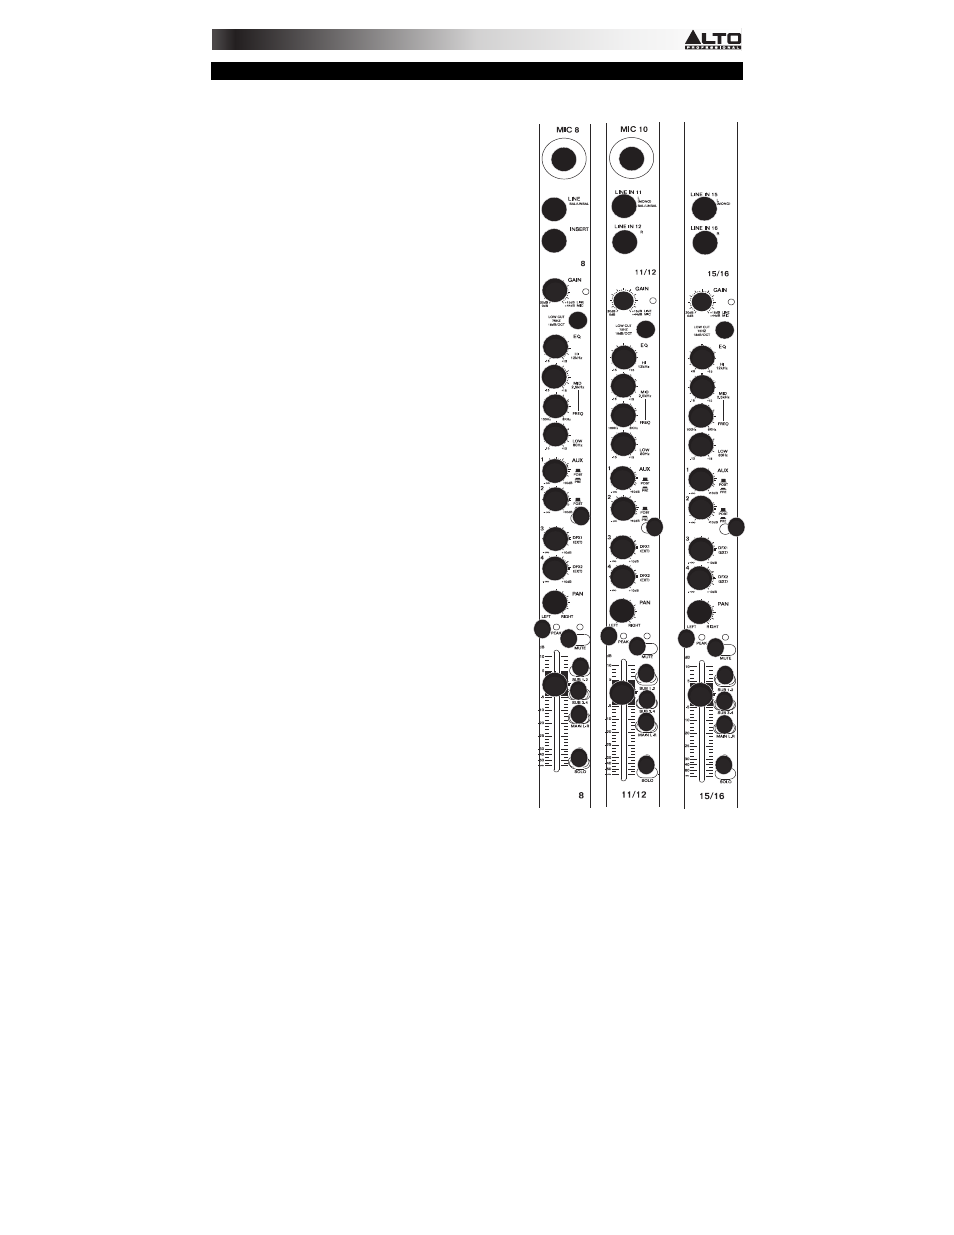
TOP PANEL FEATURES
Note: The channels have essentially the same controls with some minor variations between Channels 1-8, 11-12, 15-
16. The three different channel types are shown here.
1.
MIC INPUT – Connect a microphone to these inputs with
an XLR cable.
2.
LINE INPUT – Connect line-level devices to these inputs
with 1/4" cables.
3.
INSERT – Use a standard 1/4" TRS cable to connect an
external processor (such as a compressor, limiter, external
EQ unit, etc.) to this jack. The signal will be taken after the
channel's gain control and returned before the channel's
EQ controls.
4.
GAIN – Adjusts the channel audio level (pre-fader and
pre-EQ gain). Adjust this so that the PEAK LED just
barely lights up during the loudest parts of the song.
5.
LOW CUT FILTER – When this button is depressed, that
channel's audio will be sent through a 75 Hz low-
frequency filter with a slope of 18 dB per octave. This is
useful for reducing hum and other low-frequency noise
when using microphones.
6.
HI EQ (TREBLE) – Adjusts the high (treble) frequencies of
the channel.
7.
MID EQ – Adjusts the mid-range frequencies of the
channel.
8.
MID FREQUENCY SELECTOR – Adjusts the frequency
band affected by the MID EQ knob.
9.
LOW EQ (BASS) – Adjusts the low (bass) frequencies of
the channel.
10.
AUX SEND CHANNEL VOLUME – Adjusts the audio level
sent from that channel to the Aux Channel (which is sent
out the AUX SENDS and controlled by the AUX SENDS
VOLUME knobs). The top two knobs can adjust the pre-
or post-fader levels (as determined by the AUX PRE-
/POST-FADER SWITCH). The bottom knob can adjust
the level of the signal sent to the mixer's effects processor.
11.
AUX PRE-/POST-FADER SWITCH – When the button is
depressed, the audio sent to the corresponding AUX
SENDS is taken before the channel's fader. When the
button is raised, the audio sent to the AUX SENDS is
taken after the channel's fader.
12.
CHANNEL PAN / BALANCE – If this knob is labeled
"PAN," it adjusts the (mono) channel's position in the
stereo field. If the knob is labeled "BAL," it adjusts the
balance between the two mono channels of that stereo
signal.
13.
PEAK LED – The LED will flash if the signal is clipping. If
this happens, decrease the setting of the GAIN knob or
CHANNEL FADER.
14.
CHANNEL FADER – Adjusts the audio level on the
channel.
15.
CHANNEL MUTE – Press this button to mute/unmute the
channel. The channel's audio will only be sent to its
INSERT or heard in the Solo Channel when its SOLO
button is depressed.
16.
CHANNEL ASSIGNMENT – Use these buttons to send
the channel to a subgroup, multiple subgroups, and/or the
main mix. Subgroup levels are controlled by the
SUBGROUP VOLUME FADERS; the main mix level is
controlled by the MAIN MIX FADER.
17.
SOLO – When this button is depressed, the audio will be heard in the Solo Channel, which will become the
only audio sent to the PHONES OUTPUT and CTRL OUTS. The LED METERS will also display the audio
levels, which are controlled by the PHONES and CTRL ROOM volume knobs.
1
1
2
2
2
3
2
2
1
5
5
5
1
12
12
4
4
4
6
16
16
17
17
17
18
18
18
19
19
19
1
10
1
10
1
10
1
10
1
10
1
10
11
11
11
12
1
10
1
10
1
10
1
10
1
10
1
10
13
13
13
1
14
1
14
1
14
15
15
15
16
16
16
16
16
16
16
16
16
17
17
17