Step 2: fasten hood support rails, Step 4: install hood rails – Greenheck Hooded Propeller Fans Exhaust and Supply (455601) User Manual
Page 2
2
Hooded Propeller Roof Fans • Exhaust and Supply
®
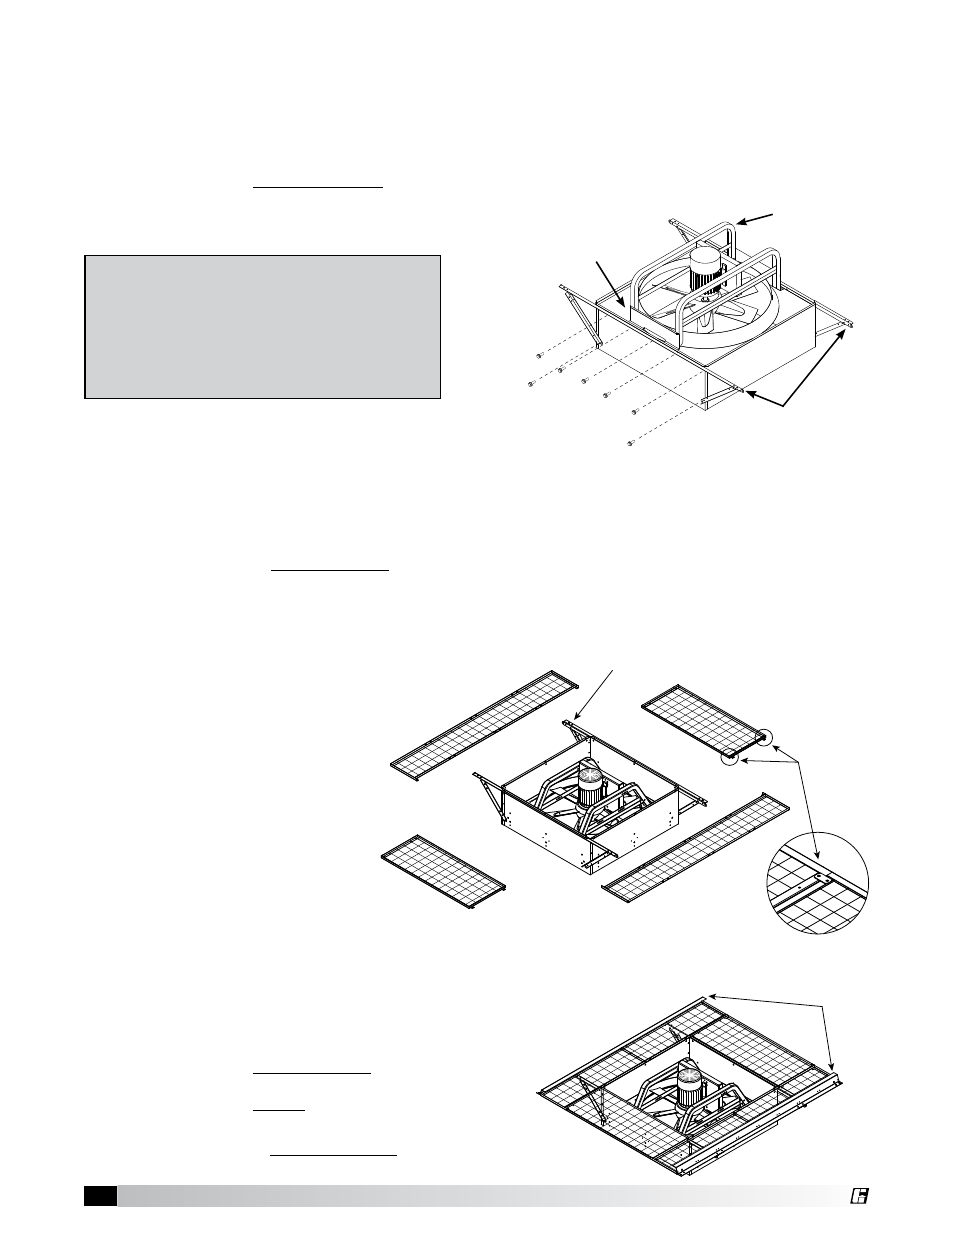
Step 2: Fasten Hood Support Rails
Hardware Required:
Hardware Package #816526
3/8” - 16 x 3/4” hex head spinlock bolts & nuts
Quantity:
Up to (8) fasteners per side for 72” fans, less required for smaller sizes.
Instructions:
WRENCH TIGHTEN the hood support rails to fan base with rails perpendicular
to fan drive frame as shown. Mounting holes in fan base will line up
with holes in hood support rails.
IMPORTANT!
Supply Fans (Models RBS, RBCS, RS2, RCS3)
The fan panel bolts are also used for the hood
support rails. Remove fan panel bolts (one
side at a time) and reinstall through the hood
support rails.
Step 3: Install Birdscreen Sections
Hardware Required:
Hardware Package #816528
5/16” - 18 x 3/4” weld studs and spinlock nuts
Quantity: Only 10 sets required of the 26 sets provided.
Instructions:
A) FINGER TIGHTEN the long birdscreen sections to the hood support
rails at the locations indicated using the 10 sets of fasteners.
B) Lay the short birdscreen sections in place and rotate the quick release
fasteners on the underside of the birdscreen to secure. (See Detail 3).
Step 4: Install Hood Rails
Hardware Required:
Hardware Package #816527
3/8” - 16 x 1-1/2” hex head spinlock bolts and nuts
Quantity: 4 sets
Instructions:
A) Position the (2) hood rails as shown and
FINGER TIGHTEN the fasteners. These
fasteners will be wrench tightened in
Step 5D after the hood panels are
installed and secured.
B) WRENCH TIGHTEN the fasteners in the
long birdscreen sections.
Fan Drive
Frame
Fan
Panel
Hood support rails
perpendicular to
fan drive frame
Fastener
Location
Quick
Release
Fastener
Detail 3
Hood
Rails
Detail 4