Step 4 step 3 – Kreg KRS1030 Universal Steel Stand User Manual
Page 3
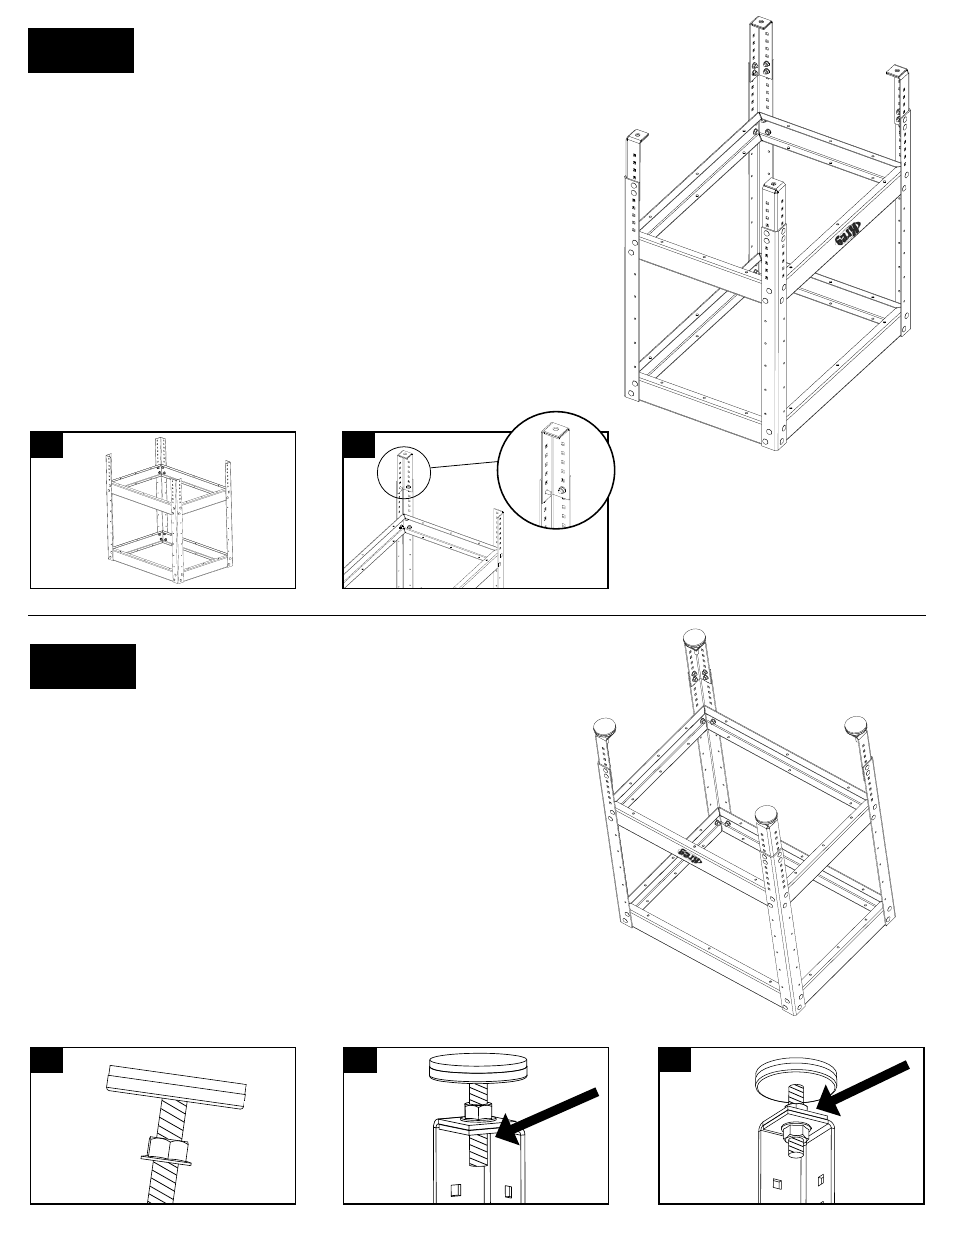
Installing Height adjusters:
In this step you will be adding the Height Adjusters to the bottom of each Leg.
Place the Steel Stand face-down on your work surface so that all four legs are pointed
up in the air, and are easily accessible, as shown in image A. Place the height
adjuster into the base of the Leg, with the squared end at the bottom of the stand, as
shown in image B. Each Height Adjuster has several holes that allow you to fi ne
tune your stand height for optimum working conditions. After you have determined
the correct spacing, line up the holes appropriately, insert the four carriage bolts, and
begin to thread the fl ange nuts onto the bolts.
Once the fl ange nuts are tightened suffi ciently, repeat this process for the three
remaining Height Adjusters. After this is complete, you will be ready to install the 4
levelers at the base of the Height Adjusters.
Step 4
Step 3
Installing Levelers:
In this step you will be adding the Levelers to the bottom of each Height Adjuster.
Rotate one fl ange nut onto the Leveler stud, and thread it down until it is approximately
one inch from the base of the leveler foot, as shown in image A. Then, place the
Leveler Stud through the opening in the bottom of the Height Adjuster, as shown in
image B. Thread the second fl ange nut onto the Leveler stud, and tighten to lock the
Leveler into place on the Height Adjuster, as shown in image C.
Once the fl ange nut is tightened suffi ciently, and the Leveler is locked into place,
repeat this process on the remaining three (3) Levelers. After all three Levelers are
locked into place, it is a good idea to position the stand right-side-up and test it for
level. Based on your readings, you can adjust the Levelers to compensate for any
discrepancies in the stand or on your fl oor. Simply loosen the two fl ange nuts on the
leveler you wish to adjust, make your small height adjustment, and retighten the nuts
into place. Repeat as necessary.
A.
B.
A.
B.
C.
Step 3 -
Final Assembly
Shown
Step 4 -
Final Assembly
Shown