Operation, Maintenance – Kreg DB210 Foreman Pocket-Hole Machine User Manual
Page 12
Operation
9.
1. Keep the motor clean and the machine base free of wood chips
and dust. When used without a shop vacuum, routinely remove
waste material from inside the cabinet or mount the machine on
an open stand that prevents waste-material accumulation.
2. Periodically lubricate the guide rods with a dry-film lubricant
such as Dri-Tool™ Lubricant from Empire Manufacturing. A dry
film lubricant will not collect wood chips and dust and will extend
the life of the bearings and the guide rods. The motor link and
linkage associated with the clamping mechanism should be
lubricated periodically to ensure free movement.
3. Use a sharp drill bit. You can drill between 4,000 and 5,000
holes in oak before sharpening the bit. Adjust your sharpening
schedule for your settings and the material that you are
drilling. Keeping the drill bit clean and free of pitch, resin,
and glue significantly extends the life of the bit. Periodically
clean the drill bit with a cleaner such as Blade Saver™ and
apply a dry lubricant such as OptiCut-XL™, both from Empire
Manufacturing. Even a dirty drill bit can be very sharp, so
exercise caution when handling the cutting edges.
Kreg offers a sharpening service for Standard pocket-hole
drill bits only. Call or e-mail customer service at 800.447.8638 /
[email protected] for details.
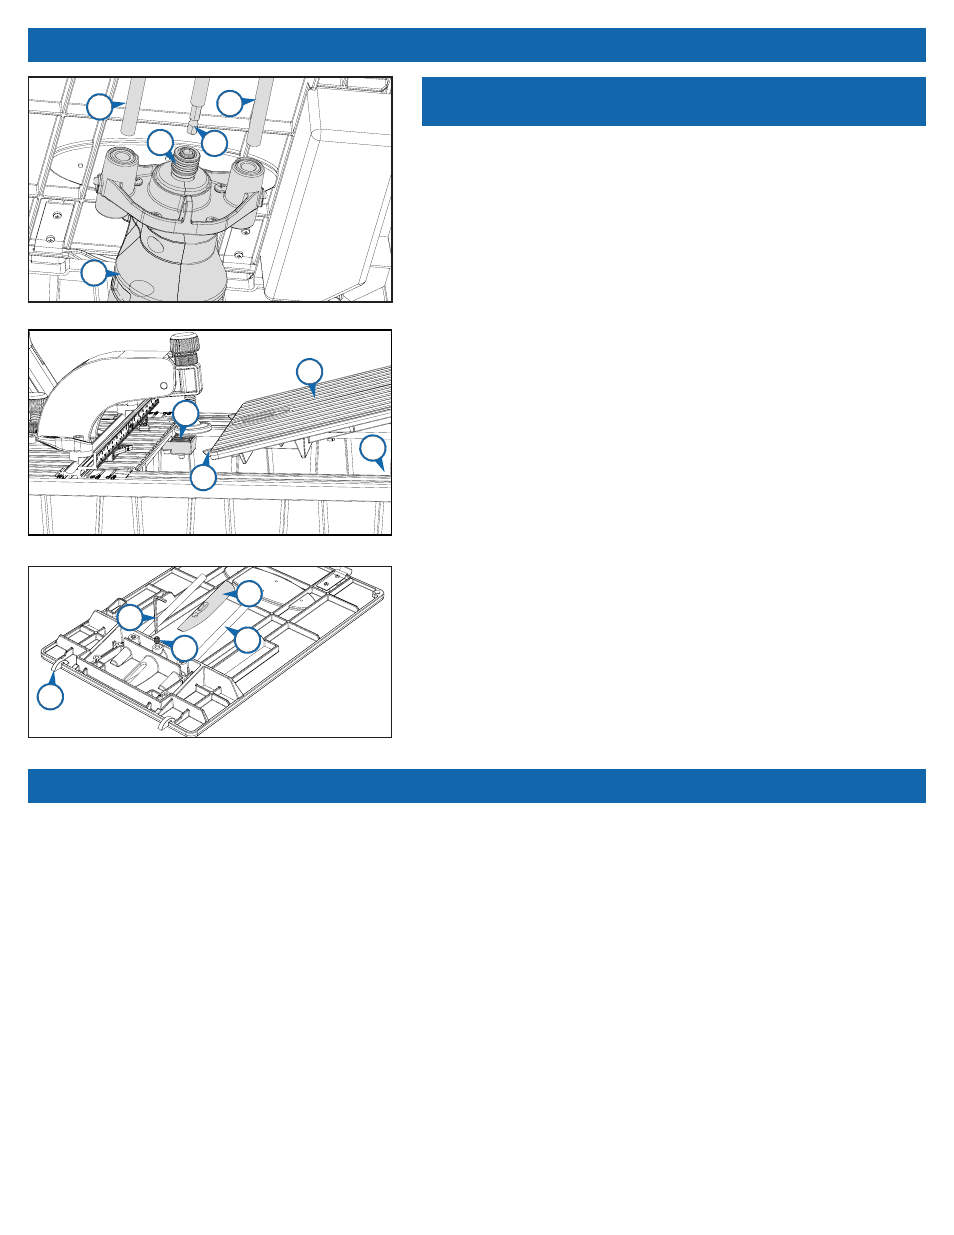
Use the appropriate procedure below when replacing a drill bit
or installing the optional Micro or HD drill bits and drill guides.
To protect the workpiece stops (32) when opening the access
panel (11), release the fence-lock handles (15) and move the
fence (16) all the way back. Turn the clamp adjustment knob (27)
counterclockwise to raise the clamp pad (26). Open the access
panel and engage the panel support (38). Remove the link-release
pin (39) and slide the motor (40) off the guide rods (41).
To replace the drill bit (20), pull the quick-change chuck (42) collar
forward and remove the drill bit. Insert the new drill bit hex shank
into chuck, and release the collar. Slide the motor onto the guide
rods, inserting the drill bit into the drill guide (23). Align the motor
link (43) with the link hole on the motor, and insert the link-release
pin. Disengage the access panel support and close the panel.
When switching to the optional Micro or HD drill and guide, change
the drill bit as instructed above. Then disconnect the vacuum hose
(10) from the vacuum shroud (7). Lift the access panel off the
machine, disengaging the hinge pivots (44) on the access panel
from the pivot sockets (45) on the machine top (12).
Place the access panel upside down on a flat surface (for example,
a tablesaw table). Loosen the drill-guide set screw (46) with the
3mm hex wrench (13) and remove the drill guide. Firmly holding the
access cover against the flat surface, slide the new drill guide into
the opening, rotate it so the angled face is against the flat surface,
and tighten the set screw.
Install the access panel on the machine and engage the panel
support. Reconnect the vacuum hose to the vacuum shroud. Slide
the motor onto the guide rods, inserting the drill bit into the drill
guide. Connect the motor link (43) to the motor with the link-release
pin and close the cover.
Replacing a drill bit or installing a drill bit and
drill-guide set
41
45
11
46
12
13
44
42
40
41
20
41
44
Maintenance
23