English – Marantz SR6001 User Manual
Page 46
ENGLISH
43
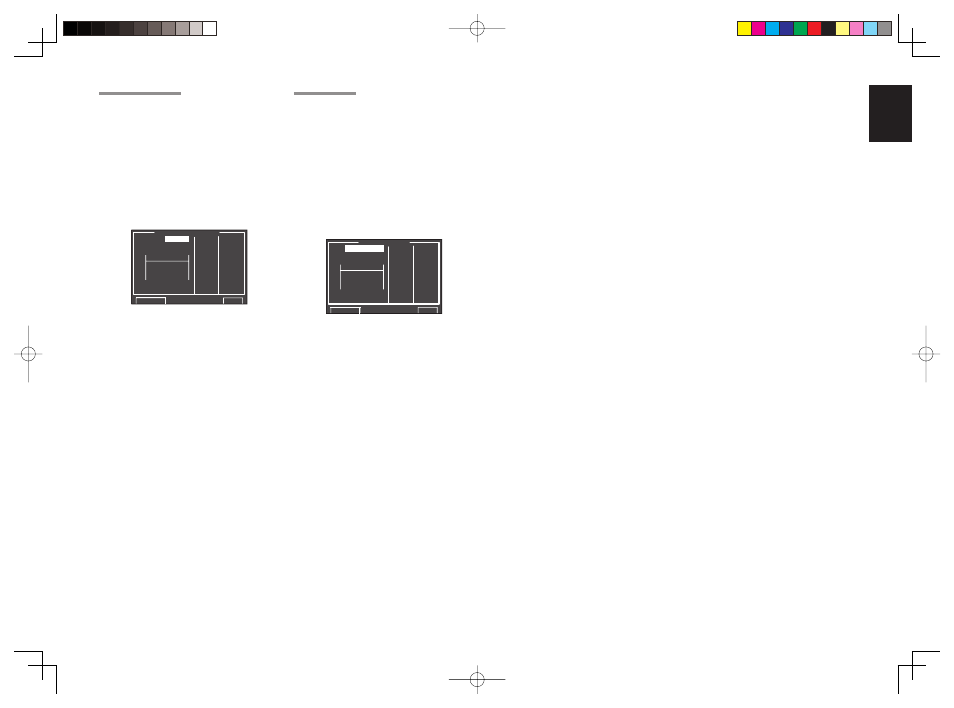
6-2 CHECK AUTO
These menus are for confirming the results of
AUTO SETUP function equalizer measurement
(AUDYSSEY, FRONT, FLAT).
1.
Select
“6. ACOUSTIC EQ” from MAIN MENU
with the
3 or 4 cursor buttons and press the
ENTER button.
2.
Select
“CHECK AUTO” with the
3 or 4 cursor
buttons.
3.
Press the ENTER button to enter the
selection.
C H E C K A U T O
M D :
A U D Y S S E Y
6 3 0 . 0
C H : F L 1 2 5 0 . 0
2 5 0 0 . 0
5 0 0 0 . 0
1 k 0 . 0
2 k 0 . 0
4 k 0 . 0
8 k 0 . 0
1 6 k 0 . 0
R E T U R N
E X I T
63
125 500
2k
8k
250 1k
4k
16k
+9
0dB
-20
Select MD (mode) with the
3 / 4 cursor buttons
followed by the desired equalizer (“AUDYSSEY”,
“FRONT”, “FLAT”).
CH:
Select the channel to check with the
1 or 2 cursor
buttons.
Notes:
• The frequency will not be exactly the same as in the
Preset G. EQ modes.
• FL and FR are not indicated on the CHECK AUTO
2 menu.
4.
Once
fi nished checking, select “RETURN” with
the
3 / 4 cursor buttons and press the ENTER
button to return to the “6. ACOUSTIC EQ”
menu.
6-1 PRESET G. EQ ADJ
These modes allow you to set a 9-band graphic
equalizer for each of the 7 channels.
1.
Select
“6. ACOUSTIC EQ” from MAIN MENU
with the
3 or 4 cursor buttons and press the
ENTER button.
2.
Select
“PRESET G. EQ ADJ” with the
3 or 4
cursor buttons.
3.
Press the ENTER button to enter the
selection.
63
125 500
2k
8k
250 1k
4k
16k
P R E S E T A D J U S T
R E S E T :
C H
6 3 0 . 0
C H : F L 1 2 5 0 . 0
2 5 0 0 . 0
5 0 0 0 . 0
1 k 0 . 0
2 k 0 . 0
4 k 0 . 0
8 k 0 . 0
1 6 k 0 . 0
R E T U R N
E X I T
+9
0dB
-20
RESET:
Using the
1 or 2 cursor buttons, select the
channel(s) to be reset to either the currently
displayed channel (“CH”) or all channels (“ALL”),
and press the ENTER button to enter the setting.
“ALL” : Resets all channels.
“CH” : Resets only the currently displayed
channel.
CH:
Select the channel (“FL”, “C”, “FR”, “SR”, “SBR”,
“SBL” or “SL”) to adjust with the
1 or 2 cursor
buttons, and switch to the adjustment mode with
the
4 cursor button.
Frequency:
Select the target frequency on the graph with the
1 or 2 cursor buttons and press the ENTER button
to enter the selection. Adjust the level with the
3 or
4 cursor buttons. (Note that this can be adjusted
to any level between –20 and +9 dB in 0.5 dB
increments.)
Move to the next frequency with the
1 or 2 cursor
buttons, and adjust the level.
After you complete this portion of the setup, press the
ENTER button to enter the settings. Move cursor to
“RETURN” with the
3, 4, 1 and 2 cursor buttons and
press the ENTER button.
SR6001U DFU_1_ENG 2_4.indd 43
SR6001U DFU_1_ENG 2_4.indd 43
06.12.21 4:14:36 PM
06.12.21 4:14:36 PM