Marantz DV6600 User Manual
Page 12
– 12 –
EN
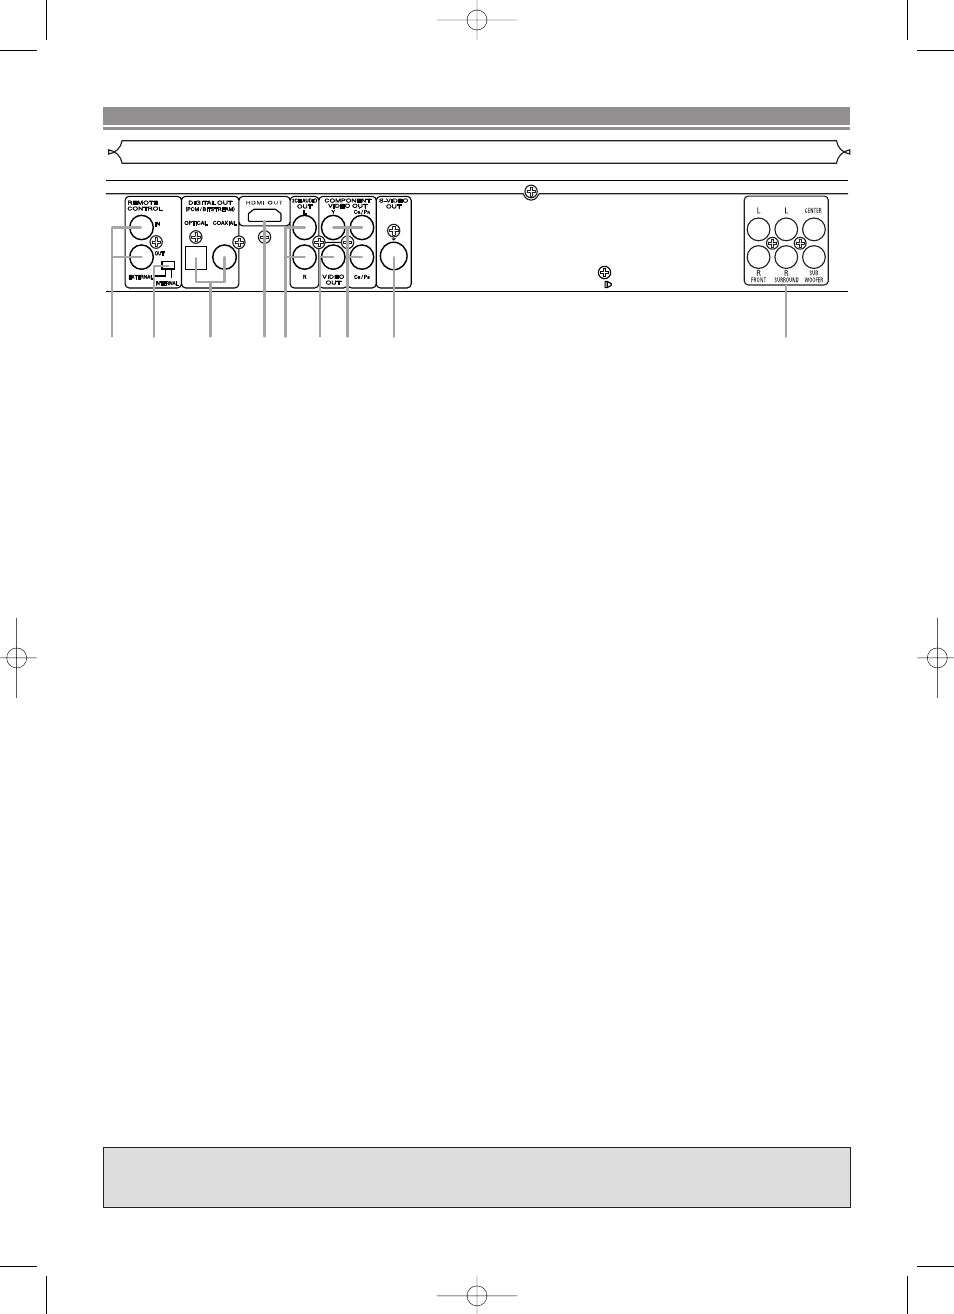
1. DIGITAL OUT Jacks
Use either an optical or coaxial digital cable to connect to an AV amplifier.
2. HDMI OUT Terminal
Use an HDMI connection cable (commercially available) to connect to a display with an HDMI terminal.
3. 2CH AUDIO OUT Jacks
Connect to the Audio input jacks of your TV or Stereo system.
4. VIDEO OUT Jack
Use a video cable to connect the jack to the Video input jack of your TV or Stereo system.
5. COMPONENT VIDEO OUT Jacks
Use these jacks if you have a TV with Component Video input jacks. These jacks provide C
R
/P
R
, C
B
/P
B
and Y video.
Component Video provides the best picture quality.
6. S-VIDEO OUT Terminal
Use the S-Video cable to connect this terminal to the S-Video input terminal of your TV for higher picture quality.
7. 5.1CH AUDIO OUT Jacks
Use Audio cables to connect these jacks to the 5.1 ch Audio input jacks of your AV amplifier with 5.1-channel input
jacks.
8. REMOTE CONTROL IN/OUT Jacks
By connecting this DVD player to another Marantz audio component using a supplied Remote control bus cable, you can
remotely operate the components as a signal system.
9. REMOTE CONTROL EXTERNAL / INTERNAL Switch
Set this switch to “INTERNAL” when using this DVD player independently. If you use this DVD player in a system with a
Marantz receiver equipped with a remote sensor, set the switch to “EXTERNAL”.
NOTES:
• When there is video output from the HDMI OUT terminal, no progressive signal is output from the COMPONENT VIDEO
OUT jacks.
• When connecting to a component with a remote sensor, be sure to connect the REMOTE CONTROL IN jack of this DVD
player to the REMOTE CONTROL OUT jack of the component.
• When connecting to a component which is not equipped with a remote sensor, be sure to connect the component to the
REMOTE CONTROL OUT jack of this DVD player.
Selecting Progressive Scan (525p/480p or Interlaced 525i/480i) Playback
• If your TV is compatible with progressive scanning (525p/480p), connect the TV to the COMPONENT VIDEO OUT jacks of
the DVD player and set “PROGRESSIVE” to “ON” in the display setting. Next, set your TV to the progressive scan mode.
Refer to page 28 for instructions on changing the display setting.
• If your TV is not compatible with progressive scanning, set “PROGRESSIVE” to “OFF”.
• Use a commercially available adaptor if the video input jacks of your TVs or monitors are the BNC type.
What is Progressive Scanning?
• Unlike conventional interlace scanning, the progressive scan system provides less flickering and images in higher resolution
than that of traditional (525i/480i) television signals.
CONNECTIONS
7
5.1CH AUDIO OUT
9
6
5
4
1
2
3
8
Description - Rear Panel
The DCDi (Directional Correlational Deinterlacing) system of this DVD player produces smooth and
natural video images, even if really dynamic, by eliminating the jagged edges.
*“DCDi” is a trademark of Faroudja, a division of Genesis Microchip Inc.
E61M5UD(EN).qx3 05.9.14 5:08 PM Page 12