Fade-in, fade-out and crossfade curves, Audio processing, Pitch/time stretch – Teac X-48MKII User Manual
Page 45: Consolidate, Pitch/time stretch consolidate, 6 – editing
TASCAM X-48MKII
45
10 When adjusting the crossfade is possible, the fades
of Clip 1 and Clip 2 will not be adjusted, so the fade
tool will not appear even when the cursor is placed
at the top of a clip.
In addition, if you adjust the start point of Clip 2 or
the end point of Clip 1 in step 6 or 9, the clips will
no longer overlap, making it impossible to adjust
the crossfade. If you have done this, undo the edit
so that you can adjust the crossfade.
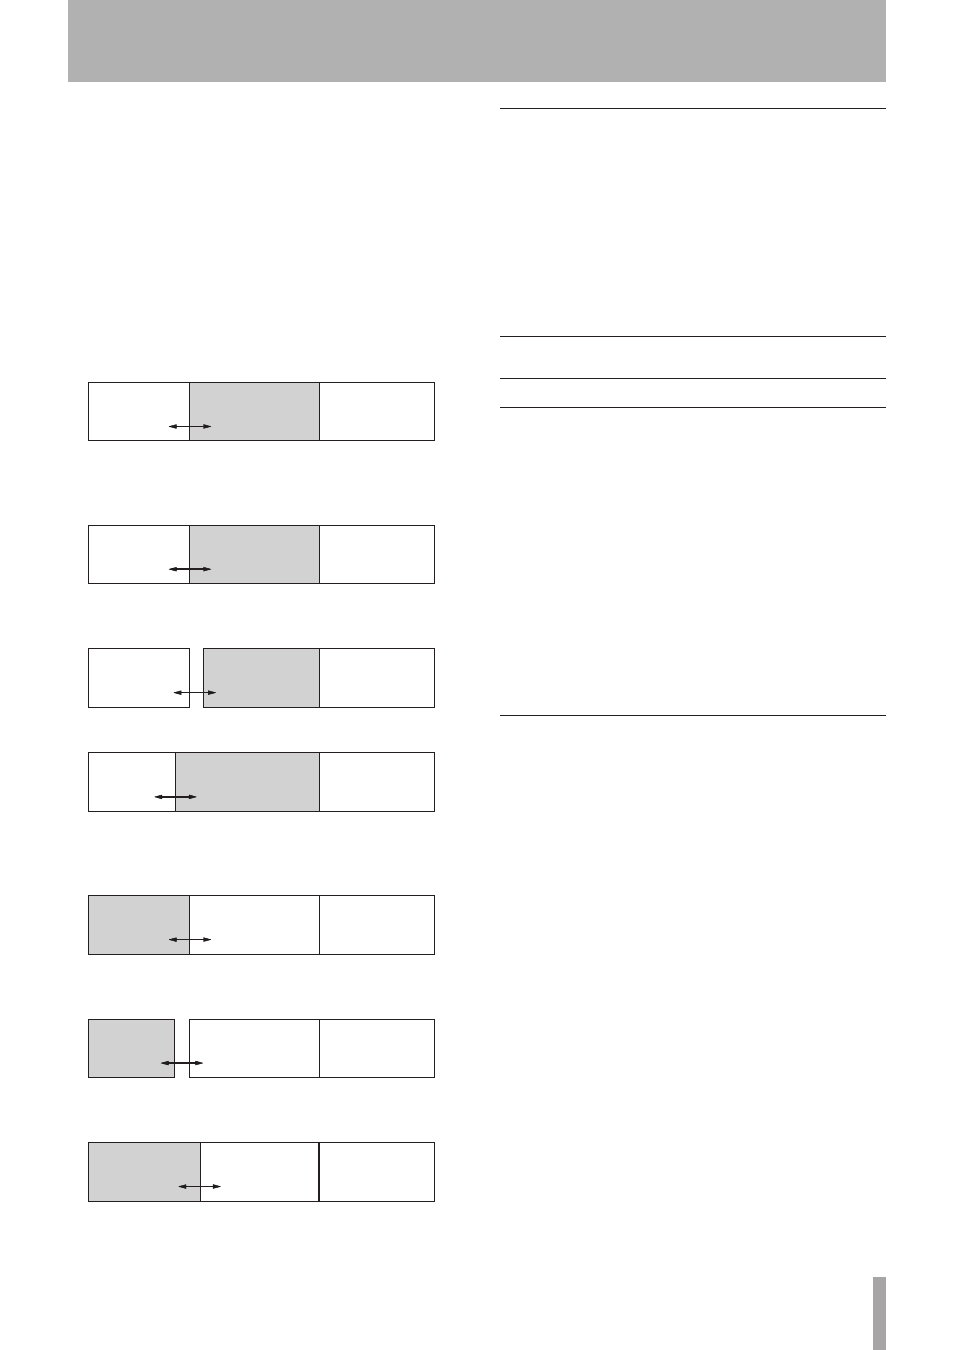
11 To readjust the clip border, fix the start point of the
clip on the right and the end point of the clip on the
left first. For example, adjust the border position
so that it is the same as in step 3.
Clip 1
Clip 2
Clip 3
12 To move the clip border further to the left, move
the double-headed arrow cursor little to the left of
the border and click to make Clip 2 active.
Clip 1
Clip 2
Clip 3
13 If you drag to the left, the crossfade will be
adjusted as in step 8, so drag to the right first.
Clip 1
Clip 2
Clip 3
14 Then, drag to the left to adjust the clip border.
Clip 1
Clip 2
Clip 3
15 To move the clip border set in step 11 to the right,
place the double-headed arrow cursor little to the
right of the border and click to make Clip 1 active.
Clip 1
Clip 2
Clip 3
16 If you drag to the right, the crossfade will be
adjusted as in step 5, so drag to the left first.
Clip 1
Clip 2
Clip 3
17 Next, drag to the right to adjust the position of the
clip border.
Clip 1
Clip 2
Clip 3
Fade-in, fade-out and crossfade
curves
Select the Object tool.
Double-click on a clip to open the CLIP PROPERTIES
dialogue or double-click on a crossfade to open the
CROSSFADE PROPERTIES dialogue. In each dialogue you can
alter fade curves.
Please refer to “Clip properties” on page 35 of this manual
for further information.
Audio Processing
Pitch/Time Stretch
Selecting this item from the Process menu opens the Time
Compression/Pitch Shift window. There are two options in
this window.
Time Compression allows the length of a clip to be changed
without changing the pitch. Use a mouse and keyboard to
set the length of a clip.
The start time for the clip remains the same while the end
point changes to reflect the new length. The clip’s fade in
or out remains non-destructive.
Pitch Shift allows the pitch of a clip to be changed without
changing the length.
Click OK to process the clip.
Consolidate
Selecting this item from the Process menu merges all
selected clips or time into one audio file. Any crossfades or
fade ins/outs that were added to the clip are also written
to the new clip. This command may be used before
exporting all of the edits on a track as one long Broadcast
WAVE file.
Audio clips that are merged using the consolidate
function must be given a new name. When you execute
the Consolidate item from the Process menu a naming
screen opens.
6 – Editing