Home screen, Preparation, Preparing the power supply – Teac DR-44WL User Manual
Page 6: Home screen preparation
6
TASCAM DR-44WL
Home Screen
This is the screen that is usually shown when the unit
is stopped.
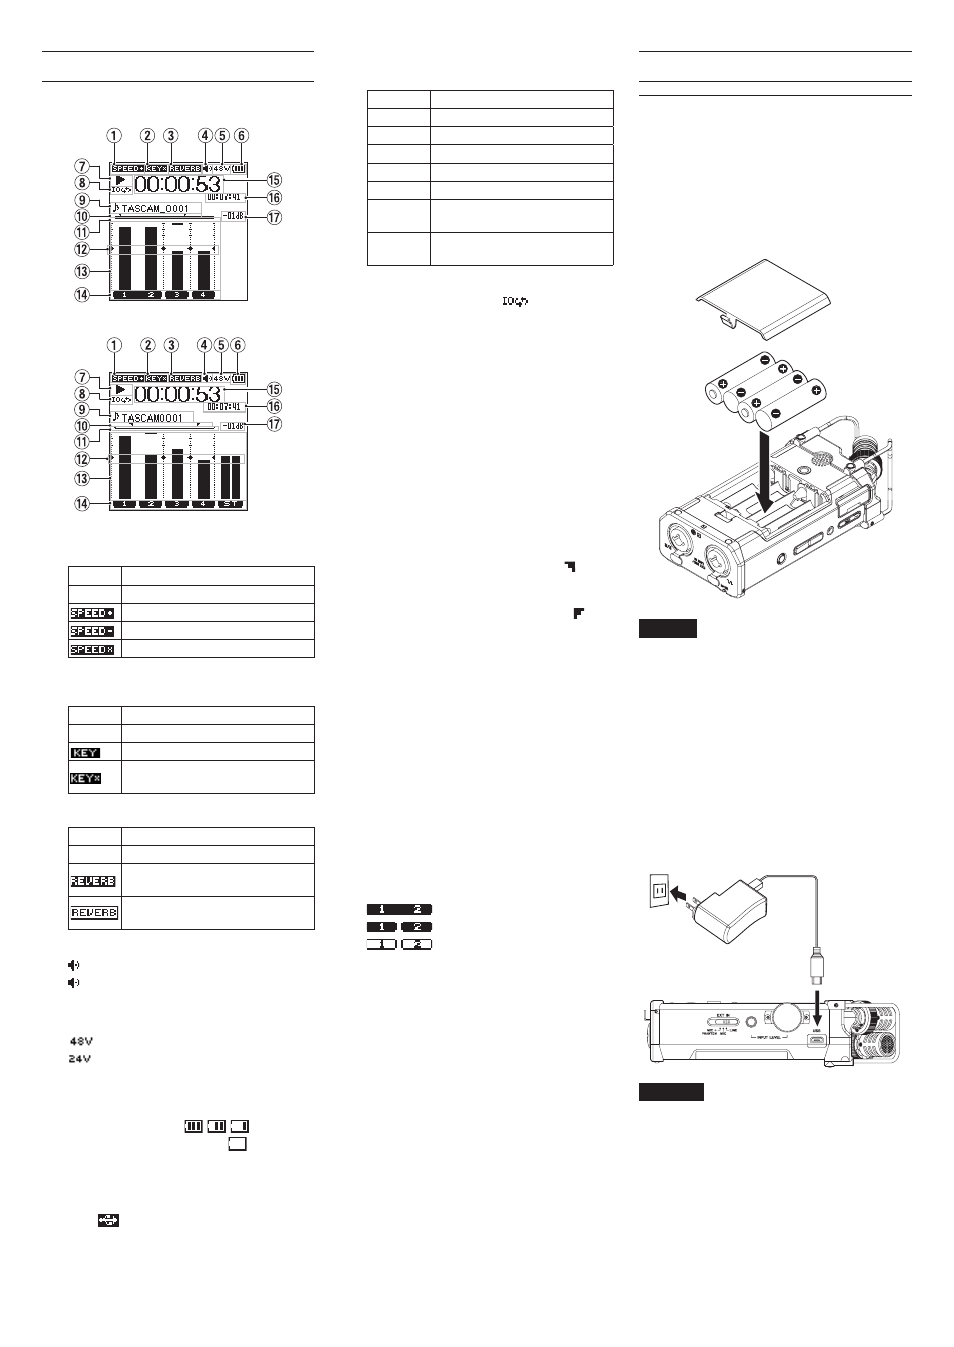
Home Screen in the 4 CH mode
Home Screen in the MTR mode
1
Playback speed status display
Icon
Playback speed
Blank
Playback speed not changed
1.1× – 2.0×
0.5× – 0.9×
Playback speed cannot be changed
2
Display of the key control function on/off
status
Icon
On/off status
Blank
Key control function off
Key control function on
Key control function on
(setting disabled)
3
Display of the reverb on/off status
Icon
On/off status
Blank
Reverb off
Reverb on
(Recording with the effector on)
Reverb on
(SEND status)
4
Speaker output display
displayed: Speaker output on
not displayed: Speaker output off
5
Phantom power supply display
Blank: No phantom power supply
: 48 V phantom power supplied
: 24 V phantom power supplied
6
Power supply status display
When power is supplied from the batteries, the
battery icon shows the amount of remaining
battery power in bars (
,
,
).
When the icon displays no bar,
blinks, and
the power subsequently turns off (standby
state) due to dead batteries.
When the dedicated AC adapter (GPE053B)
supplied with the product or USB bus power is
used,
is shown.
7
Recorder operation status display
These icons show the recorder operation status.
Indicator Meaning
8
Stopped
9
Paused
7
Playing back
,
Fast-forwarding
m
Fast-rewinding
/
Skipping to the head of the next
file
.
Skipping to the head of the
current file or of the preceding file
8
Loop playback setting status display
During loop playback, the
icon is
displayed.
9
File name/song name display
When the 4CH mode is selected, the name or
tag information of the file being played back is
shown.
When there are multiple files in the 4CH mode,
only the format portion of the file names and
the basic number of the recording files are
displayed.
When the MTR mode is selected, the name of
an opened song is shown.
0
Loop playback IN (starting) and OUT
(ending) points setting state
Shows the IN (starting) and OUT (ending)
points-setting state of loop playback.
When the IN (starting) point is set, the icon is
displayed at the corresponding position on the
playback position-displaying bar.
When the OUT (ending) point is set, the icon
is displayed at the corresponding position on
the playback position-displaying bar.
q
Playback position display
The current playback position is shown by a bar.
w
Level meter guide display
This is a level meter guide for adjusting the
input and output levels.
It is displayed at the “-12 dB” position on the
scale.
e
Level meter
Shows the level of sound being input or played
back.
r
File state display
The file state is displayed in different ways,
depending on the type of file to be played
back.
: Stereo file
: Mono file ×2
: No file is present.
t
Elapsed time display
Shows the elapsed time (hours : minutes :
seconds) of the current file.
y
Remaining time display
Shows the remaining time (hours : minutes :
seconds) of the current file.
u
Peak value displayed in decibel (dB)
Shows in decibels the maximum value of the
playback level in a certain period of time.
Preparation
Preparing the power supply
Using AA size batteries
1. Remove the battery compartment cover on the
bottom panel.
2. Install four AA size batteries with their ¥
and ^ marks as shown in the battery
compartment.
3. Attach the battery compartment cover.
NOTE
Set the type of batteries to use in the
BATTERY TYPE
item of the POWER/
DISPLAY
menu in order for the unit to
accurately show the amount of remaining
power and allow the unit to accurately
determine whether enough power is
available for its proper operation. (By
default, the type is set to ALKAL for
alkaline batteries.)
Using an AC adapter
As shown in the illustration, use the included USB
cable to connect the included GPE053B AC adapter
to the unit's USB port.
Connect included
USB cable
AC outlet
GPE053B
Micro B USB plug
CAUTION
• Always use the included AC adapter
(GPE053B) when using this unit. Use of a
different adaptor could cause malfunction,
fire or electric shock.
• Noise may occur when recording with a
microphone if the unit is too close to the
AC adaptor. In such a case, keep sufficient
distance between the AC adaptor and the
unit.