Starting up the unit, Setting the built-in clock, Shutting down – Teac DR-44WL User Manual
Page 7: Connecting monitoring devices and headphones, Basic menu operation procedures, Menu structure, Recording, Recording screen, Connecting monitoring devices and, Headphones
TASCAM DR-44WL
7
NOTE
• When both batteries are installed and the AC
adaptor is connected, power will be supplied
from the AC adaptor.
• The AC adapter for the unit includes two
types of outlet plugs. Attach the type of plug
that matches the power outlet that you are
using.
Changing the outlet plug
$
%
2
1
5
3
4
1
Move the latch on the AC adapter in the
direction of the arrow.
2
Pull off the outlet plug.
3
Replace it with the other outlet plug (A or B).
4
Move the latch on the AC adapter in the
direction of the arrow again.
5
Attach the outlet plug to the AC adapter.
CAUTION
Do not use the adapter if there is anything
abnormal about the plug after changing it.
Use when the plug is abnormal could cause
fire or electric shock. Request repair from a
retailer or TEAC (see page 2).
Starting up the unit
When the unit is turned off (standby state), slide
the HOLD/
switch in the
direction and,
when TASCAM DR-44WL (start-up screen) is
displayed, release the switch.
The Home Screen appears when the unit starts up.
Setting the built-in clock
When the unit is started up for the first time (or after
being left without batteries), the DATE/TIME
screen appears before the start-up screen to allow
the date and time to be set.
Use the .// button and the wheel to enter
the date and time, and press the ENTER/MARK
button to set them.
Shutting down
While the unit is turned on, slide the HOLD/
switch of the left side panel in the
direction and, when TASCAM DR-44WL
shutting down
appears, release the switch.
The power turns off in a few seconds.
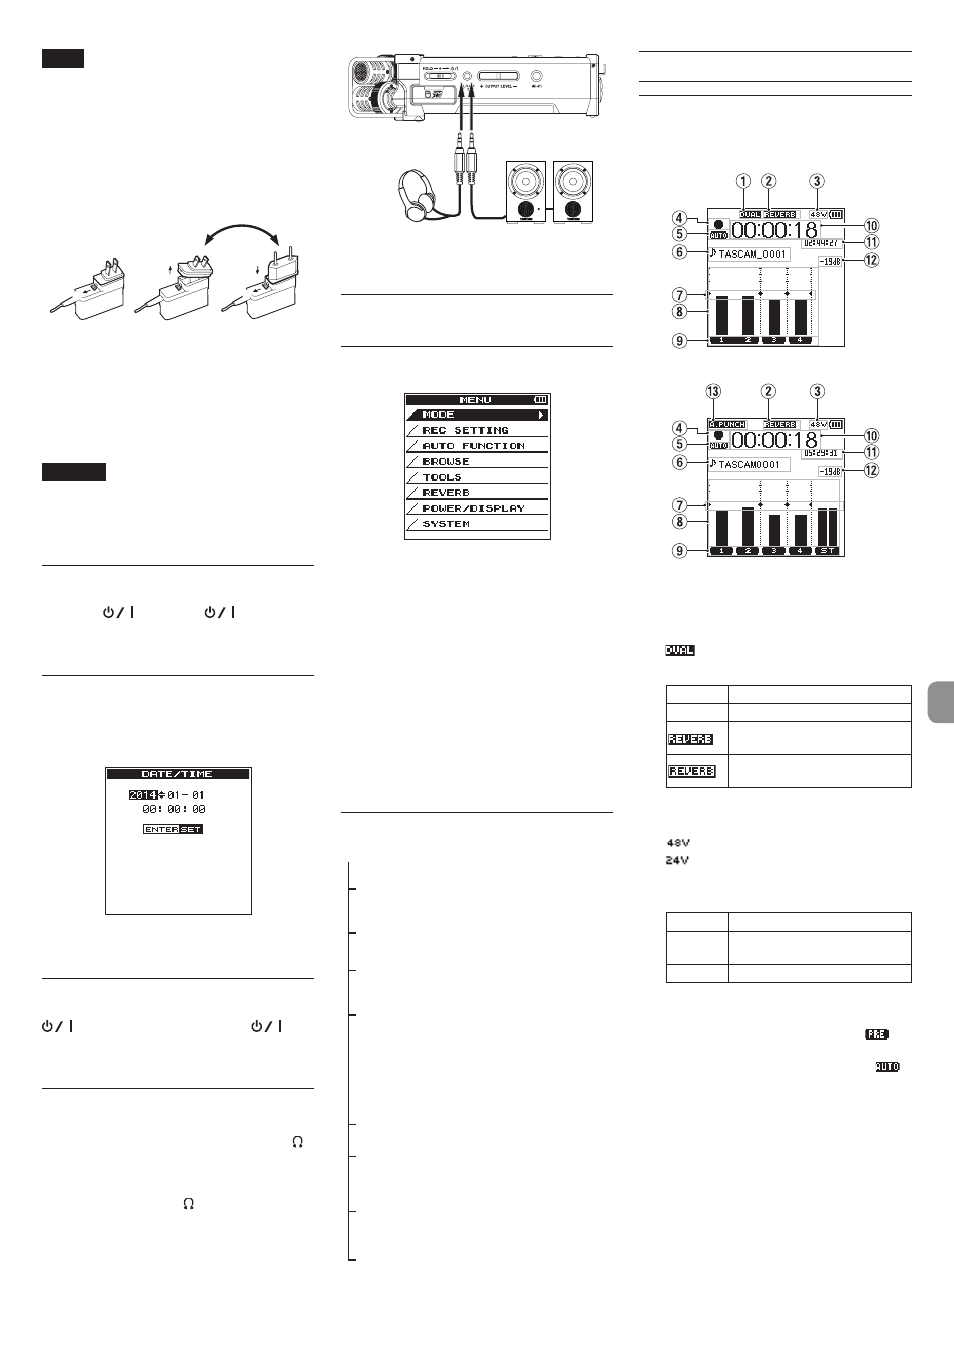
Connecting monitoring devices
and headphones
To listen with headphones, connect them to the /
LINE OUT jack.
To listen with an external monitoring system
(powered monitor speakers or an amplifier and
speakers), connect it to the /LINE OUT jack.
Headphones
Powered monitor speakers
or
an amplifier and speakers
Basic menu operation
procedures
1. Press the MENU button to open the MENU
screen.
2. Use the wheel to select (highlight) one of the
menu items, and then press the ENTER/MARK
button to go to the desired setting screen.
3. Use the wheel to select (highlight) an item to
set.
4. Press the ENTER/MARK button or / button
to move the cursor to the right and highlight
the setting value.
5. Use the wheel to change the setting.
6. When setting a different item in the same
menu, press the ENTER/MARK button or .
to move the cursor to the left.
7. Repeat Steps 3. to 6. as necessary to set other
items.
8. When finished, press the 8/HOME button to
return to the Home Screen.
Menu structure
MENU
MODE
Select recording or
playback mode
REC SETTING
Set for recording
AUTO FUNCTION
Convenient
functions for
recorded files
BROWSE
(only when the 4CH mode
is selected)
SONG
(only when the MTR mode
is selected)
Operate files and
folders in the SD
card
TOOLS
Set other convenient
functions
REVERB
Set reverb effects
POWER/DISPLAY
Set the power
supply and the
display
SYSTEM
System settings of
the unit
Recording
Recording Screen
The screen below is shown when the unit is in the
recording standby state or while recording is in
progress.
Recording screen in the 4 CH mode
Recording screen in the MTR mode
1
Display of the DUAL REC function on/off
status (4CH mode only)
No display: DUAL REC function off
: DUAL REC function on
2
Display of reverb on/off status
Icon
On/off status
Blank
Reverb off
Reverb on
(Recording with the effector on)
Reverb on
(SEND status)
3
Phantom power supply display
Blank: No phantom power supply
: 48 V phantom power supplied
: 24 V phantom power supplied
4
Recorder operation status display
These icons show the recorder operation status.
Indicator Meaning
09
Recording in standby or recording
paused
0
Recording in progress
5
Display of the setting status of the PRE REC
or Auto REC function (4CH mode only)
When the PRE REC function is ON, the
icon shown.
When the AUTO REC function is ON, the
icon is shown.
6
File name/song name display
The file name that will automatically be given
to a recorded file is shown.
When there are multiple files in the 4CH mode,
only the format portion of the file names and
the basic number of the recording files are
displayed. When a single file is recorded, its
name is shown.
When the MTR mode is selected, the name of
an opened song is shown.