Fuji-x-pro2_74-75 – FujiFilm X-Pro2 User Manual
Page 19
74
Using the Fujifilm X-Pro2
Exposing Right
75
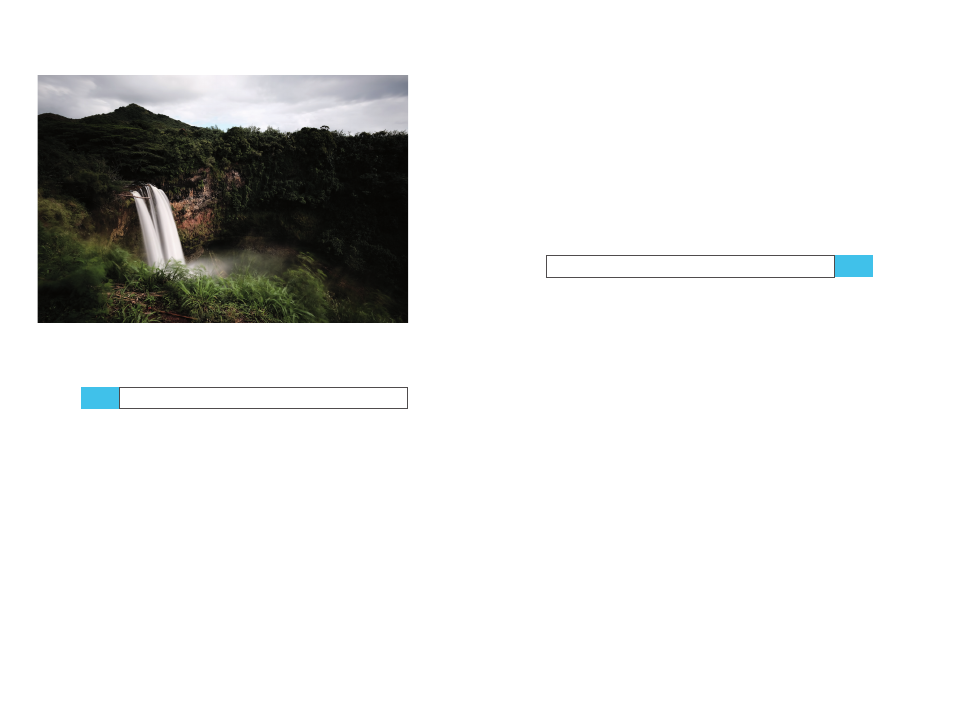
Fig. 22:
A
long exposure of nine seconds taken in T mode. Make
sure to use a solid tripod and a remote shutter release for these
kinds of shots.
Long exposures in bright daylight
In order to achieve long exposure times under normal day-
light conditions, you can’t just stop down the lens—even
at f/22, your shutter speed would still be too fast. Besides,
diffraction blur is kicking it beyond f/10, so stopping down
beyond this point is only recommended when it cannot be
avoided.
To realize long shutter speeds in good light, it’s best to use
a so-called ND filter [36], or Neutral Density filter. This is a
fancy name for a simple gray filter that you can put in front
of the lens to block a portion of the light from reaching the
sensor.
For example, a filter with an ND 3.0 specification will
extend your exposure time by a factor of about 1000 (or
TIP 50
10 f-stops). This means that by using such a filter, a scene
that would normally require a shutter speed of 1/50s at f/8
can be shot at the same aperture with an exposure time of
20 seconds.
However, there’s a catch: since your X-Pro2 is equipped
with a rather weak infrared cut filter in front of the sensor,
long exposures (typically one minute or longer) in bright
daylight should be performed with a regular neutral den-
sity (ND) filter and a dedicated IR cut filter in front of the
lens. This will help you avoid false colors. A few ND filters
already include an IR cut filter.
ISO settings—what’s the deal?
The meaning of ISO in the digital realm is often misunder-
stood. Higher ISO settings don’t increase the sensor’s sen-
sitivity. The sensor in your X-Pro2 is calibrated to its native
ISO 200 (based on the popular SOS standard) [37], and this
remains the same no matter what ISO you set in the camera.
To be clear, there’s no difference between taking a shot
with f/5.6 and 1/60s at either ISO 100 or at ISO 25600. In
both cases the sensor is exposed to the exact same amount
of light (or photons). The amount of light (the real exposure)
is solely determined by aperture and shutter speed.
So what exactly is ISO doing? ISO determines the amount
of signal amplification that’s applied to the image. ISO 200,
the sensor’s native setting, is equivalent to the camera’s
basic calibration. At ISO 400, the signal (or sensor data) is
amplified by one aperture stop to brighten the image and
increase its exposure. At ISO 800, the amplification amounts
to two stops, and so on. At ISO 25600, the additional am-
plification of the light recorded by the sensor amounts to
seven stops. It’s not surprising that image quality decreases
when ISO amplification increases; noise and artifacts are
amplified along with the actual image data.
TIP 51