Fuji-x-pro2_94-95 – FujiFilm X-Pro2 User Manual
Page 22
94
Using the Fujifilm X-Pro2
Exposing Right
95
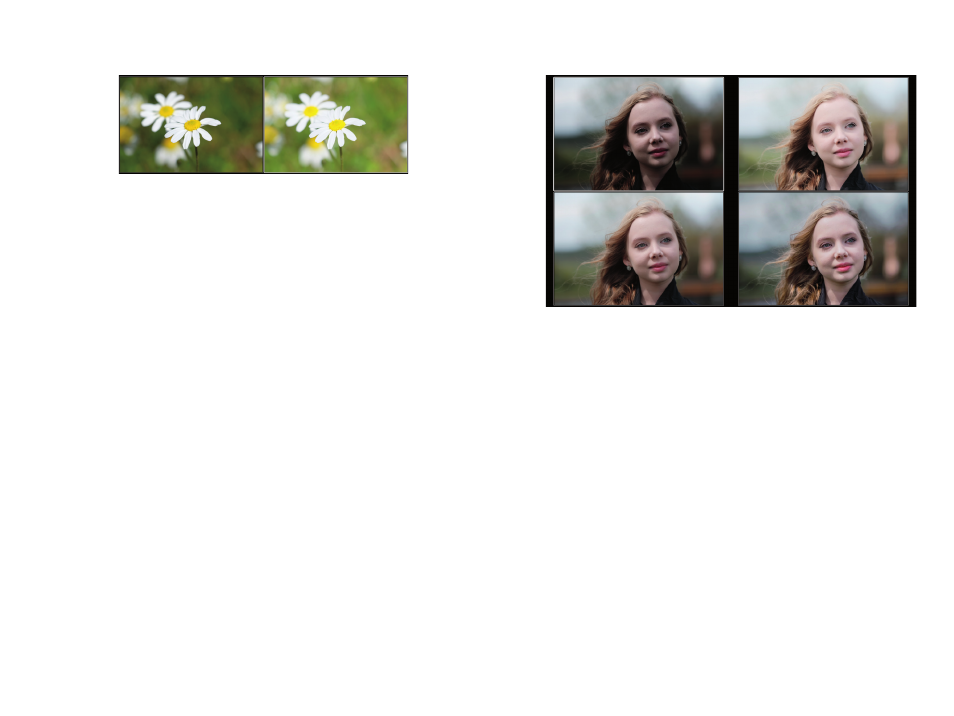
Fig. 31:
Turning the DR function into a virtual high-key studio:
The example on the left illustrates a regular exposure of a flower
at ISO 200, DR100%, f/5.6, and 1/1000s. The exposure was de-
signed to protect the structure of the white petals. The example
on the right is the same scene shot at ISO 400, DR200%, f/5.6,
and 1/1000s. This means that while the RAW data remains the
same, only the JPEG from the ISO 400/DR200% version delivers
the desired high-key look while leaving the structure of the petals
intact. Doubling ISO and DR settings in tandem (leaving all other
exposure parameters untouched) moves the histogram of the shot
to the right, but without blowing bright highlights. Instead of cut-
ting them off, the tonality of the bright highlights is compressed.
You can fine-tune such results with the camera’s built-in RAW con-
verter, for example, by reducing the highlight contrast (HIGHLIGHT
TONE settings). Additionally, you can revert a high-key shot that
was taken (for example) at ISO 400/DR200% into a regular ISO 200/
DR100% JPEG by reprocessing the RAW image in the built-in RAW
converter using PULL −1 EV and DR100% settings.
Tone-mapping and tonality compression can also be used
to improve portraits. It can reduce contrast and harsh shad-
ows on faces that are illuminated by a single light source,
such as the sun. With our high-key technique, dark eyes and
shadows under the nose can be lifted without blowing the
bright parts of the skin. At the same time, the tone-mapping
and highlight tone compression makes skin blemishes al-
most disappear.
Fig. 32:
Using virtual high-key in a portrait: This example illus-
trates a difficult portrait situation with strong contrast and harsh
shadows on the face.
The upper-left sample shows a JPEG that was created by expos-
ing for the highlights with the CLASSIC CHROME film simulation
and ISO 200. This resulted in a rather dark face with strong contrast
and shadows.
The upper-right image shows the same shot two stops brighter,
and with extended highlight dynamic range to protect the high-
lights. This means using ISO 800 and DR400% while maintaining
the exposure (aperture and shutter speed) of the upper-left
sample. Additionally, I set HIGHLIGHT TONE to –2 to pull back
the brightest (skin) tones. As you can see, the eyes are now much
brighter and the harsh contrasts are gone.
Too much? Don’t worry! Using the X-Pro2’s built-in RAW con-
verter, you can always create more realistic versions of your high-
key shots. In this case (lower-left image), I used PULL –1 (effectively
pulling the shot from ISO 800 down to ISO 400) along with DR200%
(to compensate for the pull), SHADOW TONE –2 (for more shadow
detail), and HIGHLIGHT TONE –1 (to bring back the brightest skin
tones).
Alternatively, you can also process the RAW file in any exter-
nal RAW converter. In the case of the lower-right example, I used
Adobe Lightroom.