Fuji-x-pro2_156-159 – FujiFilm X-Pro2 User Manual
Page 35
156
Using the Fujifilm X-Pro2
White Balance and JPEG Parameters
157
formatted card, make sure to take at least one shot in order
to create the X-Pro2’s directory structure.
The directory where you must place your RAW files is
located in a folder called DCIM. It’s named “xxx-FUJI,” with
“xxx” being a 3-digit number that reflects the overall num-
ber of shots you have already taken. An example would be
104-FUJI.
Please remember that file transfers to the camera aren’t
available via USB, so make sure to insert the SD card directly
into your computer or use a card reader.
By the way, your X-Pro2 cannot process RAW files from
other camera models, including other X-series models. How-
ever, you can process RAW files from other X-Pro2 cameras.
In this case, your camera will display a parcel symbol indi-
cating that the RAW file was created with another X-Pro2.
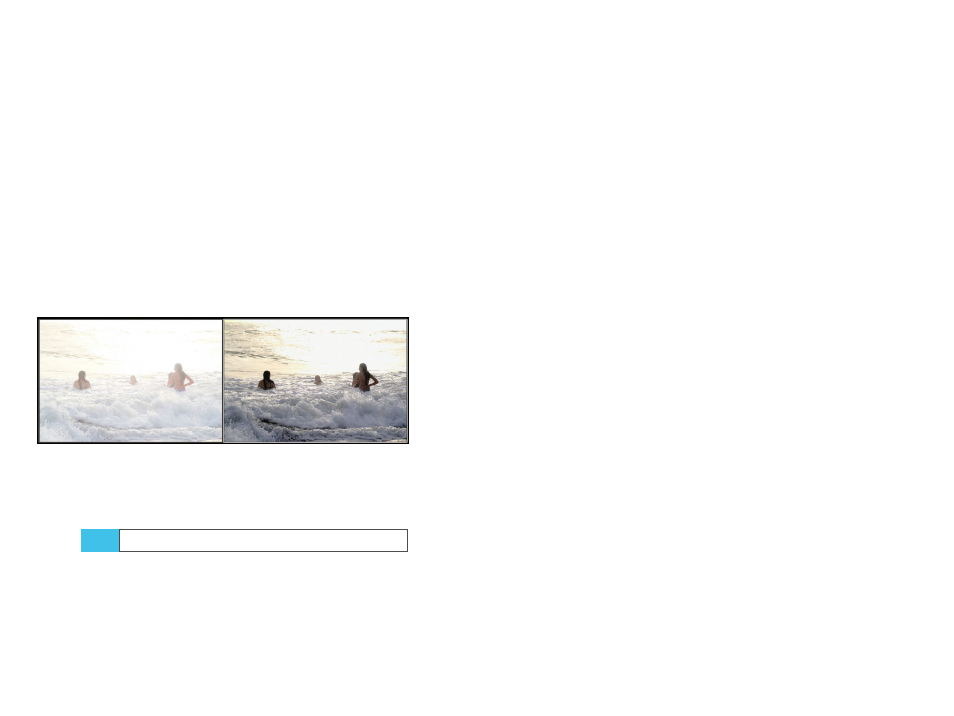
Fig. 59:
The
built-in RAW converter in action: The left image
shows an overexposed sample shot that was recorded with the
camera’s default settings and DR400%. On the right, you can see
the same shot processed with a PULL of –2 EV, maximized shadow
contrast (SHADOW TONE +4), and VELVIA film simulation.
Comparing RAW converters
So far, we have talked a lot about the X-Pro2’s built-in RAW
converter. It’s the perfect tool to create JPEGs. It’s a JPEG
shooter’s paradise! It’s also super-easy, because the built-in
RAW converter utilizes the same functions and parameters
TIP 94
available in the shooting menu. That’s no surprise, because
the built-in RAW converter is the JPEG engine of the camera!
If you are a JPEG shooter, ignoring the internal converter
that turns RAW files to in-camera JPEGs means overlooking
the aspects of the camera that make the X-Pro2 so special.
That’s why even diehard JPEG fans should shoot with
FINE+RAW. You need the RAW files to feed the engine that
generates JPEGs with the colors, tonality, and overall look
that you like from your Fuji camera.
What about the other half—diehard RAW shooters who
don’t care much about JPEGs, Fuji colors, or in-camera con-
version? Those guys (I tend to be one of them from time
to time) require an external RAW converter to process the
RAW files on a computer. The results are often saved as un-
compressed 16-bit TIFF files of more than 100MB each. Such
files can be further processed in Photoshop and similar
applications.
In this tip, I’ll compare how certain popular external RAW
processors handle specific features of the X-Pro2:
■
RAW File Converter EX came free with your camera (have
a look at the CD). This software is based on an older ver-
sion of the Japanese Silkypix [58] RAW processor that is
currently available in version 7. If you want to use all the
features of this software, you should definitely upgrade
to the latest version of Silkypix. As a Fujifilm camera user,
you are eligible for an upgrade discount in many terri-
tories. Please note that the new RAW File Converter EX
version 2 also supports Fujifilm’s film simulation modes.
This software is available as a free download [59].
■
The most popular RAW converter is Adobe Lightroom.
Its processing module is also available in Photoshop as
Adobe Camera Raw. This website [60] will provide more
information and a free trial version.