Freestanding installation – Avalon Firestyles 796-1990 to 1993 User Manual
Page 17
Page 17
FREESTANDING INSTALLATION
Standard Ceiling Installation
When installing a freestanding stove into a residence with a standard ceiling, certain precautions should
be taken to insure a safe installation. The directions below illustrate one way to install your freestanding
stove into a standard ceiling with a factory-built chimney. There are several other alternative methods.
Check with your dealer or installer for information on other options available to you.
IT IS RECOMMENDED THAT NO CEILING
SUPPORT MEMBER BE CUT FOR CHIMNEY
AND SUPPORT BOX INSTALLATION. IF IT IS
NECESSARY TO CUT THEM, THE MEMBERS
MUST BE MADE STRUCTURALLY SOUND.
1. Make sure the factory built chimney satisfies
all of the rules in the section titled
"CHIMNEY INFORMATION &
REGULATIONS".
2.
Follow all of the regulations and guidelines
specified in the sections titled
"FREESTANDING INSTALLATION -
SPECIFICATIONS" and "PREPARATION
FOR INSTALLATION - FREESTANDING".
3.
Carefully place the stove on top of the floor
protection and join the chimney connector to
the stove. When determining the placement
of the stove, make sure to take into
consideration the necessary clearances to
combustibles and the placement of the
chimney.
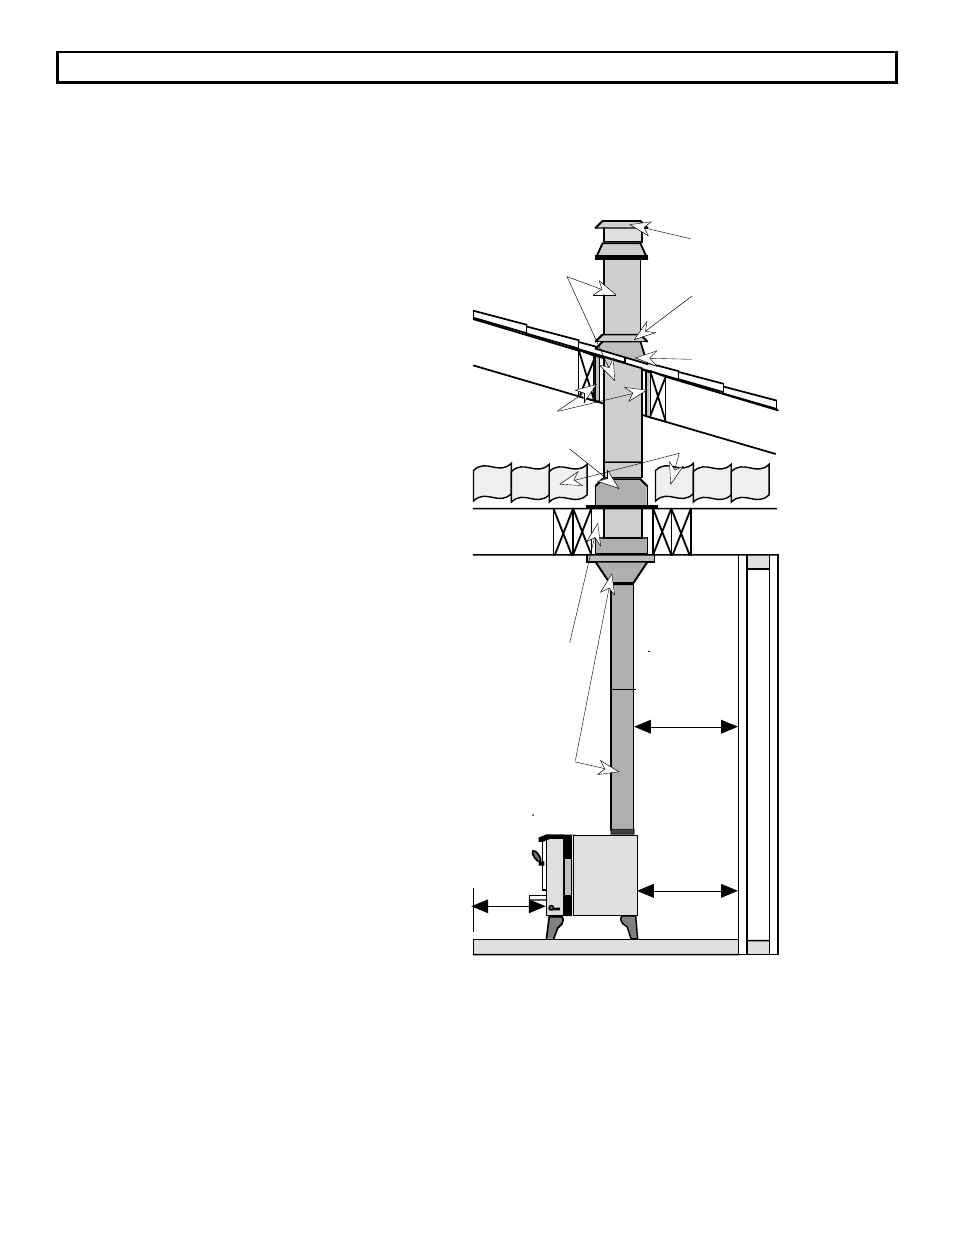
NOTE: When the chimney connector extends to a
standard ceiling, as shown to the right, a support
package and sometimes a chimney connector
adapter are installed at the ceiling.
Working from the attic or roof, sufficient sections of
factory-built chimney (available in different
lengths) are installed to go through the space
above the ceiling, then through and above the
roof to the correct height above the roof line. The
chimney sections should be stacked and locked
securely as specified by the manufacturer.
A
minimum clearance of 2 inches is typically
required between the outside surface of the
factory-built chimney and any combustibles or
insulation; the air space around the chimney
never must be filled with insulation or any other
material.
Chimney Connector
Minimum Air Space
in Accordance with
Chimney Listing
Attic Radiation Shield
Insulation
Chimney Sections
Chimney Cap
Storm Collar
Roof Flashing
Roof Radiation Shield
(Required by some
manufacturers)
Min.
16"
Min. 15 1/2" for
Single Wall, 10"
for Reduced
Clearance
Connector
Min. 14 1/2" for
Single Wall, 9
1/2" for Reduced
Clearance
Connector
996 Flush Top Flue
Shown Here Ð Follow the
clearances for the 996
Extended 45 Flue when
that model is used.
IMPORTANT: Make sure to follow all guidelines provided by the manufacturer of the chimney for safety
in installation.