Attaching the pto shaft to the tractor and trimmer – DR Power 3-Point Hitch (April 2015 - Present) User Manual
Page 10
10
DR
®
3-POINT HITCH TRIMMER/MOWER
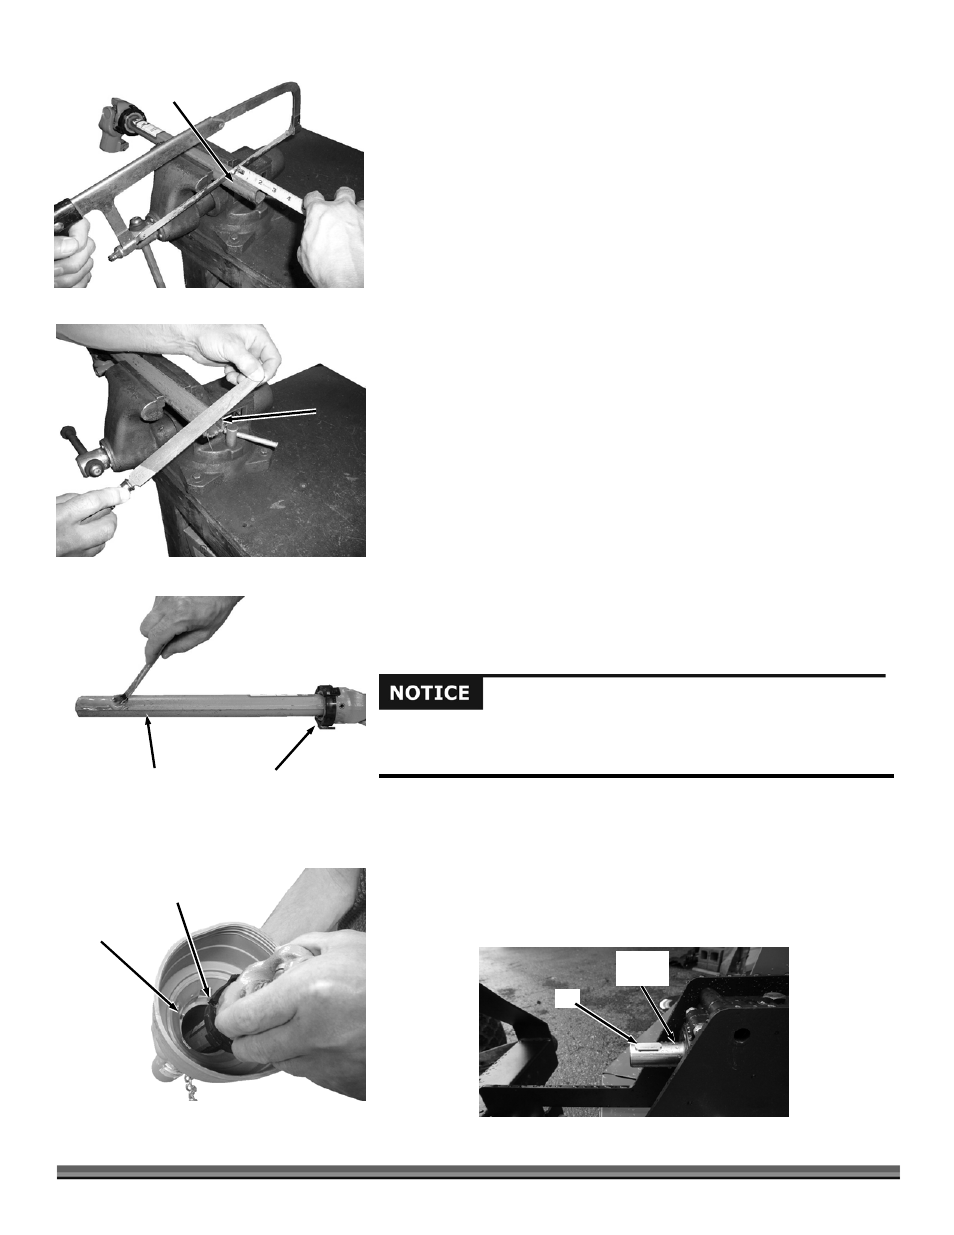
4. Measure and cut each Shaft Tubes to the required length using the hacksaw
(Figure 11).
5. File or sand any burrs from the Shaft ends (Figure 12).
6. Grease both Shaft Tubes and under the Bearing Rings of each Shaft (Figure
13).
7. Insert the Shaft Halves into the Guards making sure that the Bearing Ring
Slot lines up with the Tab on the inside of the Guards for proper installation
(Figure 14).
8. Slide the two PTO Shaft Halves together.
Note: When inserting one half of the PTO Shaft to the other you must line up the
splines correctly (two pointed splines and one flat spline).
Continue to the following section to attach the PTO Shaft to the Tractor and
Trimmer.
Attaching the PTO Shaft to the Tractor and Trimmer
Note: The PTO Driveshaft provided with your new machine is sized to fit a standard
category 1 PTO (1-3/8" DIA. x 6" Spline).
The PTO Spline Shaft on the tractor that is to use this machine must rotate
clockwise when viewing the PTO from the rear of the tractor. If the PTO rotates
counterclockwise, you must have your tractor modified by installing a gearbox to
reverse the direction of rotation.
The length of the PTO Driveshaft that is included with your new machine will
work in most instances but may need to be modified. See “Calculating Length of
PTO Shaft needed” for checking the PTO Shaft length desired and then “Modifying
the PTO Shaft if required” instructions if the PTO Shaft is too long.
Tools Needed:
4mm Allen Wrench
1. Open the Gearbox Guard as described on page 8.
2. Insert the Key into the Trimmer Gearbox Shaft (Figure 15).
Shaft Tube
Figure 11
Shaft
Tube
End
Figure 12
Bearing
Ring
Figure 13
Shaft
Tube
Figure 14
Bearing
Ring Slot
Guard
Tab
You must install the Key supplied in the Product Package where the PTO shaft
attaches to the Trimmer Gearbox. Failure to install the Key will result in damage
to the machine and is not covered under warranty.
Key
Figure 15
Gearbox
Shaft