Preparing the trimmer/mower for trimming, Checking 3-point bracket to pto shaft clearance – DR Power 3-Point Hitch (April 2015 - Present) User Manual
Page 14
14
DR
®
3-POINT HITCH TRIMMER/MOWER
Chapter 3: Operating The DR 3-POINT HITCH TRIMMER/MOWER
Operation Notes
See the Owner’s Manual that came with your Tractor for all safety warnings and detailed information for operating your Tractor
properly.
Always operate the Tractor PTO at 540 RPM when trimming.
Always disengage the PTO, lock the Parking Brake and shut off the Tractor when leaving the Tractor Seat.
Never transport the Trimmer while the PTO is turning.
Do not have the Trimmer engaged or resting on the ground when backing up. The machine is designed to trim and roll on the
Wheel in the forward direction only. Trimming or rolling on the Wheel in the reverse direction could damage the machine and
is not covered by the Warranty.
Remove any debris buildup from the machine before every use of the Trimmer.
Always install the Locking Bolt and Wing Nut into the transport holes of the 3-Point Bracket and Trimmer when transporting the
Trimmer. See “Preparing the Trimmer/Mower for Transport” in this Chapter.
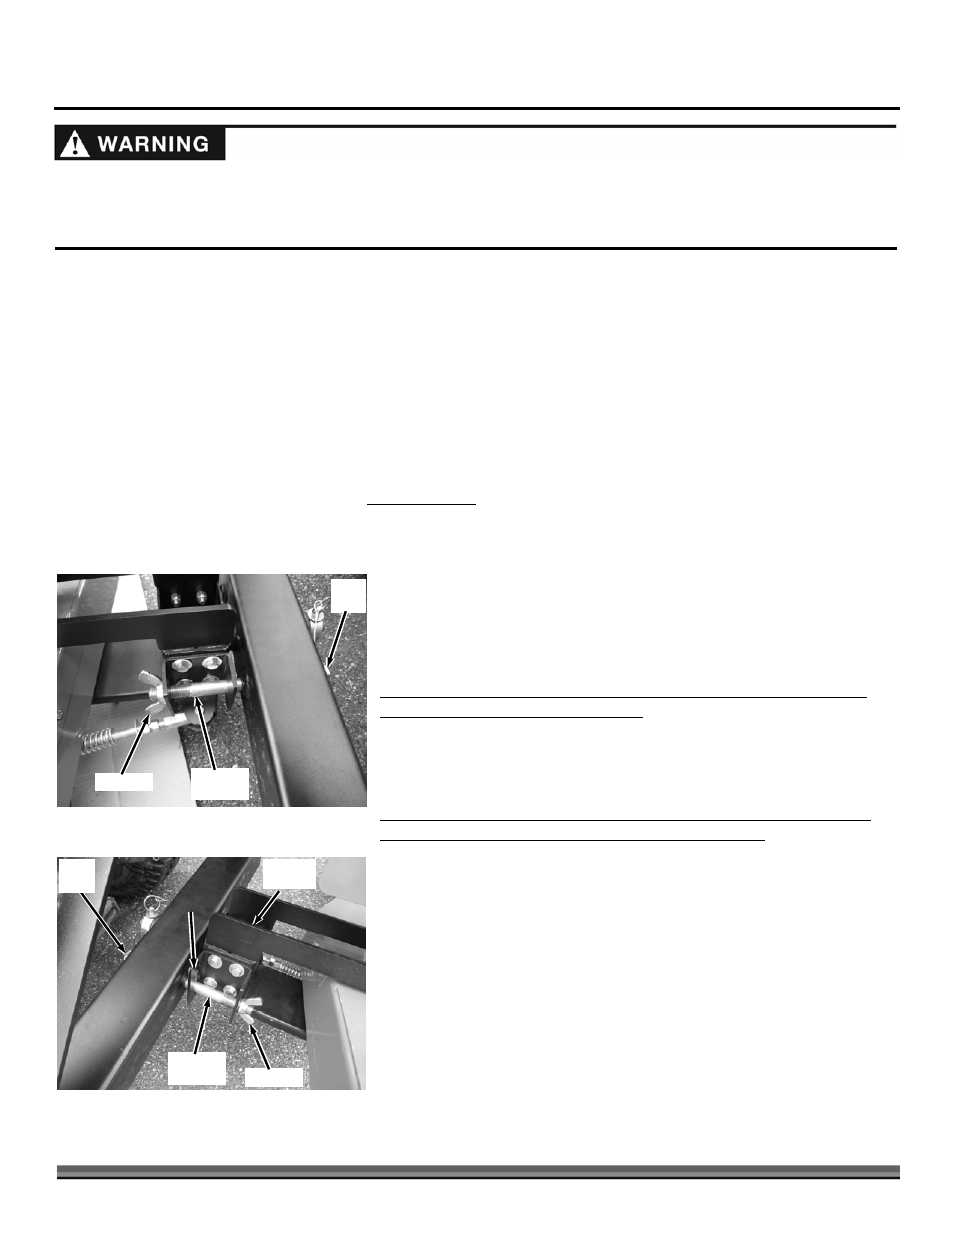
Preparing the Trimmer/Mower for Trimming
The characteristics of cutting height and quality is controlled by the position of
the Trimmer Cords, location of Locking Bolt, Wheel Spacer arrangement and
height of Tractor PTO lift Arms. It takes time and practice to learn what the
best combinations of settings for different conditions are.
INSTALLING THE LOCKING BOLT FOR PARALLEL TRIMMING/MOWING
(terrain that is level with Tractor Wheels)
1. Install the Bolt into the right side “holes” location through the 3-Point
Bracket and Trimmer Bracket (Figure 25).
2. Secure the Bolt with the Wing Nut.
INSTALLING THE PIVOT BOLT FOR PIVOT TRIMMING/MOWING (terrain
that is higher or lower than Tractor Wheels such as ditches)
1. Install the Bolt into the left side “slots” location through the 3-Point Bracket
and Trimmer Bracket (Figure 26).
2. Secure the Bolt with the Wing Nut.
Checking 3-Point Bracket to PTO Shaft clearance
Observe the Trimmer as it is lifted to ensure that the 3-Point Bracket does not
contact the PTO Shaft. If they do touch, the Tractor may have a setting to limit
the distance it is lifted off the ground to prevent contact. See your Tractor user
manual for details of Tractor settings.
This machine is designed to operate at 540 rpm PTO Shaft speed only! Never operate at a faster speed; doing so can cause
serious injury to the operator or bystanders and could cause damage to the machine that is not covered under warranty.
Read and understand your Tractor users manual and all Tractor safety Warnings for operating your Tractor safely before
operating this DR 3-Point Hitch Trimmer/Mower.
Bolt
Head
Pivot
Position
Figure 26
Wing Nut
3-Point
Bracket
Trimmer
Bracket
Slot
Trimming
Position
Figure 25
Bolt
Head
Wing Nut
3-Point
Bracket
Trimmer Bracket