To remove the mow-ball™ support assembly, To remove the mow-ball, Support assembly – DR Power Walk-Behind Pro (2000 - 2001) User Manual
Page 28
DR
®
TRIMMER/MOWER
™
Assembly & Operating Instructions
22
What to do:
· Check that the battery is fully charged. A fully charged battery should read 12 volts under
load. Manually start the engine and then put a volt tester on the battery. If you need to
charge the battery, follow the directions above.
· Check all cable connections.
· The wiring harness consists of a set of wires that lead from the ignition switch to the battery.
Disconnect and reconnect the battery wires (black to black and red to red) and check the wire
connections at the key switch.
· Call one of our Technical Service Representatives TOLL-FREE 1(800)DR-OWNER(376-
9637) for assistance.
To Remove the Mow-Ball
™
Support Assembly
WARNING! Before performing any maintenance procedure, the engine should be stopped
and the spark plug wire disconnected.
Tool Needed:
• #3 Phillips head screwdriver or one with
at least a 6" shank
Set the machine on a bench if possible.
Do not tip the machine all the way back
on its handlebar unless you have drained
the gas and oil.
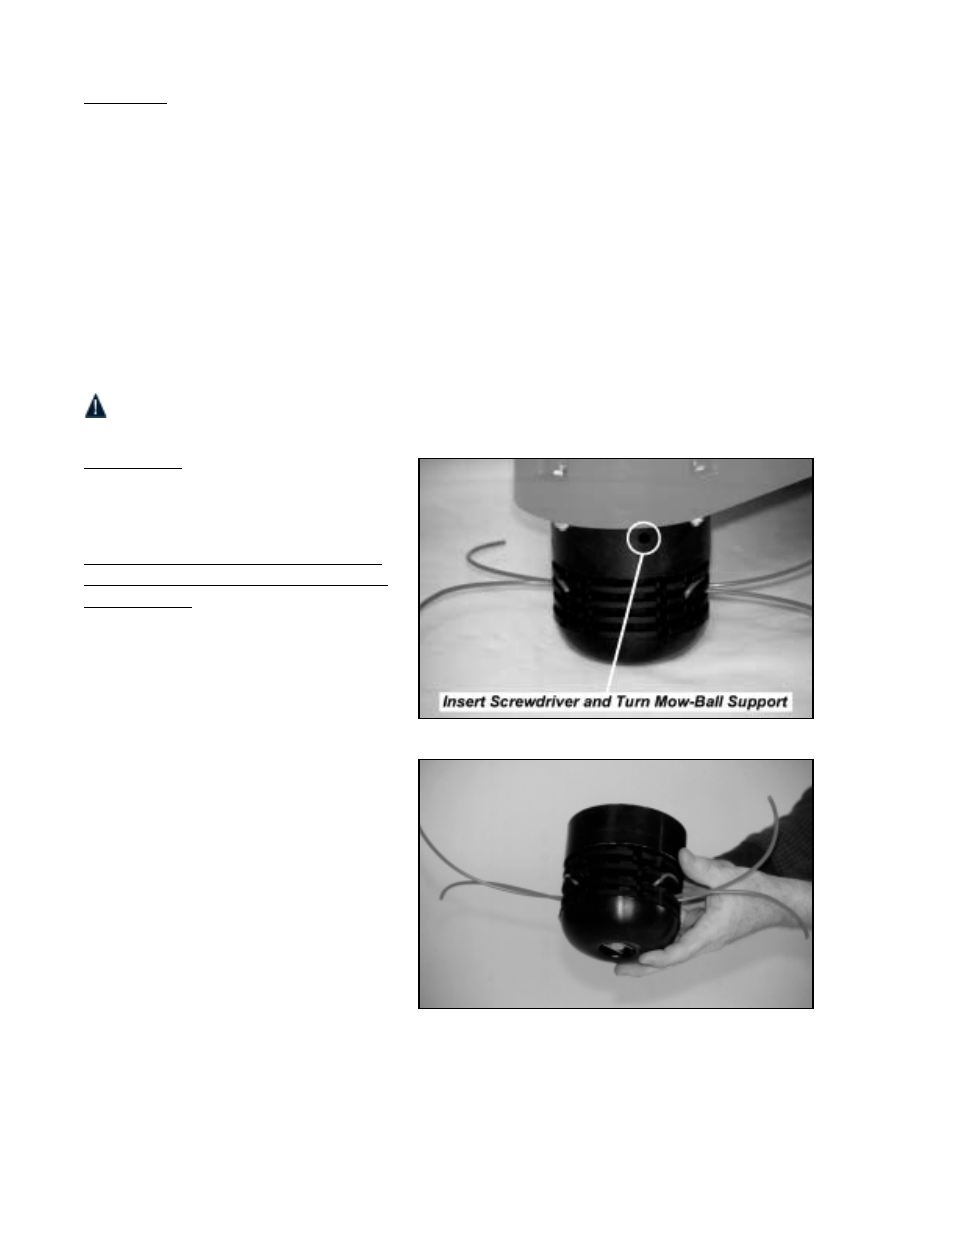
1. Insert the screwdriver into the hole in
the outer cylinder, then rotate the
Mow-Ball
™
Support until the
screwdriver fits into a second hole in
the bearing housing, locking it into
place (Figure 35).
2. Turn the Mow-Ball
™
Support
assembly as you would a light bulb
(counterclockwise) until it unscrews
completely from the bearing housing
(Figure 36).
Note: If the Mow-Ball
™
Support
assembly continues to turn, but does
not come off, rotate it until the
screwdriver fits into a third hole in the
bearing housing shaft. This should
lock it in place and allow you to
remove the Mow-Ball
™
Support
assembly.
Figure 35
Figure 36