Practical use, 1 switching on the furnace, 2 loading the programat s1 – Ivoclar Vivadent S1 User Manual
Page 23: 3 sintering using a standard program
23
6. Practical Use
The operating procedure for the Programat S1 will be explained with
the help of two examples: one standard and one individual program.
6.1 Switching on the furnace
Put On/Off switch (9) on position „I“. The furnace conducts an
automatic self-test, which will be indicated in the beginning.
Subsequently, a status bar shows the progress of the self-test. Make
sure that the furnace is not manipulated during this time.
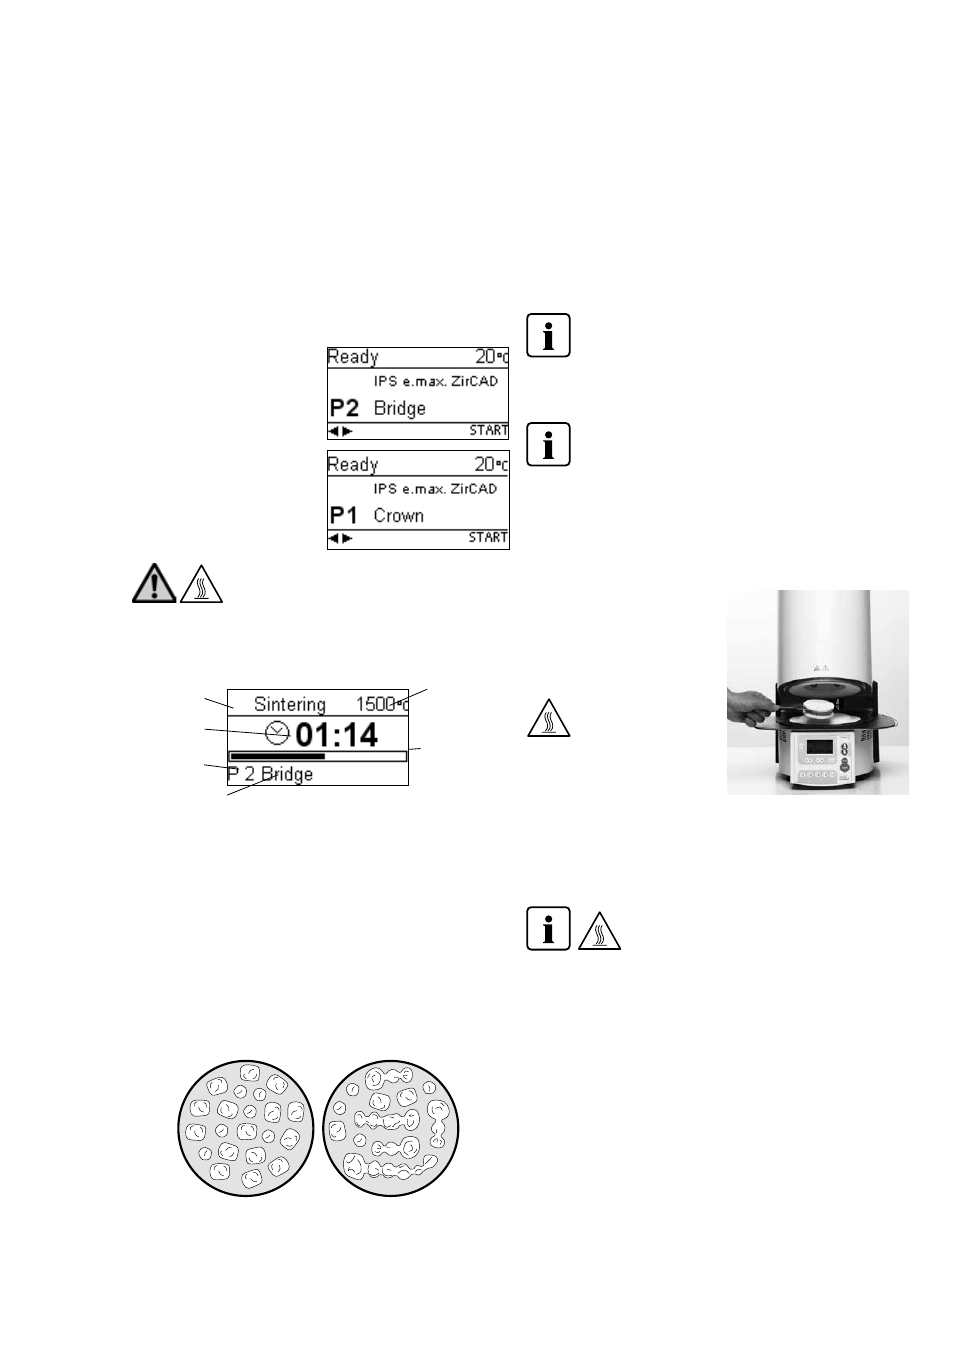
6.1.1 Stand-by screen
If the self-test has been successful,
the stand-by screen will appear in
the display and the desired pro-
gram can be selected using the
program selection keys.
Once the furnace head has been
opened and the loaded sinter tray
placed, the program can be started
using the START key. For that pur-
pose, the START key is shown in
the recommendation area.
Note:
For safety reasons, the furnace head can only be
opened once the temperature has dropped below
600 °C/1112 °F.
6.1.2 Program progress indicator
When the program is started using the START key, the program
progress indicator is shown in the display.
The following information is provided:
a) Program status
b) Remaining time (hh:mm)
c) Current temperature
d) Program number
e) Program name
f) Progress bar
6.2 Loading the Programat S1
The sinter tray (100) holds up to approximately 20 single-tooth
restorations. Make sure that the objects do not touch in order to
prevent them from sintering together. The ZrO
2
sinter beads are
usually not required for this process.
In case of stack milling, the individual objects have to be separated
from the stack, the corresponding margins adjusted and the
attachment points smoothed out by grinding.
CAD/CAM fabricated support structures (for large frameworks with a
pronounced curvature) should not be separated for the sintering
process. In order to achieve optimum sintering results, the objects
should be placed on their occlusal or labial surface (not on the
cervical margin). Furthermore, no objects should be placed on the
groove in the sinter tray, if possible.
After that, the sinter tray is placed in the center of the sinter
chamber by means of the sinter tray fork (101).
Please read the following processing notes very
carefully
The individual pre-drying times of the ZrO
2
objects must
be observed. They depend on the size of the restoration
and the pre-drying temperature. For more detailed information,
please refer to the instructions for use of the corresponding material.
If the Colouring Liquids are used, several points must be
observed:
– The restorations stained with Colouring Liquid must be
adequately pre-dried in a pre-drying furnace. Air drying is
not sufficient in these cases and may result in cracks in
the objects during the sintering process.
– After the sintering process, clean contaminated areas of the
furnace with a soft cloth.
– In case of severe contamination of the sinter chamber or the
insulation, conduct a cleaning firing.
Once the sintering process is com-
pleted, the sinter tray is removed
from the furnace using the sinter
tray fork. If the tray is placed on
the cooling tray, make sure that it
is securely positioned.
For safety reasons,
always use the sinter
tray fork when placing
the sinter tray in or
removing it from the
furnace.
6.3 Sintering using a standard program
Step 1:
Select the desired program using the program keys.
Note
If the sintering program has been aborted, the
furnace head can be only opened once the
temperature has dropped below 600 °C/1112 °F.
Step 2:
Open the furnace head using the Open furnace head key (87) and
place the loaded sinter tray into the furnace.
Step 3:
Press the Start key (37) and the program will start. You can observe
the cycle on the program progress indicator.
f)
a)
b)
d)
c)
e)