3 speaker/r. eq setup, Setup – Marantz NR1501 User Manual
Page 25
NAMES AND
FUNCTIONS
21
BASIC
CONNECTIONS
BASIC
OPERA
TION
ADV
ANCED
CONNECTIONS
SETUP
ADV
ANCED
OPERA
TION
TROUBLESHOOTING
OTHERS
SETUP
ENGLISH
2-5 LIP SYNC
With some video components connected to the
unit, there may be a time lag between the video
signal processing and the audio signals. While it
may be a mere time lag, it can seriously affect the
enjoyment of movies or music.
The LIP.SYNC function delays the audio signals and
adjusts the difference in their timing from the video
signals.
The default setting is 0 ms, and adjustment up to
200 ms is possible.
1.
Press the
3/4 cursor buttons to move the
cursor to LIP SYNC on the INPUT SETUP
sub-menu.
B l u - r a y C O N F I G
N A M E : B L U - R A Y
D I G I T A L I N : - - -
A U D I O M O D E : H D M I
A U T O S U R R O U N D : A U T O
> L I P S Y N C : 0 m s
R E T U R N T O I N P U T S E T U P
• Press
the
1/2 cursor buttons to adjust the
time lag.
Tip
For adjusting the time lag while monitoring the
images on the display, projector or other video
component, refer to “LIP.SYNC FUNCTION”
(page 28).
Note
• 0 ms is set for this function in the SOURCE
DIRECT mode. When the SOURCE DIRECT
mode is released, the value that has been set is
restored.
SETUP
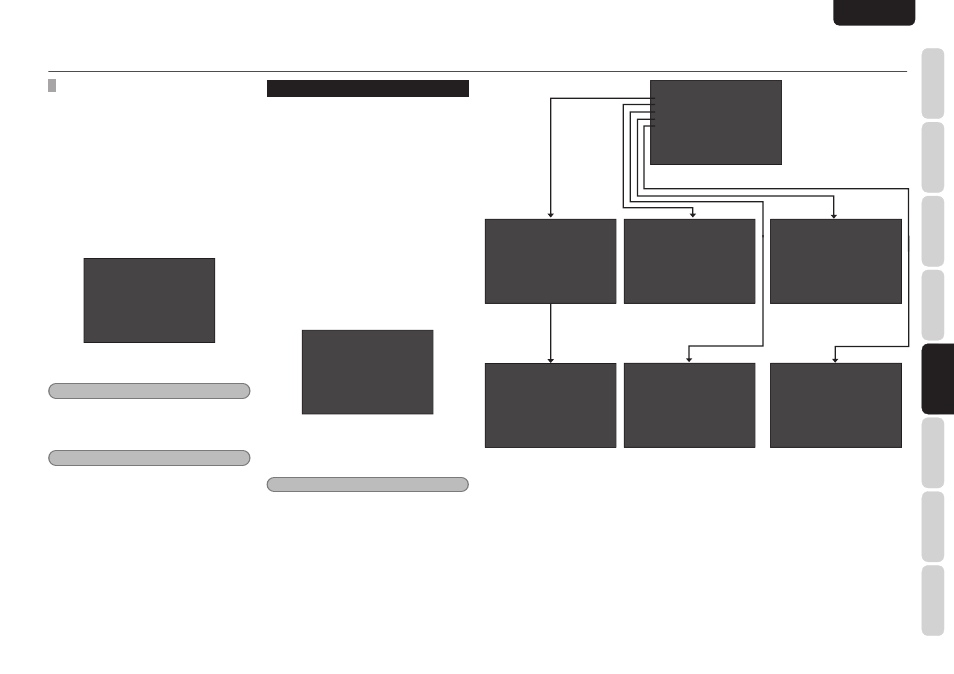
3 SPEAKER/R. EQ SETUP
After you have installed the unit connected all the
components and determined the speaker layout, it
is now time to perform the settings in the Speaker
Setup menu for the optimum sound acoustics for
your environment and speaker layout.
Before you perform the following settings, it is
important that you fi rst determine the following
characteristics:
• AUTO SETUP:
“3-1 AUTO SETUP” (see page 22)
• MANUAL SETUP:
“SPEAKER COFIG” (see page 22)
“SPEAKER DISTANCE” (see page 23)
“SPEAKER CROSSOVER” (see page 23)
“ROOM EQ SETUP” (see page 23)
1.
Select
“SPEAKER SETUP” from the MAIN
MENU with
3 or 4 cursor buttons and
press the ENTER button.
S P E A K E R / R . E Q S E T U P
> A U T O S E T U P
S P E A K E R C O N F I G
S P E A K E R D I S T A N C E
S P E A K E R C R O S S O V E R
R O O M E Q S E T U P
R E T U R N T O M A I N M E N U
2.
Select the desired menu with the
3 or
4 cursor buttons, and press the ENTER
button.
Note
• After you complete this the portion of the setup,
press the
3, 4, 1, and 2 cursor button. The
cursor will move to “RETURN TO SETUP
MENU” and press the ENTER button to go to
the Sub-menu.
S P E A K E R / R . E Q S E T U P
> A U T O S E T U P
S P E A K E R C O N F I G
S P E A K E R D I S T A N C E
S P E A K E R C R O S S O V E R
R O O M E Q S E T U P
R
R E T U R N T O M A I N M E N U
S P E A K E R D I S T A N C E
> U N I T : M E T E R S
F R O N T L E F T : 1 0 . 0 f t
C E N T E R : 1 0 . 0 f t
F R O N T R I G H T : 1 0 . 0 f t
S U R R R I G H T : 1 0 . 0 f t
S U R R . B R : 1 0 . 0 f t
S U R R . B L : 1 0 . 0 f t
S U R R L E F T : 1 0 . 0 f t
S U B W O O F E R : 1 0 . 0 f t
R E T U R N T O S E T U P M E N U
S P E A K E R X - O V E R
> F R O N T : F U L L R A N G E
C E N T E R : 7 0 H z
S U R R O U N D : 7 0 H z
S U R R . B : 7 0 H z
R E T U R N T O S E T U P M E N U
R O O M E Q C O N F I G
> M O D E : O F F
R E T U R N T O M A I N M E N U
A U T O S E T U P
B E F O R E S T A R T I N G T H E
S Y S T E M P L E A S E P L U G
T H E M I C . I N U S I N G
T H E F R O N T P A N E L J A C K
* * W A R N I N G * *
T H E T E S T T O N E I S L O U D
> S T A R T
R E T U R N T O M A I N M E N U
A U T O S E T U P
C O M P L E T E D
> A P P L Y C A N C E L
S P E A K E R C O N F I G
> C E N T E R : Y E S
S U R R O U N D : Y E S
S U R R . B : 2 C H
S U B W O O F E R : Y E S
R E T U R N T O S E T U P M E N U