Setup – Marantz NR1501 User Manual
Page 26
NAMES AND
FUNCTIONS
22
BASIC
CONNECTIONS
BASIC
OPERA
TION
ADV
ANCED
CONNECTIONS
SETUP
ADV
ANCED
OPERA
TION
TROUBLESHOOTING
OTHERS
SETUP
ENGLISH
SETUP
3-1 AUTO SETUP
The unit's AUTO SETUP function automatically
measures the acoustic characteristics of the
speaker systems and listening room where the unit
is installed using the microphone provided, and sets
the optimum listening environment.
HOW TO OPERATE AUTO SETUP
During the measurement process, as the current
statuses will be displayed on the OSD menu screen,
turn on the monitor's power.
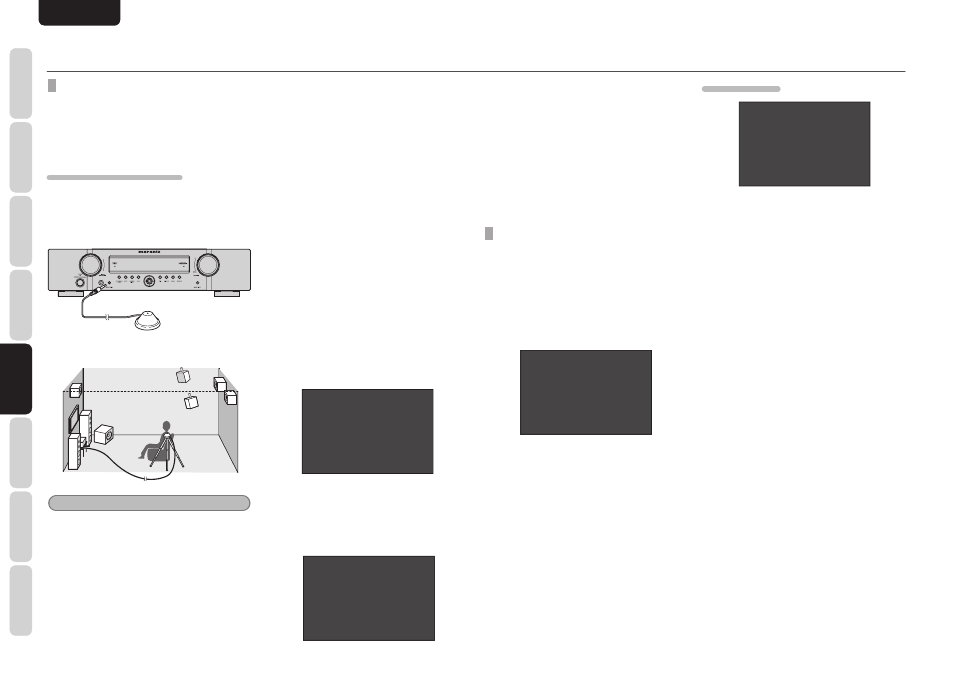
1.
Connect the microphone provided to the
SETUP MIC jack on the front panel.
2.
Position the microphone at the main
listening point.
Notes
• Place the microphone at the main listening point
before carrying out the measurements.
• With the microphone pointed straight up at the
ceiling at the listening point, use a stand or tripod
to adjust the microphone to the same height above
the fl oor level as your ears.
• Be sure not to place any obstacles between the
speakers and microphone.
• When using a subwoofer with built-in amplifi er,
set the volume control to the center position, and
set the crossover frequency to off or the highest
frequency.
• While the measurements are being performed,
do not stand between the microphone and either
speaker. Make the listening room as quiet as
possible. Dark noise may adversely affect the
indoor measurements. Close the windows, and
turn off the power of all devices (such as cell
phones, TV, radio, air conditioner, fl uorescent
lights, electrical appliances or dimmers).
• During the measurement process, place your cell
phone at a distance from all the audio electronic
devices.
Cell phones, even when they are not being used,
may adversely affect the measurements due to
RFI (radio frequency interference).
• We recommend that the AUTO SETUP operation
be performed using the remote controller rather
than the front panel controls.
• The volume levels of the test tones played from
each channel will exceed the peripheral noise
in the listening environment and continue to
increase until the optimum signal-to-noise ratio
is attained.
• Proceed while taking the environment and any
nearby children into consideration.
3.
Select SPEAKER SETUP on the MAIN
MENU, press the
3/4 cursor buttons to
select AUTO SETUP, and press the ENTER
button to display the start screen.
A U T O S E T U P
B E F O R E S T A R T I N G T H E
S Y S T E M P L E A S E P L U G
T H E M I C . I N U S I N G
T H E F R O N T P A N E L J A C K
* * W A R N I N G * *
T H E T E S T T O N E I S L O U D
> S T A R T
R E T U R N T O M A I N M E N U
4.
Press the
3/4 cursor buttons to select
START, and press the ENTER button to start
the measurements.
When the measurements have been
completed, the screen shown below will
appear.
A U T O S E T U P
C O M P L E T E D
> A P P L Y C A N C E L
To reflect the measurement results, move the
cursor to APPLY, and press the ENTER button. The
results that have been set by the AUTO SETUP can
be monitored on the menu setting screens shown
below.
• SPEAKER CONFIG (see page 22)
• SPEAKER DISTANCE (see page 23)
• SPEAKER CROSSOVER (see page 23)
• ROOM EQ SETUP (see page 23)
• CH LEVEL SETUP (see page 24)
3-2 MANUAL SETUP
When you want to set up the system to your
specifi cations rather than using AUTO SETUP, set
the following items.
• SPEAKER CONFIG
• SPEAKER DISTANCE
• SPEAKER CROSSOVER
• ROOM EQ SETUP
• CH LEVEL SETUP
S P E A K E R / R . E Q S E T U P
> A U T O S E T U P
S P E A K E R C O N F I G
S P E A K E R D I S T A N C E
S P E A K E R C R O S S O V E R
R O O M E Q S E T U P
R
R E T U R N T O S E T U P M E N U
1.
Select SPEAKER SETUP from the MAIN
MENU.
2.
Press the
3/4 cursor buttons to select an
item.
3.
Press the ENTER button to enter what has
been selected.
4.
Repeat steps
2 and 3 until all the settings
have been selected. Then press the
3/4
cursor buttons to select RETURN TO SETUP
MENU, and press the ENTER button.
SPEAKER CONFIG
S P E A K E R C O N F I G
> C E N T E R : Y E S
S U R R O U N D : Y E S
S U R R . B : 2 C H
S U B W O O F E R : Y E S
R E T U R N T O S E T U P M E N U
The confi guration of the speakers connected to the
unit is set by following the steps below.
1.
Press the
3/4 cursor buttons to select the
speakers of each channel.
2.
Press the
1/2 cursor buttons to set whether
a speaker is to be selected (YES) or not
(NO).
CENTER:
Set whether the center speaker is to be selected
(YES) or not (NO).
SURROUND:
Select whether the surround left and right speakers
are to be selected (YES) or not (NO).
SURR. B:
Set the surround back left and right speakers.
2CH:
Select this when using the surround back left and
right speakers.
1CH:
Select this when using one surround back speaker.
The audio signals will be output from the SURR.-L
terminal. Check the connections.
NO:
Select this when not using both surround back left
and right speakers.
SUBWOOFER:
Select whether the subwoofer is to be selected
(YES) or not (NO).
3.
When all the settings have been selected,
press the
3/4/1/2 cursor buttons to select
RETURN TO SETUP MENU, and press
the ENTER button to return to the menu
(SPEAKER/R.EQ SETUP).