Kichler 337008 User Manual
Kichler Hardware
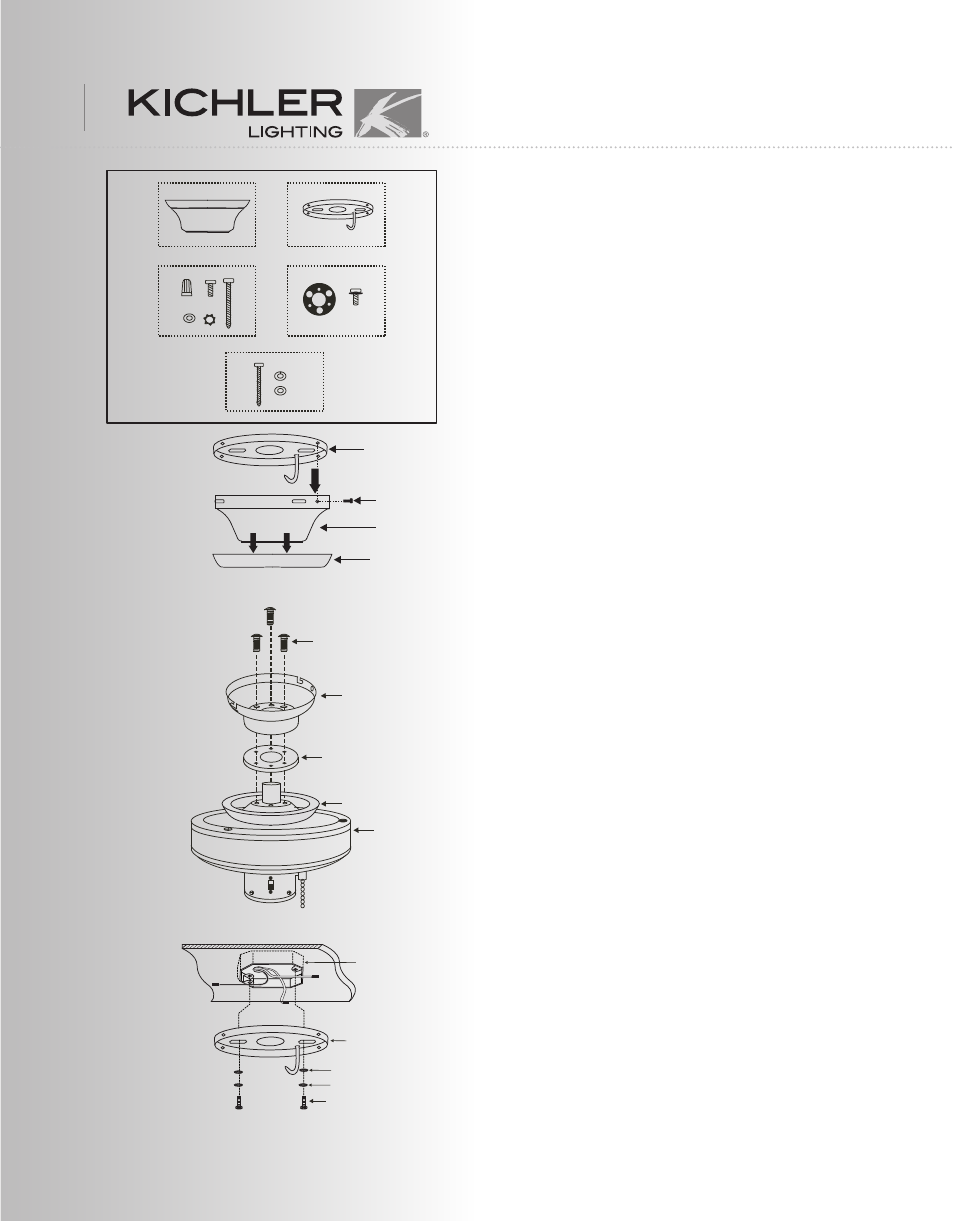
1
1. Remove the canopy ring from the canopy.
(Fig. A)
2. Remove the mounting plate from the canopy
by loosening the four screws on the top of the
canopy. Remove the two non-slotted screws
and loosen the slotted screws. This will enable
you to remove the mounting plate. (Fig. A)
3. Remove 3 of the 6 screws (Every other
screw) from the top of the motor housing.
4. Route motor wires through the canopy ring,
rubber gasket and canopy supplied with this kit.
(Fig. B)
5. Align the recessed holes in the canopy along
with the rubber gasket over the three screw
heads on the top of the motor housing. (Fig. B)
6. Secure the canopy to the top of the motor
housing by tightening three 3/16" x 16mm
screws provided. (Fig. B)
7. Secure the mounting plate to the ceiling
outlet box using the two 8-32 x 3/4" screws, star
washers, lock washers and flat washers
provided. (Fig. C)
Fig. A
Fig. C
Fig. B
C
D
E
A
B
A. Canopy
B. Mounting plate (located inside canopy)
C. #10 X 1.5" Wood screws (2 PCs.),
#8-32 X 3/4" Machine screws (2PCs.),
4mm Star washers (2 PCs.),
Wire nuts (3 PCs. ), Washers (2PCs.).
D. 3/16" x 16 mm screws (3PCs.), Rubber
gasket.
E. Safety cable hardware: Wood screw, Lock
washer and Flat washer.
BE SURE TO FOLLOW ALL STEPS IN THE
ORDER GIVEN. BE SURE POWER IS OFF
AT FUSE, OR CIRCUIT BREAKER BOX.
Screws
8-32 X 3/4"
Flat Washers
Mounting plate
Outlet box
Star Washers
Screws
3/16" X 16 MM
Canopy
Rubber gasket
Motor
housing
Canopy ring
Ceiling
mounting
plate
Ceiling
canopy
Screws
Canopy
ring