Panel description, Front panel, Back panel – Atlona AT UHD CLSO 824 User Manual
Page 4: Hdmi 4 through 7 - connect hdmi sources, Vga 8 - connect analog video sources, Dc 48v port - connect included power supply, Ex. at-pa100-g2), Ethernet), Ex. at-hdvs-150-tx), Dvi or displayport compatible with adaptors)
4
atlona.com
Toll free: 1-877-536-3976
Local: 1-408-962-0515
Panel Description
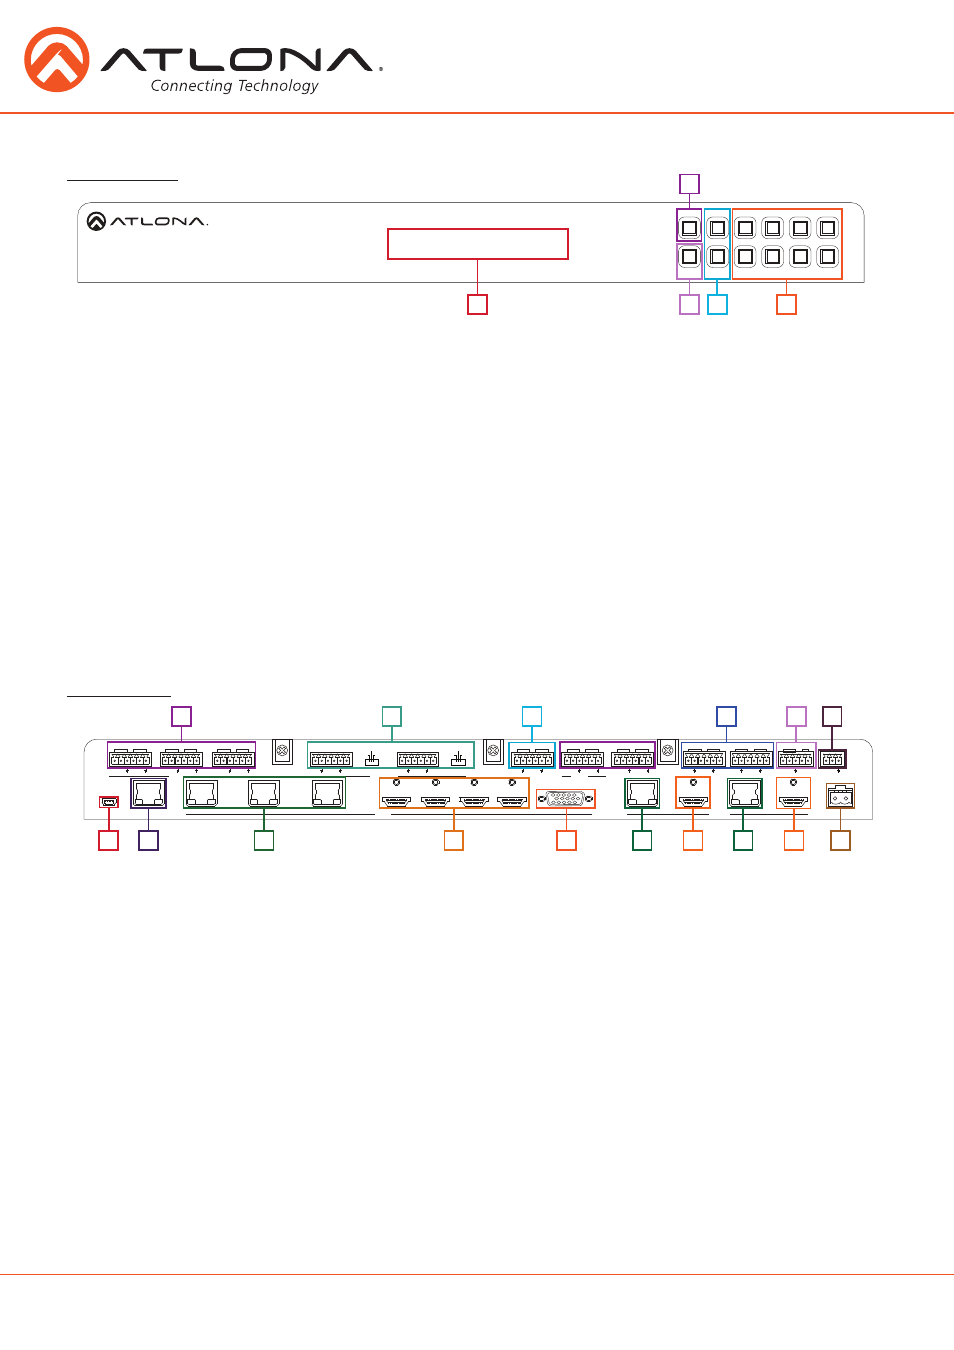
Front Panel
1. LED screen - Front panel LED display for status and control
2. Menu - Access the front panel setup controls - also used within the menu as a back button
3. Enter - Select options within the front panel control menu
Note: Menu and Enter pressed and held for at least 3 seconds will put unit in standby
4.
^ and - Use to navigate between selections within the front panel control menu
5. Numeric Keys - Switch between inputs and outputs
1 - HDBaseT input 1 - Used while updating MCU firmware
2 - HDBaseT input 2
3 - HDBaseT input 3 - Used while updating DSP firmware
4 - HDMI input 4 - Used while updating FPGA firmware
5 - HDMI input 5 - Used while updating the TX (HDBaseT output) firmware
6 - HDMI input 6 - Used while updating the RX (HDBaseT input) firmware
7 - HDMI input 7
8 - Multifunction VGA input 8
Back Panel
1. RS-232 ports - Control for external devices - send or receive RS-232 or TCP/IP commands
2. MIC/LINE IN - Connect a microphone or audio sources
MIC Switch - Match input to type of microphone or audio source being used
3. Audio In - Connect audio sources to be embedded to any video input
4. Audio Out - Audio output to audio amplifiers
(ex. AT-PA100-G2)
or audio systems
5. IR IN/OUT - Switcher IR control ports
6. Master RS-232 - Connect control system to control the switcher
7. Firmware port - Connect to a PC with a USB cable for firmware updating
8. LAN port - TCP/IP
(Ethernet)
port, connect to router, computer, or control device
9. HDBaseT 1 through 3 - Connect compatible PoE HDBaseT transmitters
(ex. AT-HDVS-150-TX)
10. HDMI 4 through 7 - Connect HDMI sources
(DVI or DisplayPort compatible with adaptors)
11. VGA 8 - Connect analog video sources
Note: Compatible with VGA, RGBHV and component signals
12. HDBaseT Outputs - Connect to compatible HDBaseT displays or compatible receivers
(ex. AT-UHD-EX-100CE-RX)
13. HDMI Outputs - Connect to local display or extenders
(ex. AT-UHD-EX-100CE-KIT)
14. DC 48V port - Connect included power supply
LAN
1
1
2
1
2
3
4
L
R
L
R
2
3
4
INPUT
AT-UHD-CLSO-824
OUTPUT
5
6
7
8
RX
RS-232
MIC/LINE IN
LINE
MIC
48V
AUDIO IN
TX
RX TX
RX TX
RX TX
+
- +
+
PWRIR
-
-
+
- +
-
<
<
DC 48V
-
+
FW
RS-232
IR
AUDIO OUT
MASTER
OUT
IN
RX TX
+
- +
-
5
6
1
2
3
4
5
ENTER
MENU
6
7
8
RX TX
RX TX
7
8
8
1
1
2
2
RS-232
RX TX
RX TX
9
10
RX TX
RX TX
LINE
MIC
48V
+
- +
-
L
R
+
- +
-
AUDIO OUT
^
LAN
1
1
2
1
2
3
4
L
R
L
R
2
3
4
INPUT
AT-UHD-CLSO-824
OUTPUT
5
6
7
8
RX
RS-232
MIC/LINE IN
LINE
MIC
48V
AUDIO IN
TX
RX TX
RX TX
RX TX
+
- +
+
PWRIR
-
-
+
- +
-
<
<
DC 48V
-
+
FW
RS-232
IR
AUDIO OUT
MASTER
OUT
IN
RX TX
+
- +
-
5
6
1
2
3
4
5
ENTER
MENU
6
7
8
RX TX
RX TX
7
8
8
1
1
2
2
RS-232
RX TX
RX TX
9
10
RX TX
RX TX
LINE
MIC
48V
+
- +
-
L
R
+
- +
-
AUDIO OUT
1
9
10
2
11
13
13
3
12
12
4
8
5
7
14
1
2
3
4
5
6