Crank pulley installation, Crank pulley installation -1 – Paxton Superchargers Dodge Viper RT/10 User Manual
Page 15
4-1
P/N: 4809646
©2006 Paxton Automotive
All Rights Reserved, Intl. Copr. Secured
17FEB06 v2.0 92-96Viper(4809646v2.0)
Section 4
CRANK PULLEY INSTALLATION
A.
Remove the harmonic damper retaining
screw. Placing the vehicle in first gear with
the emergency brake applied should keep
the engine from turning over.
B.
Dowel pins must be installed through the
damper and into the crankshaft to assure that
the damper does not rotate on the crankshaft
snout during engine operation.
C.
Install the supplied drill guide onto the
damper using two of the screws that held the
crankshaft pulley on. Orient the damper so
that the hardened drill insert is rotated to be
as high as possible.
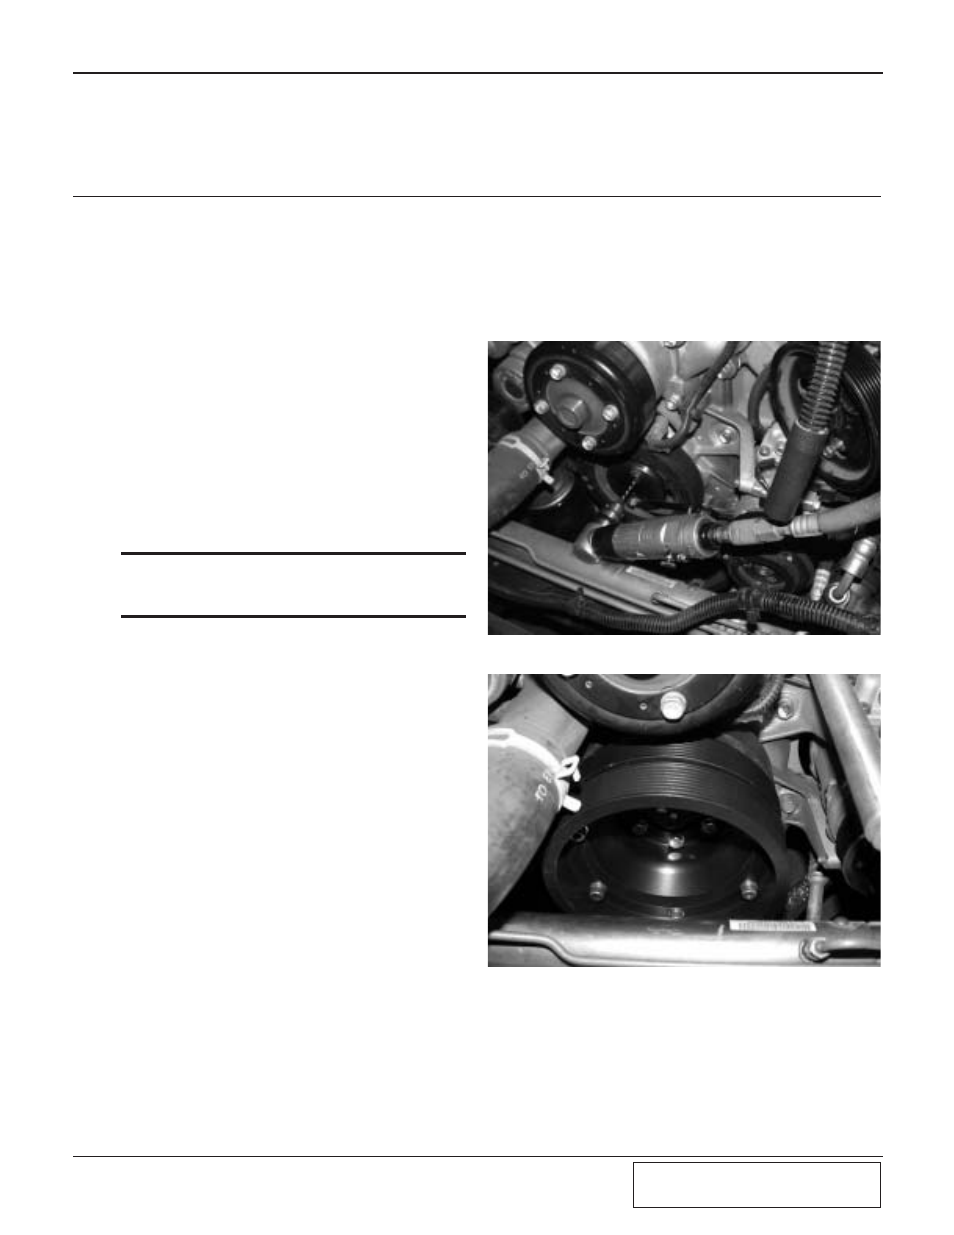
D.
Using a right angle drill and the supplied
#31 (.120") drill bit, drill into the damper
face at least 1-1/4". (See Fig. 4-a.)
***NOTE***
Remember to add 1/4" for the drill guide thickness. The
drill bit must go in at least 1-1/2" from the surface of
the drill guide.
E.
Using the supplied 1/8" reamer, plunge once
to the end of the drilled hole and remove.
F.
Remove drill guide from damper.
G.
Line up one of the supplied dowel pins and
lightly tap into the reamed hole until flush.
H.
Rotate drill guide 180° from the previously
installed position. Rotate engine until the
drill insert is at highest point and repeat
steps D-F.
I.
Tap both dowel pins into the damper until
they are flush.
J.
Re-install the Damper retaining bolt using
threadlocker and torque to 250 ft-lbs.
K.
Install the supplied 7-rib crank pulley onto
the harmonic damper using the supplied
5/16 x 1" hex head screws and thread locker.
If necessary, heat the pulley until the pilot
slides easily over the harmonic damper pilot.
Torque the six mounting screws, in a rotat-
ing pattern, to 25 Ft-lbs.
4.
CRANK PULLEY INSTALLATION
Fig. 4-a
Fig. 4-b
L.
Install the supercharger 8-rib crank pulley
into the pilot on the 7-rib crank pulley. If
necessary, heat the 7-rib pulley until the 8-
rib pulley pilot bottoms out fully. Install the
supplied 5/16" x 1" socket head cap screws
using washers and torque in a rotating pat-
tern to 20 Ft-lbs. (See Fig 4-b).