Multi – Marantz SR9600N User Manual
Page 40
36
ENGLISH
5.
Measurement results are displayed. Check
the speaker system.
YES: Speakers connected
NON: Speakers disconnected
REV: The speaker cable is opposite in polarity
(Check the speaker's cable connection.)
ERR: The speaker layout is incorrect.
(Check against cable connection diagrams.)
Error example
Move the cursor to “NEXT” or “RETRY” with the or
cursor buttons and press the OK/ENTER button.
RETRY: Retries measurement from the beginning.
NEXT: Advances to the Auto Setup 3 menu.
(If there is an error, "NEXT" cannot be displayed.)
6.
Move the cursor to “NEXT” with the , ,
and cursor buttons and press the OK/
ENTER button. Measurement starts for the
remaining items.
7.
When measurements are complete, “FINISH!!”
and “CHECK RESULT” are displayed.
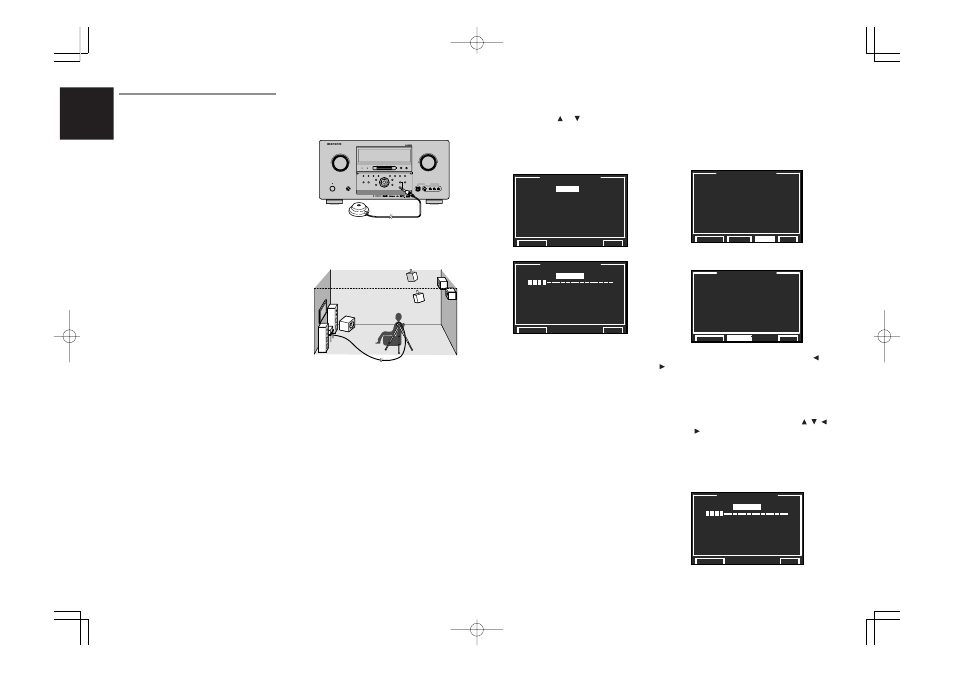
How to operate
Since settings are displayed on the monitor during
setup, turn the monitor on.
1.
Connect the included microphone to the MIC
jack on the SR9600.
2.
Set the microphone at ear height in the actual
listening position. Use a stand or tripod to
position the microphone.
Notes:
• Remove any obstructions between the speakers
and the microphone.
• Keep the room quiet during measurement.
• The test tone emitted during measurement is loud.
Please be consideratie of neighboring homes and
children.
• If using a powered subwoofer, set volume to
medium level and the crossover frequency to the
highest level.
• Step away from the listening position during
measurement and operate the SR9600 with the
remote control unit from outside the speaker path.
• The MRAC feature is not available in the following
modes.
- 7.1 Ch Input
- Pure Direct
- Source Direct
- Dolby Headphone
3.
Either press the MRAC button on the front
panel of the SR9600, or select “2. SPKR
SETUP” on the MAIN MENU. Select “AUTO
SETUP” with the or cursor buttons and
press the OK/ENTER button.
4.
Select START on the AUTO SETUP 1 display
and press the OK/ENTER button to start
measurements.
Measurement in progress examples
START:
Press the OK/ENTER button. The indication
changes to “CANCEL” and processing starts.
CANCEL (Available only during processing):
Interrupt processing with the OK/ENTER button.
The status prior to the start of Auto Setup 1 is
restored.
Progress bar:
Restarts from 0 each time processing ends for
each item.
During measurement, “- - ” appears in the
message area, otherwise “
✽✽
” appears. When
measurement ends successfully, “OK” is
displayed.
2-1 MRAC (Marantz Room Acoustic Calibration)
Speaker settings that would be difficult to configure
using manual setup can now be performed by
automatically measuring speaker characteristics
using the microphone.
Measurement
During measurement, a test tone is output from the
speakers, which is then measured and analyzed
though the microphone. The item and the order in
which they are measured are as follows:
AUTO SETUP 1
AMBIENT NOISE: Ambient noise measurement
SPEAKER CHECK: Speaker connected/not
connected check
PHASE CHECK: Speakers phase check
AUTO SETUP 2
Results from the measurements are checked.
AUTO SETUP 3
SPEAKER SIZE: Speaker characteristics check
SPEAKER DISTANCE: Distance from speaker
(delay time) check
FLAT MODE: Speaker frequency measurement.
This measurement identifies the frequency required
to compensate the sound to the flat level.
FRONT MODE: Speaker frequency measurement.
This measurement identifies the frequency required
to match the front speaker characteristics.
MULTI
MULTI
SPEAKER
SPEAKER
F/P
F/P
BAND
BAND
THX
THX
PURE DIRECT
PURE DIRECT
UP
UP
DOWN
DOWN
TUNING
TUNING
AUX 1 INPUT
AUX 1 INPUT
R
R
AUDIO
AUDIO
DIGITAL
DIGITAL
S-VIDEO
S-VIDEO
L
L
VIDEO
VIDEO
POWER ON/OFF
POWER ON/OFF
VOLUME
VOLUME
UP
UP
DOWN
DOWN
INPUT SELECTOR
INPUT SELECTOR
PHONES
PHONES
STANDBY
STANDBY
AV SURROUND RECEIVER SR9600
AV SURROUND RECEIVER SR9600
SURROUND
SURROUND
MIC
MIC
ENTER
ENTER
MENU
MENU
PURE DIRECT
PURE DIRECT
THX
THX
7.1CH INPUT
7.1CH INPUT
MODE
MODE
AUTO
AUTO
MULTI
MULTI
A/B
A/B
T-MODE
T-MODE
MEMORY
MEMORY
CLEAR
CLEAR
DISPLAY
DISPLAY
EXIT
EXIT
SPEAKERS
SPEAKERS
MRAC
MRAC
AUTO TUNE
AUTO TUNE
A U T O
S E T U P
1
S T A R T
A M B I E N T N O I S E
:
**
S P E A K E R S
C H E C K
:
**
P H A S E
C H E C K
:
**
R E T U R N
N E X T
E X I T
A U T O
S E T U P
1
C A N C E L
N O W
A N A L Y Z I N G
! !
A M B I E N T N O I S E
:
O K
S P E A K E R S
C H E C K
:
- -
P H A S E
C H E C K
:
**
R E T U R N
N E X T
E X I T
A U T O
S E T U P
2
C H E C K ! !
S P E A K E R
F R O N T
L
:
Y E S
C E N T E R
:
N O N
F R O N T
R
:
Y E S
S U R R . R
:
Y E S
S U R R . B
R
:
N O N
S U R R . B
L
:
N O N
S U R R . L
:
Y E S
S U B
W
:
Y E S
R E T U R N
R E T R Y
N E X T
E X I T
A U T O
S E T U P
2
C H E C K ! !
S P E A K E R
F R O N T
L
:
Y E S
R E V
C E N T E R
:
N O N
F R O N T
R
:
Y E S
R E V
S U R R . R
:
N O N
E R R
S U R R . B
R
:
Y E S
E R R
R E V
S U R R . B
L
:
Y E S
E R R
R E V
S U R R . L
:
N O N
E R R
S U B
W
:
Y E S
R E T U R N
R E T R Y
E X I T
A U T O
S E T U P
3
C A N C E L
N O W
A N A L Y Z I N G
! !
S P E A K E R S
S I Z E
:
- -
D I S T A N C E
:
**
F L A T
M O D E
:
**
F R O N T
M O D E
:
**
R E T U R N
E X I T
SR9600N DFU_01_ENG 3_4
05.5.23, 5:47 PM
Page 36
Adobe PageMaker 6.5J/PPC