English, 7 audio status – Marantz SR9600N User Manual
Page 51
47
ENGLISH
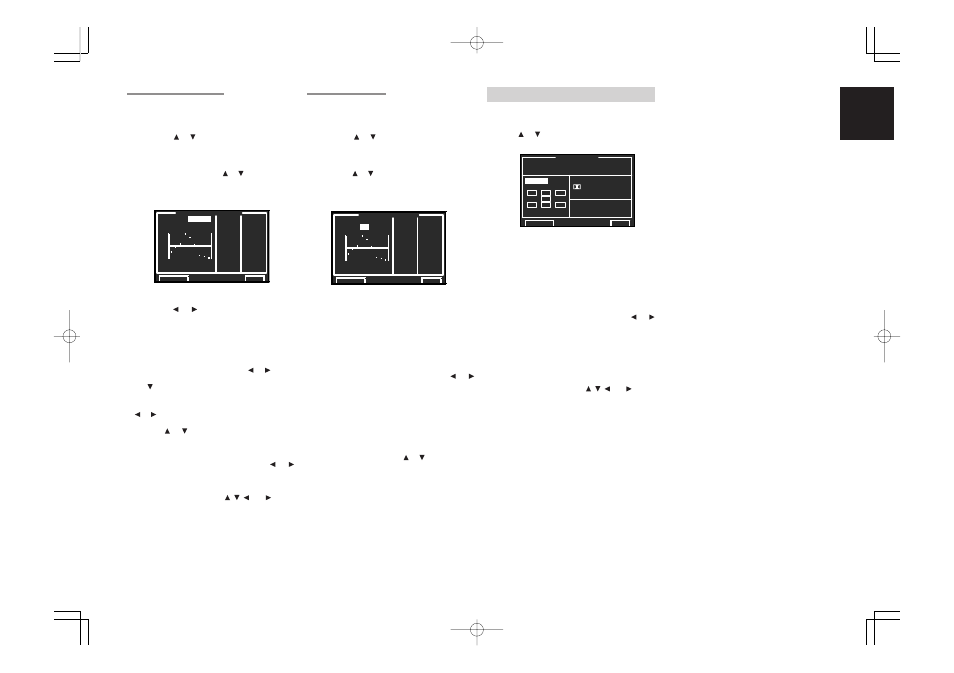
7 AUDIO STATUS
This menu provides current audio information.
1.
Select “7. STATUS” from MAIN MENU with
the or cursor buttons and press the OK/
ENTER button.
SURR. MODE:
Displays the selected surround mode.
FORMAT:
Displays the audio format of the input source.
Fs:
Displays the sampling frequency of the input
source.
INPUT (OUTPUT)
Select “INPUT” or “OUTPUT” with the or
cursor buttons.
INPUT:
Displays the input channel of the source signal.
OUTPUT:
Displays the output channel.
To select “RETURN” with the , , and cursor
buttons and press the OK/ENTER button to go to
MAIN MENU.
Note:
When playing back a disk such as an SACD or
DVD-Audio disk via i.LINK or HDMI, the actual
audio and display may not match with some DVD
players.
6-2 CHECK AUTO 1 & 2
These menus are for confirming the results of
MRAC equalizer measurement (AUTO 1/2).
1.
Select “6. ACOUSTIC EQ” from MAIN MENU
with the or cursor buttons and press the
OK/ENTER button.
2.
Select “CHECK AUTO 1 (or CHECK AUTO 2)”
with the or cursor buttons.
3.
Press the OK/ENTER button to enter the
selection.
The CHECK AUTO 1 menu displays the frequency
which is automatically compensated for the flat
level of the all channels.
The CHECK AUTO 2 menu displays the frequency
which is automatically compensated for the front
speaker characteristics.
CH:
Select the channel to check with the or
cursor buttons.
Notes:
• The frequency will not be exactly the same as in
the Preset G. EQ modes.
• FL and FR are not indicated on the CHECK
AUTO 2 menu.
Select “RETURN”, press the or cursor buttons
and press the OK/ENTER button to go to “6.
ACOUSTIC EQ.”.
6-1 PRESET G. EQ 1 & 2 ADJ
These modes allow you to set a 9-band graphic
equalizer for each of the 7 channels.
1.
Select “6. ACOUSTIC EQ” from MAIN MENU
with the or cursor buttons and press the
OK/ENTER button.
2.
Select “PRESET G. EQ 1 ADJ (or PRESET
G. EQ 2 ADJ) ”with the or cursor buttons.
3.
Press the OK/ENTER button to enter the
selection.
RESET:
Using the or cursor buttons, select the
channel(s) to be reset to either the currently
displayed channel (“THIS”) or all channels
(“ALLCH”), and press the OK/ENTER button to
enter the setting.
CH:
Select the channel (“FL”, “C”, “FR”, “SR”, “SBL”,
“SBR” or “SL”) to adjust with the or cursor
buttons, and switch to the adjustment mode with
the cursor button.
Frequency:
Select the target frequency on the graph with the
or cursor buttons and press the OK/ENTER
button to enter the selection. Adjust the level
with the or cursor buttons. (Note that this
can be adjusted to any level between –12 and
+12 dB in 0.5 dB increments.) Press the OK/
ENTER button to enter the setting.
Move to the next frequency with the or
cursor buttons, and adjust the level.
After you complete this portion of the setup, move
cursor to “RETURN” with the , , and cursor
buttons and press the OK/ENTER button.
7 . S T A T U S
S U R R . M O D E :
T H X
S U R R O U N D
E X
I N P U T
:
F O R M A T :
L
C
R
LFE
SL
S
SR
F s :
4 8 k H z
R E T U R N
E X I T
D i g i t a l
P R E S E T 1
A D J U S T
R E S E T :
A L L C H
6 3
- 6 . 0
C H
: S R
1 2 5
- 1 . 5
2 5 0
+ 1 . 5
5 0 0 + 1 2 . 0
1 k
+ 8 . 5
2 k
+ 1 . 5
4 k
- 9 . 0
8 k - 1 0 . 5
1 6 k - 1 2 . 0
R E T U R N
E X I T
63
1k
4k
16kHz
250
+12
-12
0dB
125
500
2k
8k
C H E C K
A U T O
1
M O D E → F L A T
6 3
- 6 . 0
C H
:
F R
1 0 0
- 1 . 5
2 5 0
+ 1 . 5
3 1 5 + 1 2 . 0
6 3 0
+ 8 . 5
2 k
+ 1 . 5
4 k
- 9 . 0
8 k - 1 0 . 5
1 2 . 5 k - 1 2 . 0
R E T U R N
E X I T
63
16kHz
+12
-12
0dB
SR9600N DFU_01_ENG 3_4
05.5.23, 5:48 PM
Page 47
Adobe PageMaker 6.5J/PPC