Maintenance – Polaris 2010 Victory Victory Vision 8-Ball User Manual
Page 159
155
Ma
inte
nan
c
e
Maintenance
Drive Belt Tension Inspection
6. Note the graduation mark on the rule that aligns with the lower
edge of the belt. This position represents zero force.
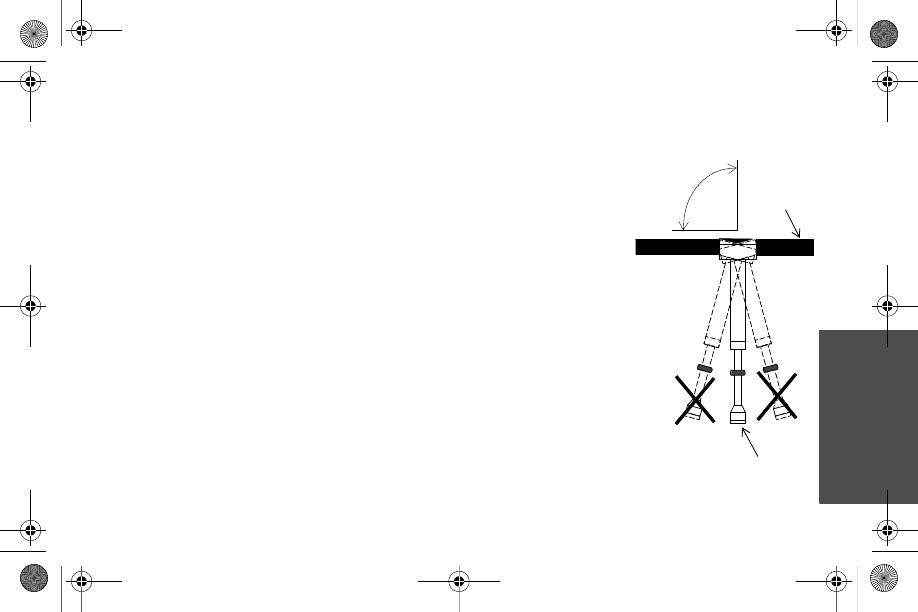
7. Place the support base of the tension gauge squarely against the
lower surface of the belt as close as possible to the rule or tape.
8. Keeping the tension gauge perpendicular to the belt surface and
parallel with its length, push the plunger upward until the small
O-ring touches the tension gauge body.
9. Be sure the tension gauge is seated squarely against the belt,
and note the graduation mark on the rule that now aligns with
the lower edge of the belt. This position represents 10 lbs.
force.
10. To calculate belt tension (deflection) subtract the smaller mea-
surement from the larger measurement and record it.
Push Inner Plunger
90°
Drive Belt
08 Maintenance.fm Page 155 Monday, May 11, 2009 2:03 PM
- 2010 Victory Victory Vision 2010 Victory Cross Country 2010 Victory Cross Roads 2010 Victory Vegas 2010 Victory Vegas 8-Ball 2010 Victory Kingpin 2010 Victory Kingpin 8-Ball 2010 Victory Hammer 2010 Victory Hammer S 2010 Victory Hammer 8-Ball 2010 Victory Vegas Jackpot 2010 Victory Ness Signature Series Vegas Jackpot 2015 Victory Hammer 8-Ball 2015 Victory Hammer S 2015 Victory Vegas Jackpot 2015 Victory Vegas 8-Ball 2015 Victory High-Ball 2015 Victory Victory Judge 2015 Victory Boardwalk 2015 Victory Victory Gunner 2015 Victory Judge 2015 Victory Gunner 2011 Victory Cross Country 2011 Victory Cross Roads 2013 Victory Vision Tour INTL 2013 Victory Ness Signature Series Vision Tour INTL 2011 Victory Victory Vision 2011 Victory Victory Vision 8-Ball 2013 Victory Vision Tour 2013 Victory Ness Signature Series Vision Tour 2012 Victory Victory Vision 2012 Victory Ness Signature Series Victory Vision 2015 Victory Victory Vision 2015 Victory Vision Tour 2016 Victory Vision Tour