Skutt KilnMaster Kilns Manufactured between 2000 and 2006 User Manual
Page 13
11
P
REPARATION
B
EFORE
F
IRING
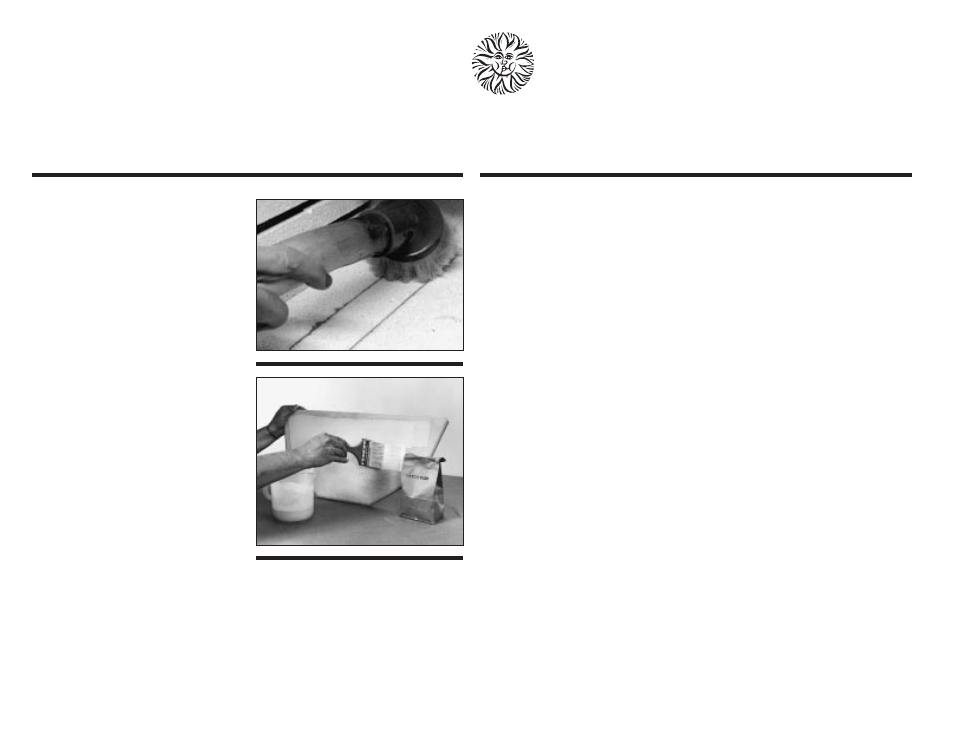
Remove any brick chips or other foreign
matter from around the elements. Bits of
bisque and glaze will eat through ele-
ments and our warranty cannot cover
such accidents. We recommend that you
vacuum the inside of the kiln to remove
any dust that accumulates during ship-
ment.
Wipe all new shelves clean, and brush
coat one side of each with high fire kiln
wash. Apply a thin coating of kiln wash in
one direction, allow to dry and apply
another thin coating in the opposite direc-
tion leaving a 1/2” margin from the out-
side edge of the shelf. A new coat is sel-
dom needed—just spot-patch and sand
off the surface evenly with coarse sandpa-
per wrapped around a wooden block. A
fresh coat may be needed before a porce-
lain firing if glaze has dripped onto the
shelf.
Kiln wash the floor of the kiln, being
careful to leave a one inch margin
unpainted all the way around interior
edge. Never kiln wash the walls or lid of
your kiln!
T
HE
I
MPORTANT
F
IRST
T
EST
F
IRING
Now you’re ready to fire. Be sure to
review the preceding sections, double
checking for safety and correct electrical
connections.
It is important to the life of your kiln that
your first firing be done properly. Before
you start, read this entire manual careful-
ly, including the preceding sections and
loading and firing instructions.
New elements and foreign matter like
dust give off vapors that tend to discolor
glazes. Therefore, your first firing should
be a Cone 04 empty test fire with only your
dry shelves in the kiln, posted as though
ware were on them. The first time the ele-
ments are fired they will give off some
smoke. This is normal and expected. This
is a good time to use Self-Supporting
Cones on the shelves to test the heat accu-
racy from top to bottom.
A Cone 04 (1944˚) is recommended for
proper pre-oxidation of a new element.
The steps to accomplish this firing are the
following:
1. Clear the PF message by pressing
Enter
.
2. Press Cone Fire mode.
3. Press 0 4 then Enter.
4. Press Medium speed then Enter.
5. Press Enter or an amount of time in
hours and minutes for Hold.
6. Press Start to begin the firing.The firing
will take approximately 7 1/2 hours.
Even though you have gone through a
simple program for a test firing, please
continue to read the detailed instructions
in the Cone Fire and Ramp/Hold sections
of this manual.
Periodically view your Self-Supporting
Cone by removing a peephole plug. It
should bend to the top of the base (5
o’clock position) and the kiln should turn
off about the same time. Watch your kiln
throughout the firing. Don’t rush through
the first firing. Make notes of things that
you want to remember and make visual
observations of the kiln while it is firing.
Likely, everything will work as it
should, and you’re ready to go on to pro-
duction firings. If things go wrong, re-read
this manual and contact your Skutt dealer.
You will notice a clicking sound while
your kiln is firing. This is normal. The ele-
ments are cycling on and off to stay within
the temperature parameters you have pro-
grammed.
After the first couple of firings, hairline
cracks may appear in the floor of a kiln.
This is caused by the expansion and con-
traction of the bottom slab caused by heat-
ing and cooling, and is considered normal.
It will not affect the firing of your kiln nor
the life of the kiln floor.