Ramp/hold mode – Skutt KilnMaster Kilns Manufactured between 2000 and 2006 User Manual
Page 25
23
Ramp/Hold Mode
An important note
To effectively use Ramp/Hold firing pro-
grams, it is imperative to understand heat
work theory. See Appendix 2 for further
details.
Description
The Ramp/Hold mode allows you to cre-
ate your own firing profile. The profile can
consist of 1 to 8 segments. Each segment
consists of three parameters: the rate of
temperature rising or cooling in ˚F or ˚C
per hour; the temperature to fire to during
that segment in ˚F or ˚C; and hold time at
the designated temperature for that seg-
ment. The user can program an alarm to
sound when a given temperature is
reached.
Rate
Rate can vary from 13˚ to 9999˚F/hr. For
comparison, in the Cone Fire mode Slow
rate, the initial rate is 80˚F/hr and in
Medium the initial rate is 200˚F/hr. In
Ramp/Hold mode, you decide how fast
you want the kiln to rise in temperature.
Segment 1 will always have a heating rate.
Note: If you should program an
unachievable heating rate such as
9999˚F/hour, the kiln cannot heat that fast
and will turn On and stay On, effectively
duplicating a High setting on a switch.
The actual rate of heating will be the maxi-
mum that particular kiln can achieve on
High. Generally, the maximum heating
rate in a fully loaded kiln is about 100˚ F
per hour as it approaches the top cone rat-
ing for the kiln.
Temperature
Temperature is the heat you want to reach
before holding or proceeding to the next
rate. The maximum temperature is 2400˚F
(1300˚C). If a Hold temperature is less
than the previous temperature entered,
the controller will ensure that the kiln will
not cool faster than the programmed rate.
Read Appendix 3 on heat work before
you use rate and temperature to emulate a
cone firing.
Hold
Hold is the amount of time in hours and
minutes you want to sustain at a given
temperature before it continues to the next
segment. Hold can be from zero to 99
hours 99 minutes. For example, a hold of
15 minutes will appear in the display as
00.15. Digits to the right of the decimal are
minutes; digits to the left are hours.
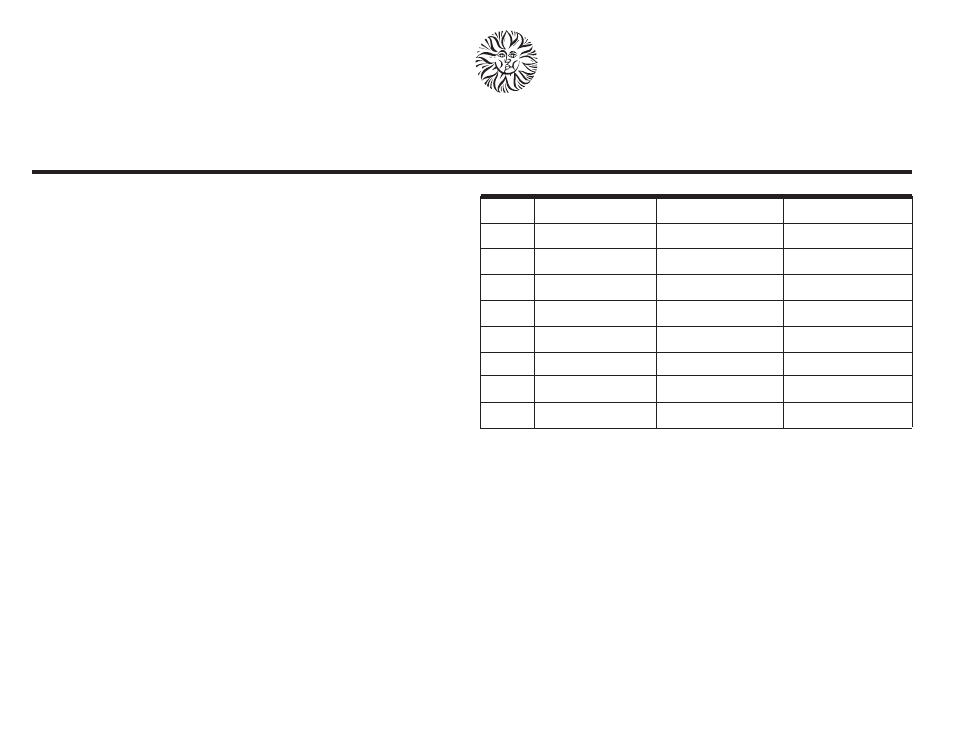
Recording your USEr programs
Before you begin input, copy this page or
create a chart to include all of the seg-
ments you plan to program. You may
have 1 to 8 segments. Each segment may
have three components as shown in the
blank chart above.
Calibration for critical work
For those who are doing critical work
which needs exact temperatures, periodi-
cally check the accuracy of the thermocou-
ple by placing witness cones on the
shelves. Observe the deformation of the
Self-Supporting Cones at the end of the
firing. If the shelf cone bends to maturity
7
8
5
6
4
1
2
3
Hold
Temperature
Rate
Segment
before the kiln turns off, press Stop and
make a note of the internal temperature.
Adjust the programmed cone or end fir-
ing temperature using the knowledge
gained from the cones from the previous
firing. Make a note of any adjustments
you have made so that your future firings
will be more accurate.
Inspect the thermocouple element regu-
larly and replace it as described on page 7
(wall-mounted controller) or 35 (KM kilns)
if it shows signs of flaking or thinning.