15 blending management – Analog Way ASCENDER 16 (LIVECORE) - Ref. ASC1602 User Manual User Manual
Page 65
65
7.3.15 Blending management
To set up your Monitoring output, you can choose:
- RATE:
Choose the output rate
- FORMAT:
Choose the output format
- TIMING:
Choose the signal timing format
- TYPE:
You can choose the type of output synchronization on analog plug or digital plug. Choose C-YC to
enable composite PAL or NTSC on composite plug
- STATUS:
Access the output status
- PATTERN:
A pattern is available to test your output without any input selected
- FLICKER:
Choose the value of the flicker filter to disabled the flicker effect on your screen (interlaced lines
effect)
- GAMMA:
Increase or decrease the luminosity of your output
- ASPECT:
You can enable the overscan and set the position and size
- HDCP:
Enable/disable and see the HDCP status
Depending on the output format chosen previously, all settings might not appear.
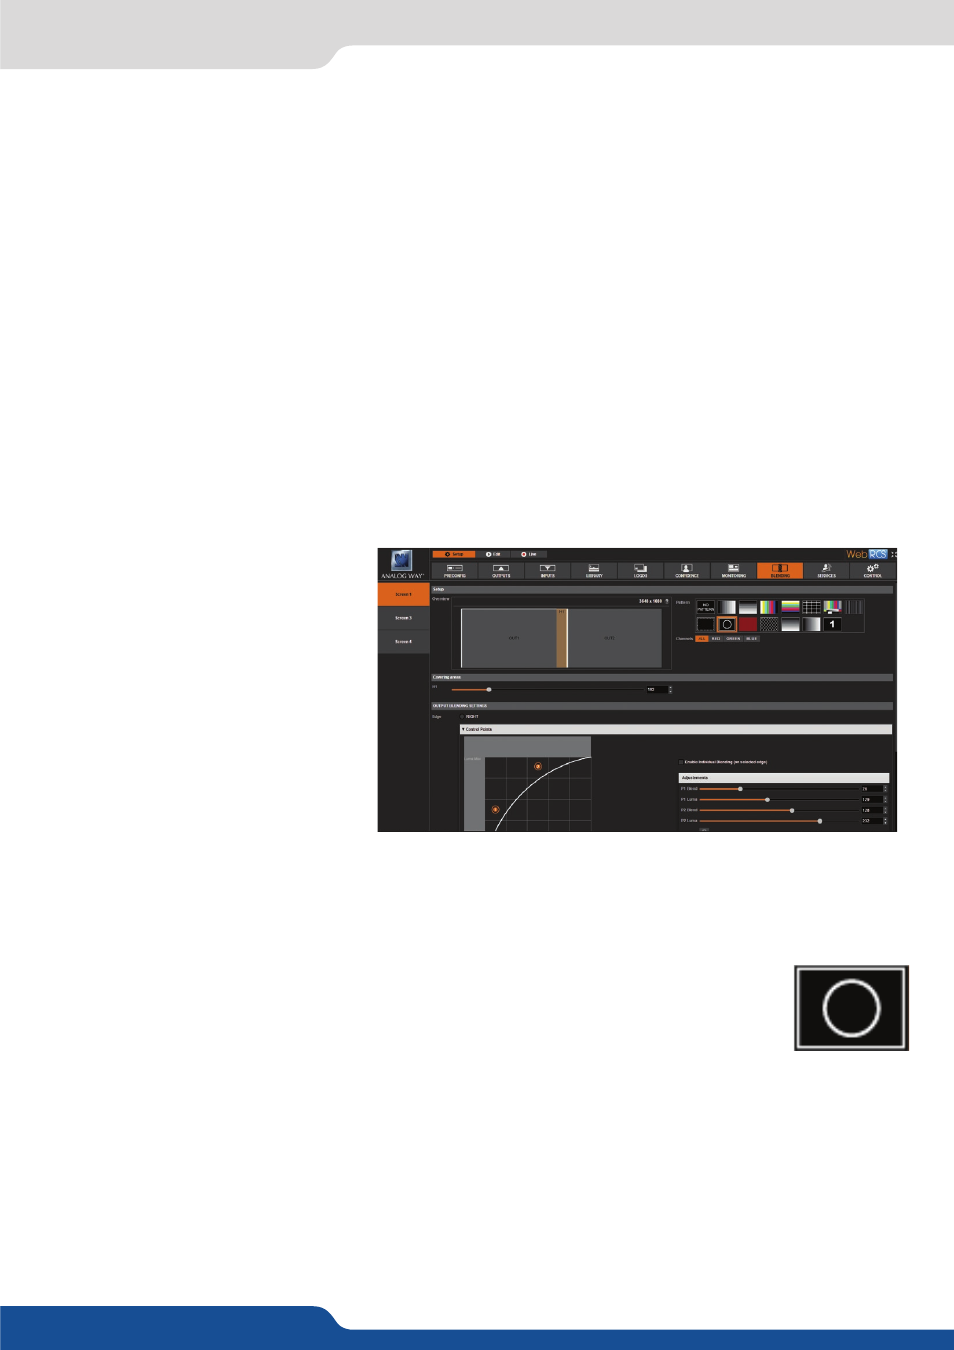
To have access to the blending
management, you first need to build
a screen with multiple outputs. This
is configured in the PRECONFIG >
SCREENS section.
SmartMatriX Ultra devices do not have
any blend capabilities. NeXtage 16,
Ascender 16 Ascender 32 & Ascender
48 devices can create blends between
any number of available outputs, both
horizontally and vertically.
To setup a soft-edge blend, proceed
with the BLENDING section:
To setup an effective blend, you will first need to physically align the projected images so they are square with
each other. Remember that you can adjust the number of lines and rows on the LiveCore™ grid test pattern.
to assist you.
Then, the covering area can be adjusted in pixel in real time thanks to the Soft Edge centering
test pattern. After enabling the Soft Edge centering test pattern, simply align the two lines one
on the other, increasing the covering value.
Two lines do not move and two other lines move when you increase the covering value. The aim is to align
exactly the half lines in order to have 2 full lines.
If you don’t see 4 half lines when increasing the covering area, click on the left/right part of your Soft Edge to
display the blending adjustments. Then disable the blending for the left part then the right part. Your pattern
will display the 4 half lines now.
Once your covering area is well defined, you need to adjust for left & right, the black levels.the black levels
for each non-overlapping portion of the blend.
7.3.15 Blending management