Analog Way ASCENDER 16 (LIVECORE) - Ref. ASC1602 User Manual User Manual
Page 87
87
7.5 Live
A FADE TO BLACK and a STEP BACK buttons are also available. The FADE TO BLACK transforms your Program
in a black screen using a fade effect on all your layers. The FADE TO BLACK feature will remain enabled until
the FADE TO BLACK button is pressed again. STEP BACK recalls your previous preset to preview.
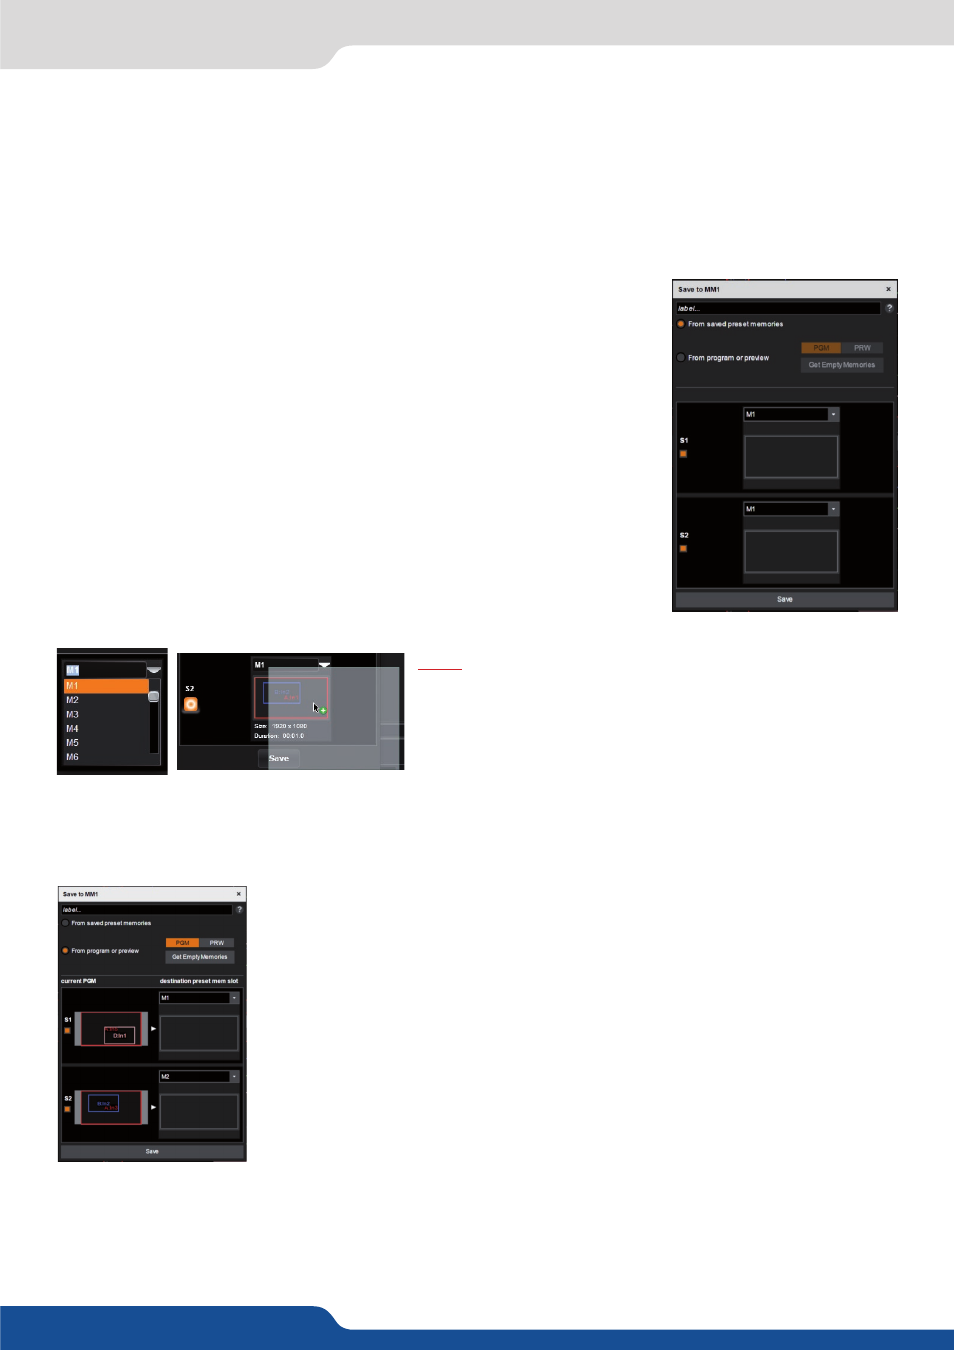
MASTER MEMORIES:
In order to load content simultaneously to several screens, you must use master memories. The MM (Master
Memories) is a macro of memories (M). It can load several memories in one time on several screens, one for
each screen.
Before starting to create your MM, it is recommended to create the memories
you will be using for the individual screens. Then to build a MM, please click on
the SAVE button and select a Master Memory slot from the Master Memories
toolbar. You have access to 144 MM.
Saving a Master Memory will produce a dialog box to help construct the
preset to be saved.
To save a preset from existing saved memories, select “From saved preset
Memories”. Then select which presets should be recalled to each screen by
either dragging a preset from the list M preset memories onto each screen,
or by using the dropdown menu. Once you are done, click SAVE at the bottom
to save the Master Memory.
Note: A screen can be deselected from the Master Memories,
simply select or unselect the screen button. In this
example S1 and S2 are selected. If the screen is not
selected, it will not affect the current screen when the
Master Memory is loaded.
If you do not have Preset Memories saved but wish to create a Master Memory based on your current pro-
gram or preview, select the option for FROM PROGRAM OR PREVIEW:
Next, choose to save from the current PREVIEW or from PROGRAM.
To save the master memory, we need valid memory slots. As the current look
on program or preview is not already saved, the unit needs to save each current
screen configuration into a valid memory, and then build those memories into a
master memory.
In our case the S1 will be saved into memory 1 and S2 will be saved into memory 2.
A choice of destination preset memory slots can be manually selected using the
drop downs, but it is much easier to let the unit locate some unused memory loca-
tions by clicking GET EMPTY MEMORIES.
BE CAREFUL TO NOT SAVE INTO AN EXISTING MEMORY, ELSE IT WILL BE OVERWRITTEN.