Appendix b, Modgas-x replacement of modgas ii, Modgas-x field technical guide – Orion System MODGAS-X User Manual
Page 25: Replacing the modgas ii with the modgas-x
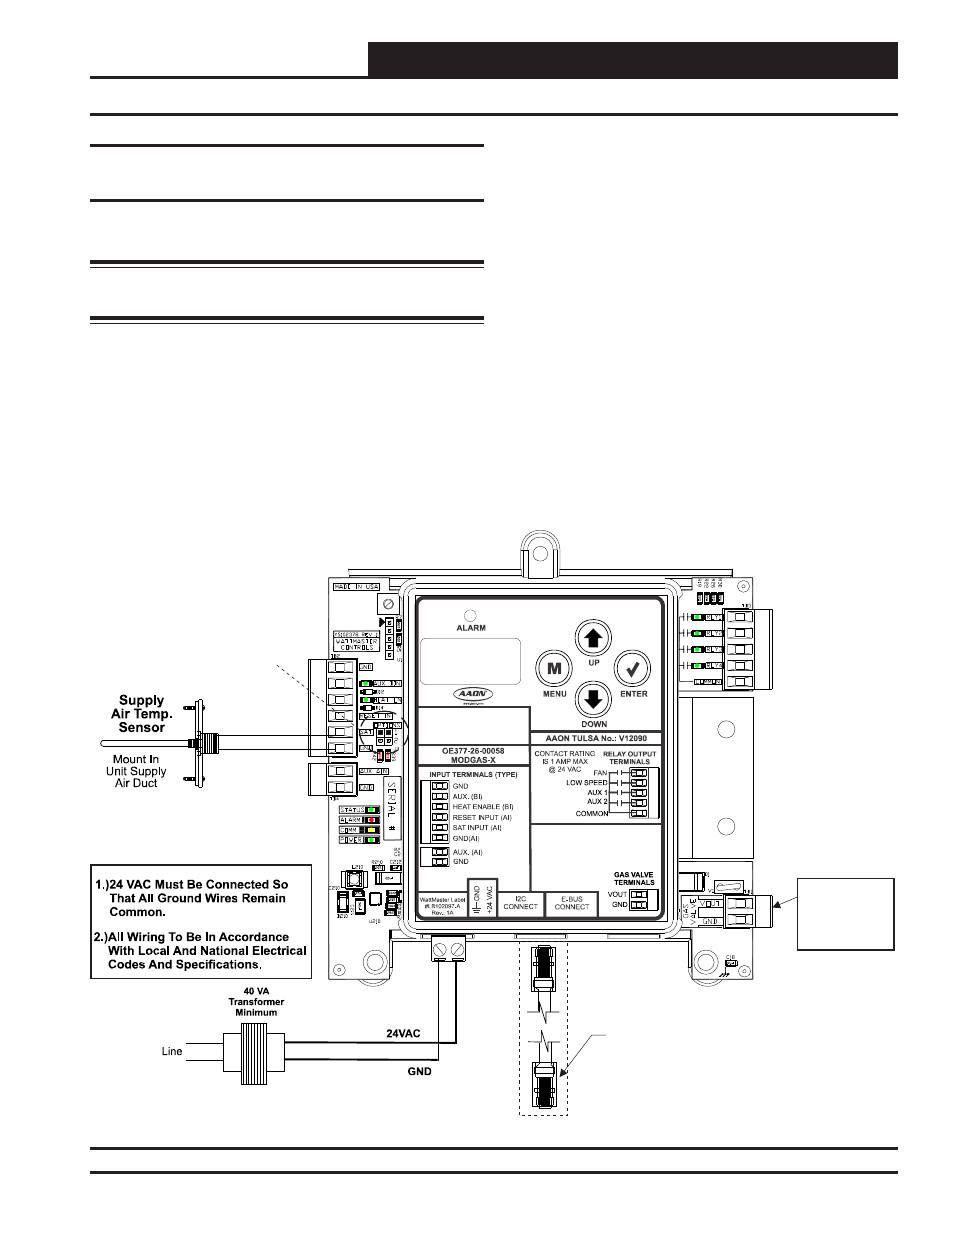
MODGAS-X Field Technical Guide
APPENDIX B
25
MODGAS-X Replacement of MODGAS II
Replacing the MODGAS II with the
MODGAS-X
The retrofi t replacement involves a few easy steps. Refer to Figure
13, below.
WARNING: Do Not Connect Power To VOUT/Ground
Terminal Block!
STAND-ALONE MODE OPERATION
Step 1: Disconnect power from the MODGAS II Controller.
Step 2: Disconnect the Supply Air Temperature Sensor from the
MODGAS II and wire it to the MODGAS-X. If the Supply
Air Temperature Sensor is being shared with a Stand-
Alone MHGRV Controller, maintain the same wiring
with
the
MHGRV
Controller.
Step 3: Wire all other inputs and outputs per Figure 2, page 5.
Step 4: Set the SAT Options Jumper per Table 8, page 24.
Step 5: Connect power to the MODGAS-X Controller.
COMMUNICATIONS MODE OPERATION
Step 1: Disconnect power from the MODGAS-X Controller.
Step 2: The Supply Air Temperature Sensor needs to remain
installed on whatever controller it is currently on. If it
is currently installed on the MODGAS II Controller, then
reinstall it on the MODGAS-X Controller.
Step 3: Set the SAT Options Jumper per Table 9, page 24.
Step 4: Connect power to the MODGAS-X Controller.
Figure 13: MODGAS-X Controller
MODGAS-X CONTROLLER
(OE377-26-00058)
WARNING!: Do
Not Connect
Power To The
VOUT/Ground
Terminal Block!
I C Cable
Connects To
Main Controller’s
Expansion
Port
2
See Tables 8 & 9, Page 24
For
Settings.
Only One Supply Air
Temperature Sensor
Can Be Used Per Application.
SAT OPTIONS
Jumper
See Table 7, Page 24
For Connection Settings.