Configuring initial control box settings – Casio YA-S10 Setup Guide User Manual
Page 15
Getting Ready
E-14
6.
On the remote controller, press the [MENU] key to display the setup menu, and then
configure the settings below in the indicated sequence.
z If the Projector System will be used in an inverted ceiling mount configuration, select “On” for the
“Screen Settings 3 Ceiling Mount” setting.
z If the Projector System will be used in a rear projection (projecting from behind the screen)
configuration, select “Rear” for the “Screen Settings 3 Projection Mode” setting.
z If the Projector System will be used in a location at an elevation of 1,500 to 2,000 meters, select
“On” for the “Option Settings 2 3 High Altitude” setting.
7.
Press the [P] (Power) key twice to turn off Projector.
After you finish configuring the initial settings of the projector(s), perform the procedure below to
configure initial Control Box settings.
To configure initial Control Box settings
1.
Press the remote controller [ALL] key (or [1] key) to turn on Control Box power.
z This also turns on the projector(s) linked to the Control Box.
2.
On the remote controller, press the [MENU] key to display the setup menu.
z Under initial default settings, menus are displayed in English.
3.
Select “Option Settings” and then “Language”, and then use the [U] and [I] keys to
select the language you want.
4.
Configure the settings below as required. For details about each setting, refer to the
“YA-S10 User’s Guide”.
z Option Settings 3 Eco Mode
z Image Properties 3 Color Mode
z Option Settings 3 Remote Power Numbers
5.
Next, perform the procedure under “Adjusting the Position of the Projector(s)” (page
E-15).
Control Box Power On/Off
The Control Box remote controller has five power keys. Four of them are numbered from [1] to [4], and
the fifth one is marked [ALL]. This allows power on/off control of multiple Control Boxes in the same
location.
z Pressing the [ALL] key turns on all of the Control Boxes.
z Keys [1] through [4] control the Control Boxes that are assigned the corresponding number with the
“Option Settings 3 Remote Power Numbers” setting.
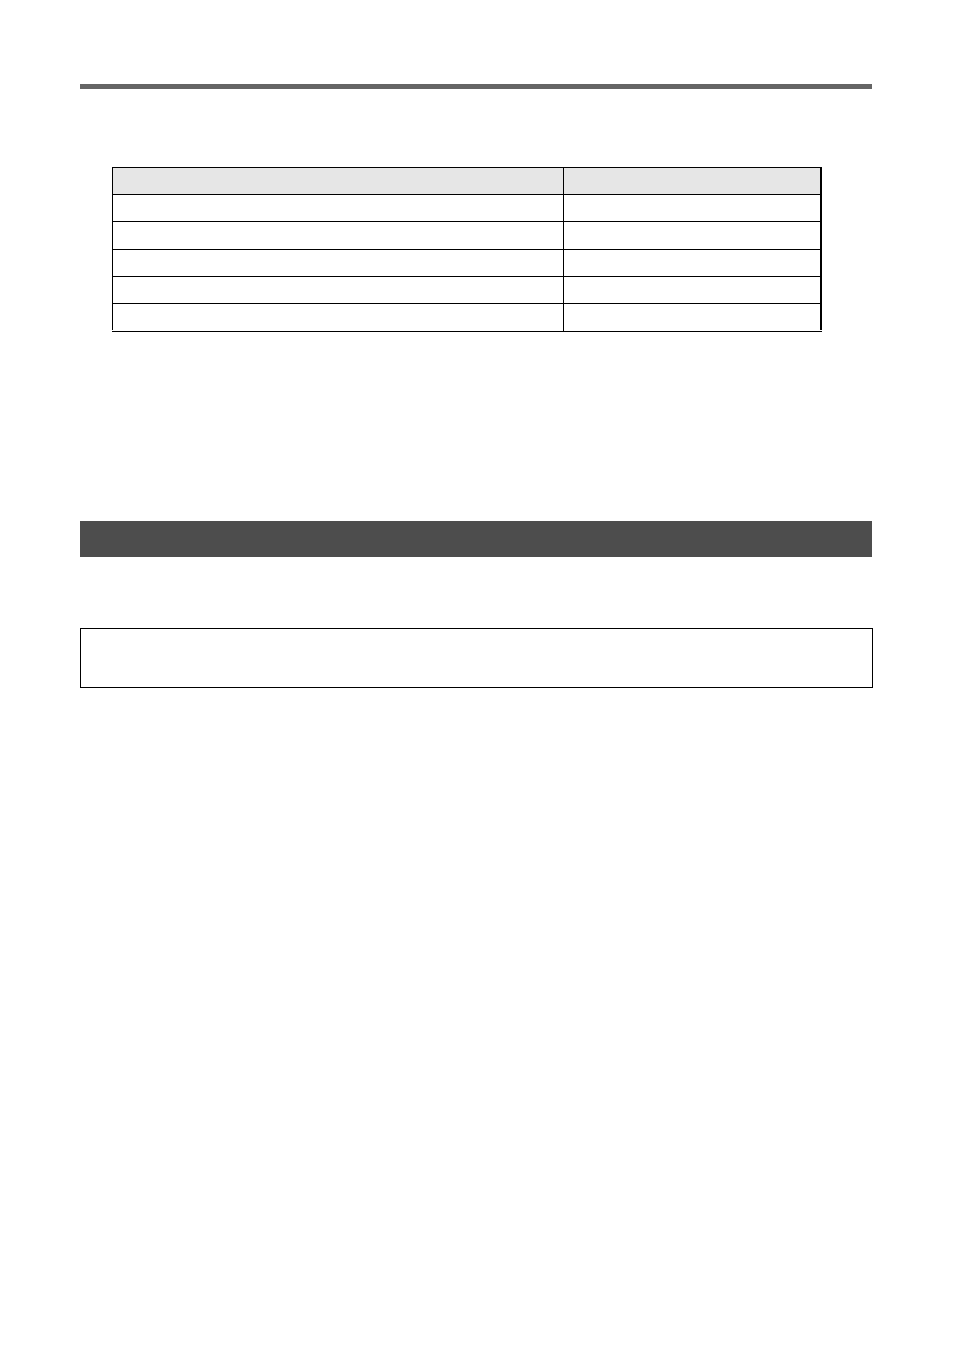
Setting Item
Setting
(1) Option Settings1 3 Auto Keystone Correction
Off
(2) Screen Settings 3 Keystone Correction
0
(3) Screen Settings 3 No Signal Screen
Black
(4) Input Settings 3 Signal Name Indicator
Off
(5) Option Settings1 3 Auto Power Off
Off
Configuring Initial Control Box Settings
Perform the operations below using the Control Box remote controller (YT-200). Note that these
operations cannot be performed using a projector remote controller.