Neupanel series - mini - quick start guide – Xilica NeuPanel Series User Manual
Page 5
NeuPanel Series - Mini -
Quick Start Guide
XILICA AUDIO DESIGN CANADA / ASIA / EUROPE
Pag
e
5
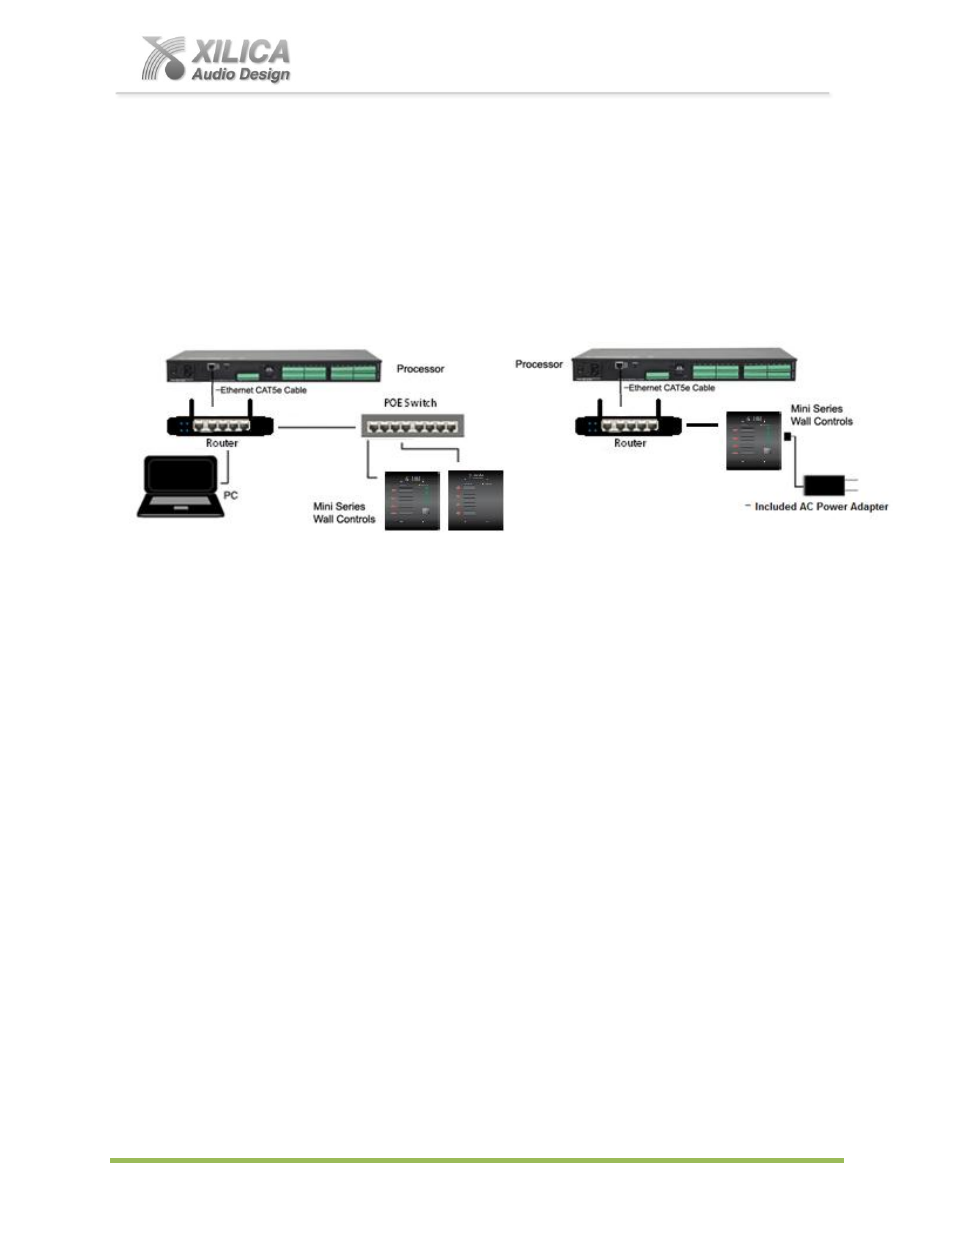
6. Initial Device Connectivity:
The Mini wall controls connect and run on a network based infrastructure & are configured &
controlled by a host computer via Ethernet using the processors NeuConsole software.
Single or multiple Mini model wall controls can be connected to the processor as part of a Mini
device/Processor device /Computer network via (A) A DHCP enabled Router, Server, or
Router/Server/POE Switch combo network connection as shown below (recommended) and
(B) A variety of non-DHCP enabled network connection methods via POE switches (no DHCP).
The primary difference between (A) & (B) is the automatic IP address assignment that DHCP
provides in (A).
(A) DHCP Enabled Router, Server, or Router/Server/POE Switch Combo Network Connection
The Mini wall control boots up with DHCP enabled by default so with a DHCP enabled router
(server/router) and POE switch combo connection as shown above
– the Mini control will
automatically obtain an IP address upon connection and power up. This may take a minute
or two as the Mini device searches for DHCP to obtain its IP address.
Available DHCP is the recommended connection method and - we recommend a low
cost DHCP enabled router along with a POE switch.
This combo will provide DHCP as
well as power to the Mini wall controls over their Ethernet cable/s by way of the switches POE
feature (Power Over Ethernet).
*Linksys routers/NetGear switches have tested well for us
(D-Link routers have not).
(B) Non-DHCP Enabled Indirect Network Connection (POE Switches - No DHCP)
When Mini wall controls are indirectly connected to the processor/PC network via a switch,
DHCP is not available to assign IP addresses so the connection process is not automatic.
(1) A Single Mini Device in the Network Only (no DHCP available)
Once no DHCP is detected
– a single Mini control will either try to connect using the IP
address last assigned and stored in the device or attempt to revert to is default IP
address of 169.254.64.64. Under some conditions the Mini device might refuse to
relinquish its stored IP address or revert to its default IP address and thus refuse to
connect. To simplify and speed this non-DHCP enabled network connection of a
single Mini we recommend that before you install and power up your device you
should Reset the Mini device to its Default IP Address using the IP Reset Button on
the back of the Mini wall control device. Resetting the Mini control to its default IP
address of 169.254.64.64 will have you connecting quickly and without problems with a
single Mini device where no DHCP is available. Please see -
IP Reset Button / Reset
Mini Control Network Settings
instructions on
Page 6
.
Note: Your PC
should be set to “Obtain IP Address Automatically” (normal default setting).